GitHub Pages Organization and Design
HTML, JavaScript, and a JavaScript fetch are all things you can do in a GitHub Pages View. Additionally, every GitHub page inherits from Theme, minimizing need to define a lot of CSS. Some key elements…
- Style, the visual design.
- SASS files in
assets/css/style.scss, review GitHub pages theme for instructions- Head and Body. The HTML tags used to structure every page.
- Layout files in
_layouts/default.html, structure is provided by GitHub pages theme- Supplement layout with files in
_includes, for instance_layouts/home.htmlis used to add menu selections to pages by including it in_layouts/default.html.- Page. Markdown or HTML is defined and constructed into page using Jekyll Build, refer to
contentreference in_layouts/default.html. Observe how files are built by looking at generatedhtmlfiles under_site.
View/CRUD Concepts
In a database project, the key idea is to build a system for capturing key information. For instance, student information on students and allowing *blogging to a Teacher would have Frontend View elements that correspond to a Backend Database.
Backend Database CRUD operations are as follows…
- Create new student records
- Read a list of students
- Update student data
- Delete records
Frontend Visual concepts of the Idea
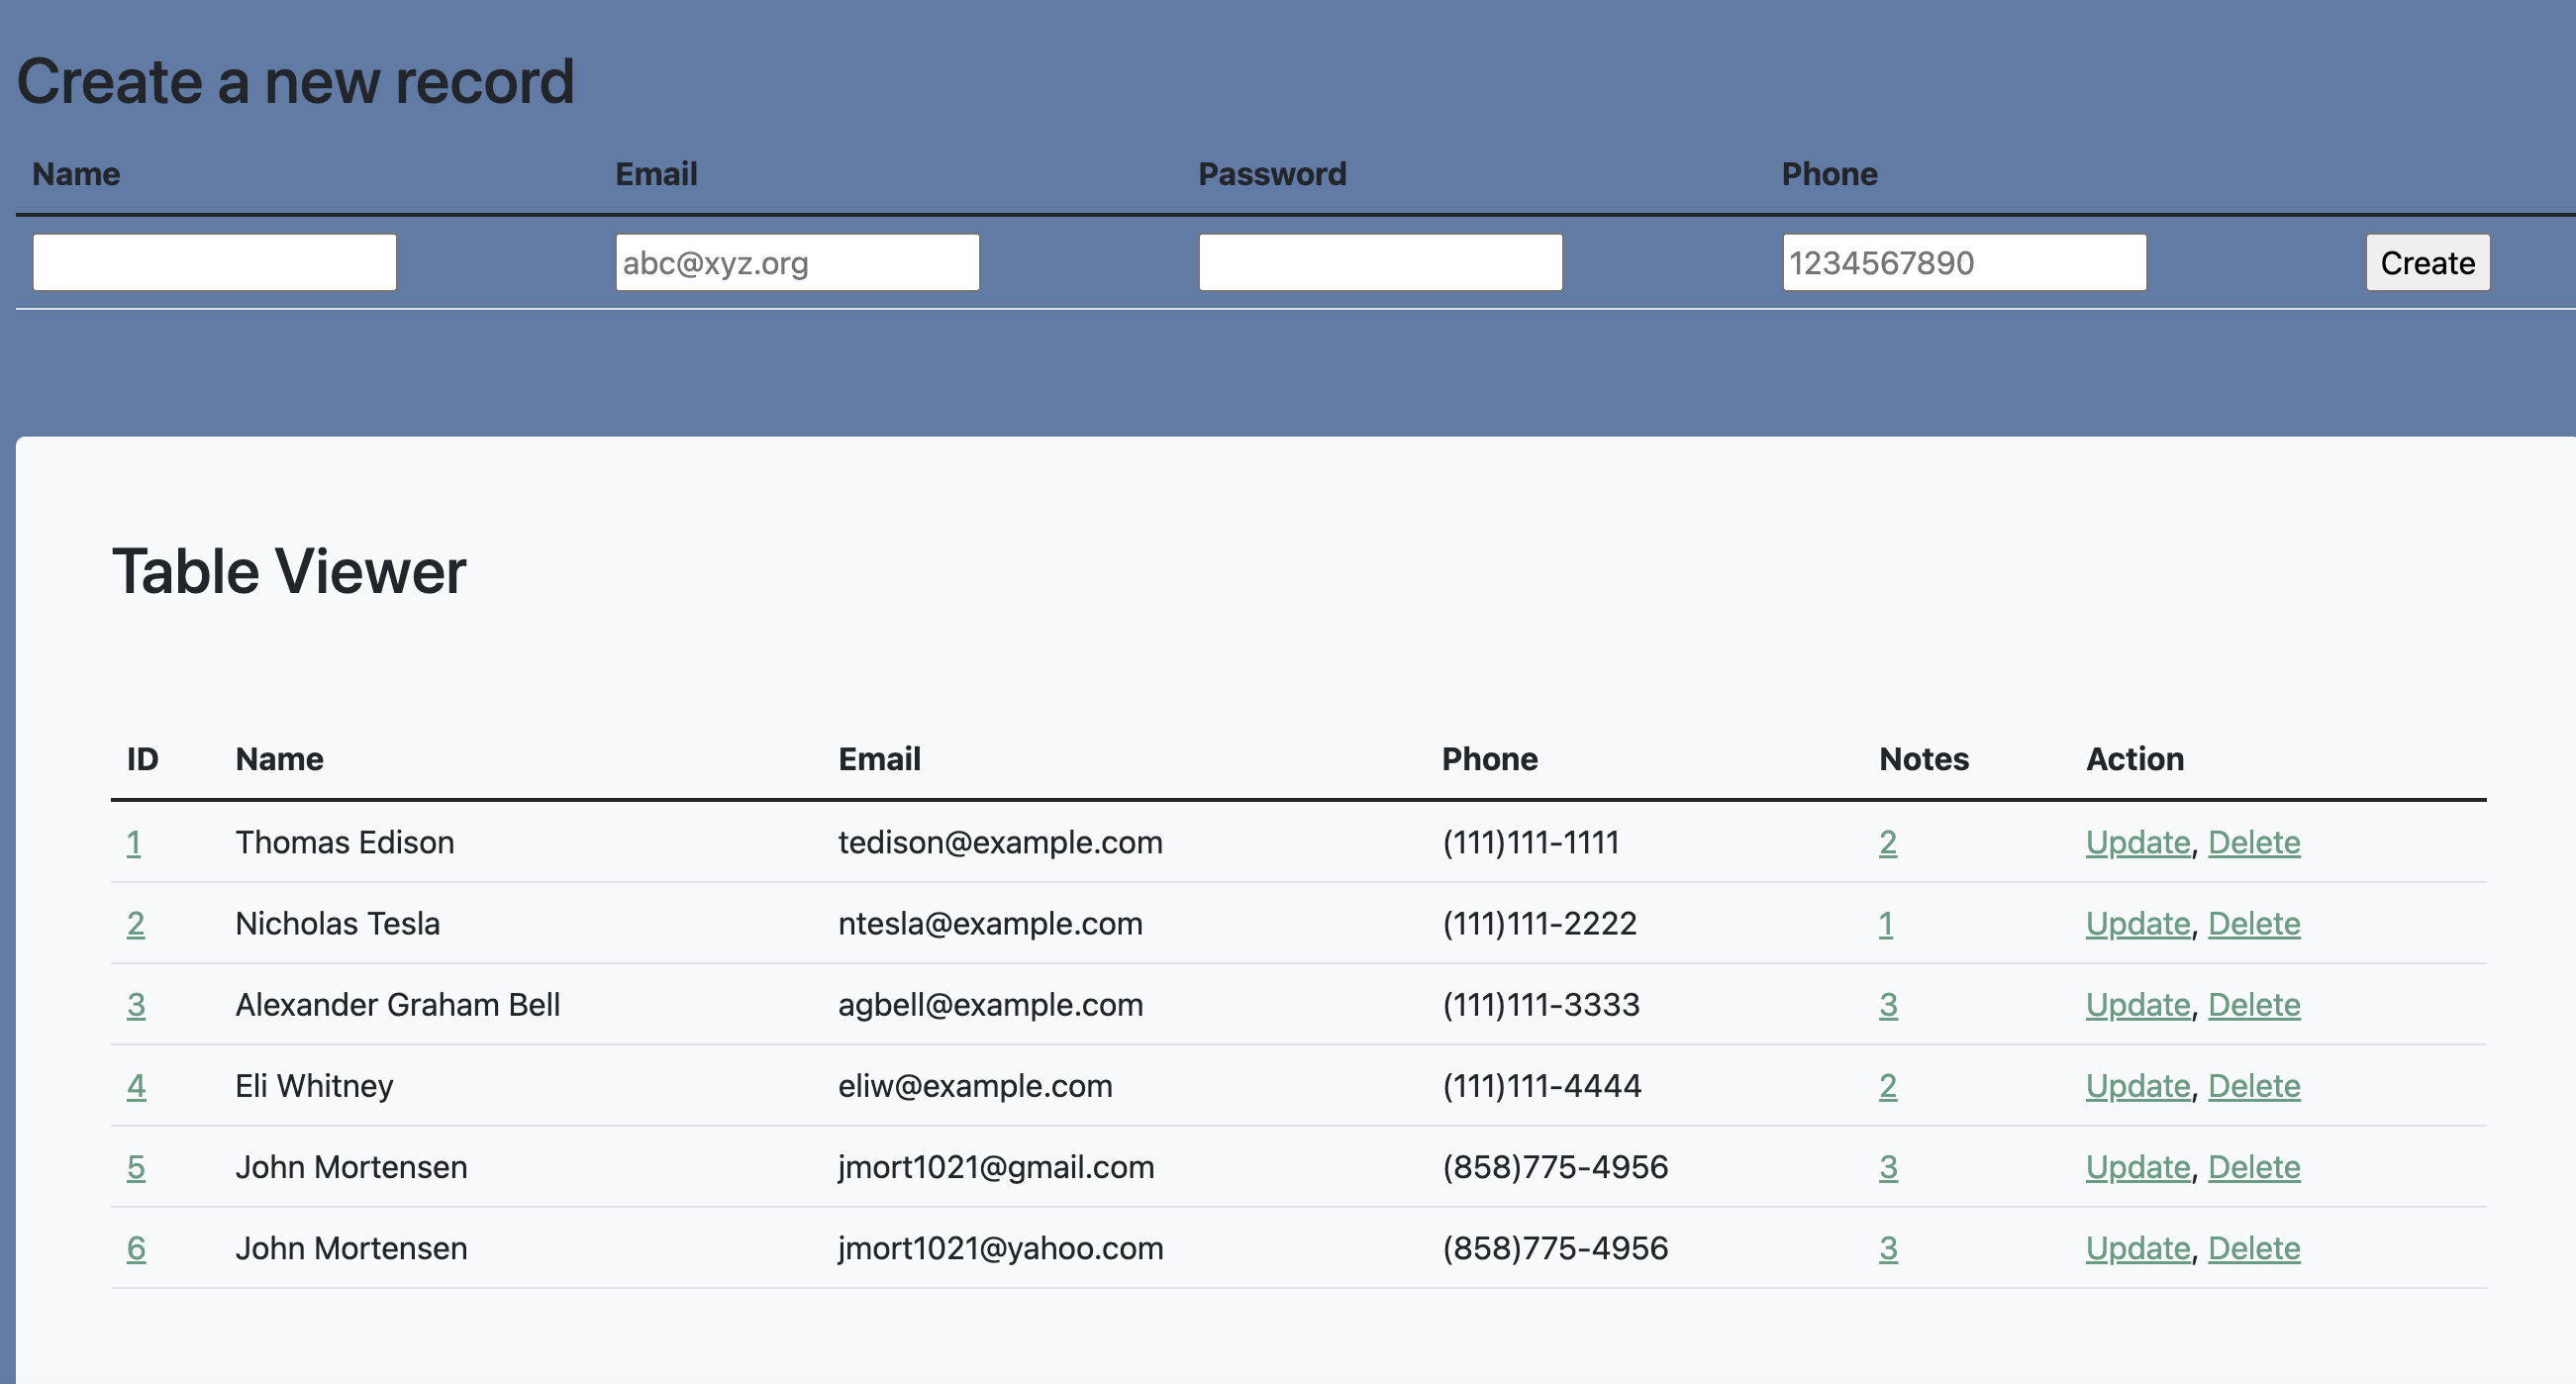
HTML to Obtain Input is a key step (aka Create/Input Step)
HTML5 table is a way to organize input
- th labels
- td input types
- onclick action
/*
<table>
    <tr>
        <th><label for="name">Name</label></th>
        <th><label for="email">Email</label></th>
        <th><label for="password">Password</label></th>
        <th><label for="phone">Phone</label></th>
    </tr>
    <tr>
        <td><input type="text" name="name" id="name" required></td>
        <td><input type="email" name="email" id="email" placeholder="abc@xyz.org" required></td>
        <td><input type="password" name="password" id="password" required></td>
        <td><input type="tel" name="phone_num" id="phone_num"
            pattern="[0-9]{3}-[0-9]{3}-[0-9]{4}"
            placeholder="999-999-9999"></td>
        <td ><button onclick="create_User()">Create</button></td>
    </tr>
</table>
*/
Table
HTML5 form is another way to organize input
- form action vs onclick
- p labels and input, in real implementation combine with CSS
/*
<form action="create_User()">
    <p><label>
        Name:
        <input type="text" name="name" id="name" required>
    </label></p>
    <p><label>
        User ID:
        <input type="text" name="uid" id="uid" required>
    </label></p>
    <p><label>
        Password:
        <input type="password" name="password" id="password" required>
        Verify Password:
        <input type="password" name="passwordV" id="passwordV" required>
    </label></p>
    <p><label>
        Phone:
        <input type="tel" name="phone_num" id="phone_num"
            pattern="[0-9]{3}-[0-9]{3}-[0-9]{4}"
            placeholder="999-999-9999">
    </label></p>
    <p><label>
        Birthday:
        <input type="date" name="dob" id="dob">
    </label></p>
    <p>
        <button>Create</button>
    </p>
</form>
*/
Form
JavaScript Fetch and Response (aka Post Step)
- After Input call action
- Extract data from DOM
- Build url
- Fetch
- Add response to end of table
function create_User(){
    // extract data from inputs
    const name = document.getElementById("name").value;
    const email = document.getElementById("email").value;
    const password = document.getElementById("password").value;
    const phone = document.getElementById("phone").value;
    const requestOptions = {
        method: 'POST',
        headers: {
            'Content-Type': 'application/json',
            'Authorization': 'Bearer my-token',
        },
    };
    //url for Create API
    const url='/crud_api/create/' + name + '/' + email+ '/' + password + '/' + phone;
    //Async fetch API call to the database to create a new user
    fetch(url, requestOptions).then(response => {
        // prepare HTML search result container for new output
        const resultContainer = document.getElementById("result");
        // trap error response from Web API
        if (response.status !== 200) {
            const errorMsg = 'Database response error: ' + response.status;
            console.log(errorMsg);
            // Email must be unique, no duplicates allowed
            document.getElementById("pswError").innerHTML =
                "Email already exists in the table";
            return;
        }
        // response contains valid result
        response.json().then(data => {
            console.log(data);
            //add a table row for the new/created userId
            const tr = document.createElement("tr");
            for (let key in data) {
                if (key !== 'query') {
                    //create a DOM element for the data(cells) in table rows
                    const td = document.createElement("td");
                    console.log(data[key]);
                    //truncate the displayed password to length 20
                    if (key === 'password'){
                        td.innerHTML = data[key].substring(0,17)+"...";
                    }
                    else{
                        td.innerHTML = data[key];}
                    //add the DOM data element to the row
                    tr.appendChild(td);
                }
            }
            //append the DOM row to the table
            table.appendChild(tr);
        })
    })
}
HTML and JavaScript Display Table
JavaScript below shows elements needed to construct the rows of data in the table.
- JSON is required, it is hardcoded in this example. Typically JSON will come from a JavaScript fetch.
- JSON object is required, it is created from JSON string. This allows access to to elements in JSON using JavaScript dot notation (user._name)
- DOM editing is a huge part of the remainder of this example. DOM elements often nest inside of other DOM elements. For instance each
tdis nested intr. Find examples of DOM create and append in the code below.- Notice the definition of table and build you own map or visual of how these things are put together.
/*
<table>
  <thead>
  <tr>
    <th>Name</th>
    <th>ID</th>
    <th>Actions</th>
  </tr>
  </thead>
  <tbody id="table">
    <!-- javascript generated data -->
  </tbody>
</table>
*/

// Static json, this can be used to test data prior to API and Model being ready
const json = '[{"_name": "Thomas Edison", "_uid": "toby"}, {"_name": "Nicholas Tesla", "_uid": "nick"}, {"_name": "John Mortensen", "_uid": "jm1021"}, {"_name": "Eli Whitney", "_uid": "eli"}, {"_name": "Hedy Lemarr", "_uid": "hedy"}]';

// Convert JSON string to JSON object
const data = JSON.parse(json);

// prepare HTML result container for new output
const table = document.getElementById("table");
data.forEach(user => {
    // build a row for each user
    const tr = document.createElement("tr");

    // td's to build out each column of data
    const name = document.createElement("td");
    const id = document.createElement("td");
    const action = document.createElement("td");

    // add content from user data
    name.innerHTML = user._name;
    id.innerHTML = user._uid;

    // add action for update button
    var updateBtn = document.createElement('input');
    updateBtn.type = "button";
    updateBtn.className = "button";
    updateBtn.value = "Update";
    updateBtn.style = "margin-right:16px";
    updateBtn.onclick = function () {
      alert("Update: " + user._uid);
    };
    action.appendChild(updateBtn);

    // add action for delete button
    var deleteBtn = document.createElement('input');
    deleteBtn.type = "button";
    deleteBtn.className = "button";
    deleteBtn.value = "Delete";
    deleteBtn.style = "margin-right:16px"
    deleteBtn.onclick = function () {
      alert("Delete: " + user._uid);
    };
    action.appendChild(deleteBtn);

    // add data to row
    tr.appendChild(name);
    tr.appendChild(id);
    tr.appendChild(action);

    // add row to table
    table.appendChild(tr);
});
View/Blog Concepts
A notes/blog would be created to add Notes between students and teacher, part of original concept. Notes could be used for many types of applications. Details on creating notes will be part of another blog, but for now we want you to think about design.
- In this design, most recent messages are on top
- Messages are intended to support markdown and inclusion of images
- Think about technique to format images in conjunction with Text

Hacks
Build and correlate a technical design between frontend view and backend model. This blog is focussing on frontend view., and visual concepts on how CRUD operations are presented to user of system. This particular Jupyter Notebook and code within it are used to help establish technical ideas. Start a design for your project…
- Each project must have a View (as pictured) and Model (json data is fetched into the View). Describe your project.
- Describe your View. Use Markdown, HTML, UML, other visuals, tables are used to characterize a project. This shows the Teacher and Graders understanding of planning Model and View.
- Transition from pure design and start inserting code elements, like inputs. Also, try build a table with json data versus fetching data.
- Issues should discuss problems/challenges, in Teacher/Student data here are a couple …
- This design will have many JavaScript actions, at least one for each CRUD operation. In this design, developer needs think of JavaScript functions to replace placeholder alerts in example code above.
- There can be different roles for CRUD operations. For instance, student will only interact with their own account. Teacher may interact with many accounts.
- Given these CRUD operations what kind of APIs are needed? They should map closely button/on click actions, as each action will fetch or manipulate data differently.
Extra Credit. Student(s) could assist in rework of my Flask project from last year into a Frontend / Backend solution. Additionally, if Frontend is done correctly it could easily be modified to work with both Spring and Flask backends.
References
Here are some working samples