Flask/Python Web Application
Next up is making a Web Application from a completely customizable framework and language. This project will focus on building a standalone Web Application. The intentions are to use this framework for Group work and backend work. At the conclusion of this article this project will only be run locally. Ultimately, this project will be hosted on AWS.
- Flask is the Web Application Framework.
- Python will be the Backend Development languages.
- Jinja2 is the Web Template language, that work well with Flask and Python.
- HTML, CSS, JavaScript will support frontend work built into the Flask project.
- The external Fastpages/Github Pages project will use the Flask/Python project for backend services, like persistent data or databases (ie SQL).
Setup Flask/Python Project
Start Flask/Python GitHub repo from a Template. Setup VSCode project to run python. Make a change and push to GitHub.
- Generate your own copy of repository using the Template: https://github.com/nighthawkcoders/flask_portfolio
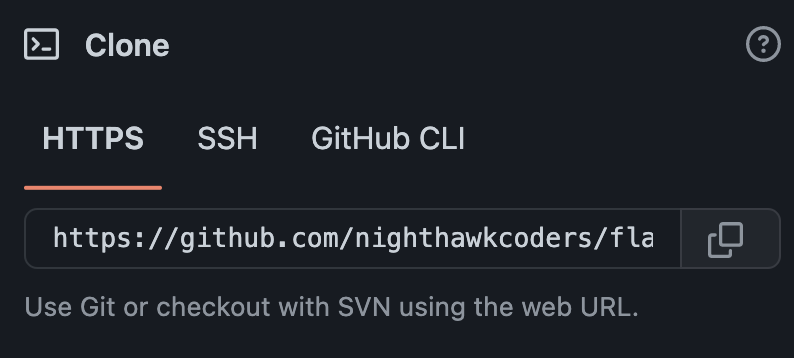
- “Copy” https address of newly Generated repository, use screen that looks like this:
- Open terminal and goto your vscode directory:
cd ~/vscode- Clone new GitHub project by run
git clone <paste/replace with https address>- Run VSCode project
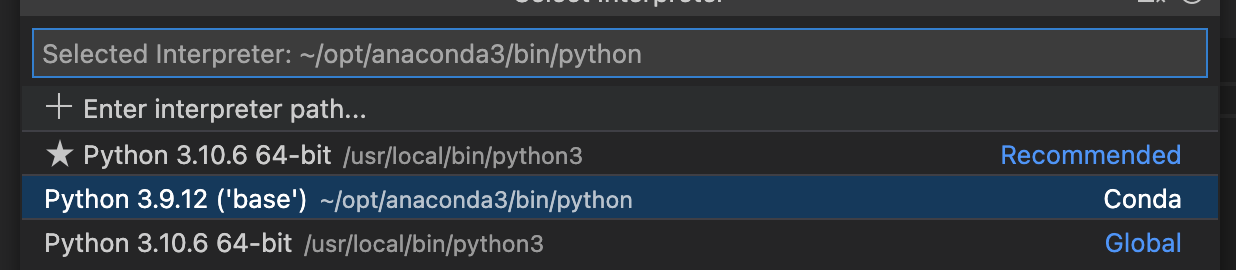
code <replace with name of project>- In VSCode type Shift-Command-P or Shift-Control-P to select your Python Interpreter
- Select Python that is in Conda environment
- In VSCode terminal install project dependencies:
pip install -r requirements.txt- Select main.py from VSCode navigator and press ▶️ in upper right corner. An alternate method is type
python3 main.pyin terminal. Observe terminal output, this sample illustrates a good outcome.- In terminal output you can shift-click on http://127.0.0.1:5000/, or goto Browser and type:
127.0.0.1:5000- Navigate the site, look for things to change.


With all of this in place, we can spin up the development container inside VS Code. Then, from the VS Code terminal in our Docker container environment, we can run docker-compose up in the root of our project. This will start up our individual service containers on the host machine. But, thanks to the shared network and volumes, we can continue to edit code in our development container and see the changes immediately show up on our services!
It’s also possible to use the Docker CLI to shut down or restart services as needed in development. You can even open another VS Code window and use the Remote-Containers extension to connect to one of the running service containers to directly inspect logs, edit code within that constrained environment, etc. This is a generic setup that can work for any project. Onboarding new developers requires just installing VS Code and Docker and then cloning the repository and opening it in a container. The initial setup is a lot of work, but I think this is the cleanest development experience you can get with Docker right now.
Hacks
Try a little bit of customization and make sure you are able to run, edit, and push. Most changes should update while server is running
- Conclude setup activity by pushing a minor change to Stub.html. This will verify GitHub support with VSCode.
- Click for VSCode guide for version control
- Stub.html lines of code to for simple change
<div class="px-5 py-5 mx-auto">
    <h1 class="text-primary"><strong>Stubby Body</strong></h1>
    <p class="text-secondary">Put your name here</p>
</div>
Group/Collaboration activity. Share a GitHub project.
- Make a team project, make each person as a Collaborator through GitHub settings.
- Each member take the HTML file under the Project menu and customize it to point to individuals material (aka Fastpages).
- GitHub gotcha when Collaborating on a Repo. Remember to Pull before you Push/Sync. The repository will be updating while your copy is isolated. Pull or Rebase gets you back on track with the shared branch of code.