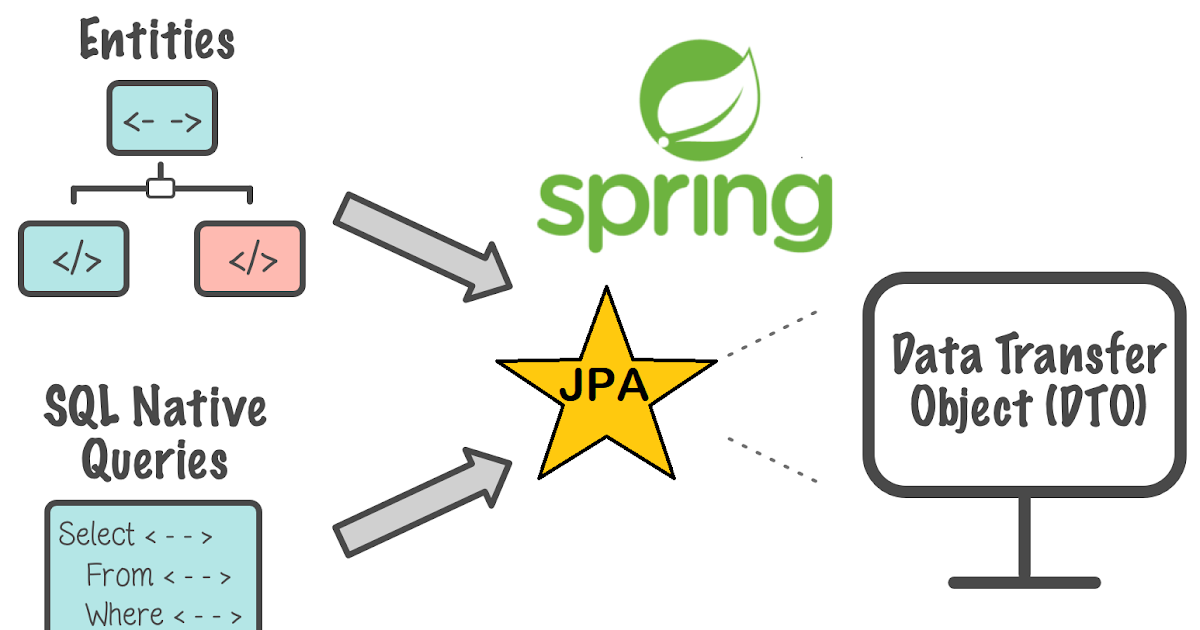
POJO, JPA, API, FE
Define a POJO, essentially an class with @Entity properties that enables it to be used with Spring Boot in the process of making a database. Continue by creating JPA, API and Frontend (FE).
Back-end Java Spring MVC Files
Java Database
A POJO is the foundation for making an Entity that is turned into a Database. The Java Persistent API (JPA) allows Developer to interact with the Database with fairly straightforward code. An API allows you to share and store data from your community of users. The pieces are described in this blog.
POJO and @Entity Definition
This code shows power of Spring Annotations and Java, with a little bit of code a Developer is opening up persistent data storage, a database.
import lombok.AllArgsConstructor;
import lombok.Data;
import lombok.NoArgsConstructor;

import javax.persistence.*;

@Data  // Annotations to simplify writing code (ie constructors, setters)
@NoArgsConstructor
@AllArgsConstructor
@Entity // Annotation to simplify creating an entity, which is a lightweight persistence domain object. Typically, an entity represents a table in a relational database, and each entity instance corresponds to a row in that table.
public class Jokes {
    @Id
    @GeneratedValue(strategy = GenerationType.AUTO)
    private Long id;  // Unique identifier

    @Column(unique=true)
    private String joke;  // The Joke

    private int haha;  // Store joke likes
    private int boohoo;  // Store joke jeers
}
Java Persistence API (JPA)
The JPA is created to access the database. The JokesJpaRepository interface extends JpaRepository. This allows the developer access predefined and additionally define useful interfaces to access their persistent storage.
import java.util.List;
import org.springframework.data.jpa.repository.JpaRepository;

// JPA is an object-relational mapping (ORM) to persistent data, originally relational databases (SQL). Today JPA implementations has been extended for NoSQL.
public interface JokesJpaRepository extends JpaRepository<Jokes, Long> {
    // JPA has many built in methods, these few have been prototyped for this application
    void save(String Joke);

    // A
    List<Jokes> findAllByOrderByJokeAsc();  // returns a List of Jokes in Ascending order
    List<Jokes> findByJokeIgnoreCase(String joke);  // look to see if Joke(s) exist
}
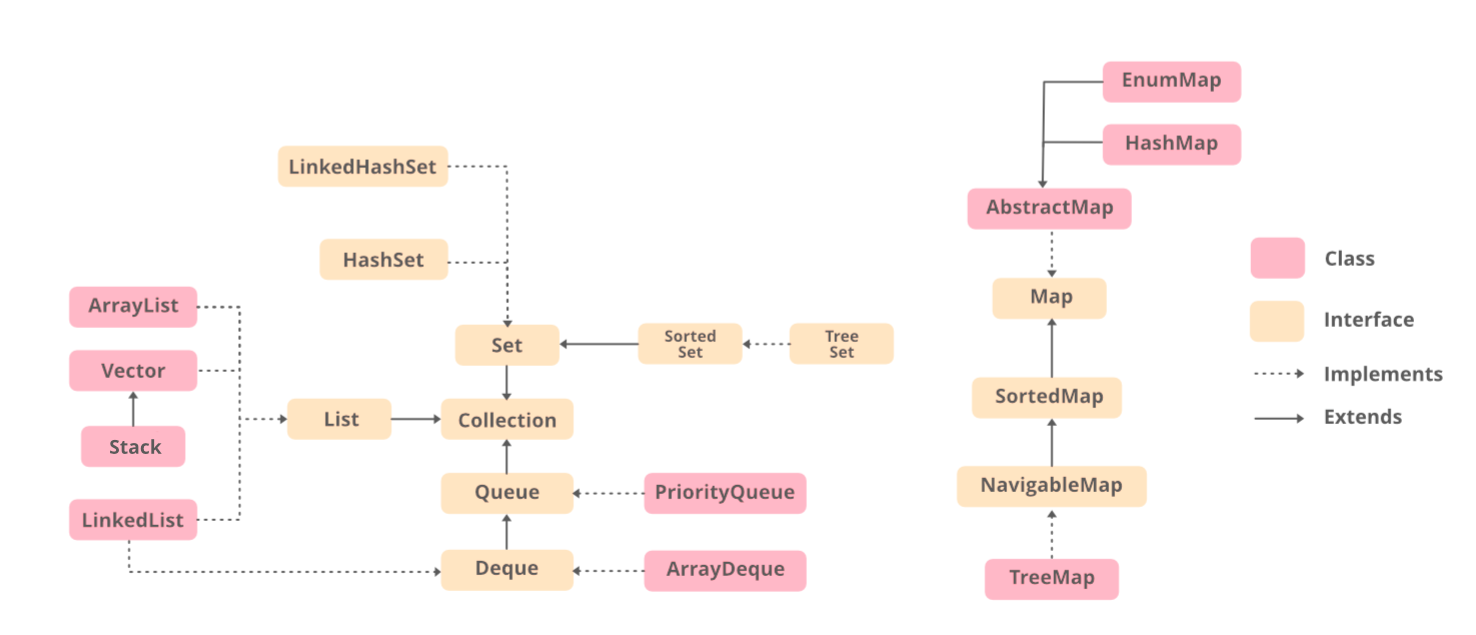
List and ArrayList
List is a super class to ArrayList. This illustration shows relationship. In the JPA code you can see that List of Jokes is common result from JPA. As a database is a series of rows, accessing a List or and ArrayList is done through similar iteration. Here is illustration of List and ArrayList from GeeksForGeeks
Controller and APIs
The last backend piece of the process of accessing the database is building out the RESTful API services to access the data. Below is the JokesApiController, this is commented extensively. This has many AP and PBL elements.
- @Autowired annotation provides full access to JokesJpaRepository, what we made with the code above. Review repository.
, there are actions for set, get, save and more. - @GetMapping and @PutMapping which establishes endpoints for RESTful web services to access the data.
- API data structuring elements @PathVariable and “return new ResponseEntity” these are keys for obtaining and returning data from the accessor.
import org.springframework.beans.factory.annotation.Autowired;
import org.springframework.http.HttpStatus;
import org.springframework.http.ResponseEntity;
import org.springframework.web.bind.annotation.*;

import java.util.List;
import java.util.Optional;

@RestController // annotation to simplify the creation of RESTful web services
@RequestMapping("/api/jokes")  // all requests in file begin with this URI
public class JokesApiController {

    // Autowired enables Control to connect URI request and POJO Object to easily for Database CRUD operations
    @Autowired
    private JokesJpaRepository repository;

    /* GET List of Jokes
     * @GetMapping annotation is used for mapping HTTP GET requests onto specific handler methods.
     */
    @GetMapping("/")
    public ResponseEntity<List<Jokes>> getJokes() {
        // ResponseEntity returns List of Jokes provide by JPA findAll()
        return new ResponseEntity<>( repository.findAll(), HttpStatus.OK);
    }

    /* Update Like
     * @PutMapping annotation is used for mapping HTTP PUT requests onto specific handler methods.
     * @PathVariable annotation extracts the templated part {id}, from the URI
     */
    @PutMapping("/like/{id}")
    public ResponseEntity<Jokes> setLike(@PathVariable long id) {
        /*
        * Optional (below) is a container object which helps determine if a result is present.
        * If a value is present, isPresent() will return true
        * get() will return the value.
        */
        Optional<Jokes> optional = repository.findById(id);
        if (optional.isPresent()) {  // Good ID
            Jokes joke = optional.get();  // value from findByID
            joke.setHaha(joke.getHaha()+1); // increment value
            repository.save(joke);  // save entity
            return new ResponseEntity<>(joke, HttpStatus.OK);  // OK HTTP response: status code, headers, and body
        }
        // Bad ID
        return new ResponseEntity<>(HttpStatus.BAD_REQUEST);  // Failed HTTP response: status code, headers, and body
    }

    /* Update Jeer
     */
    @PutMapping("/jeer/{id}")
    public ResponseEntity<Jokes> setJeer(@PathVariable long id) {
        Optional<Jokes> optional = repository.findById(id);
        if (optional.isPresent()) {  // Good ID
            Jokes joke = optional.get();
            joke.setBoohoo(joke.getBoohoo()+1);
            repository.save(joke);
            return new ResponseEntity<>(joke, HttpStatus.OK);
        }
        // Bad ID
        return new ResponseEntity<>(HttpStatus.BAD_REQUEST);
    }
}
Front End
This database was setup to allow people to HaHa or Boohoo a collection of Computer Jokes. The entirety has lot of limitation.
- People can vote more than once and in both categories.
- There is no auto refresh if several are voting and updating as you are looking at your static page.
- Perhaps Q and A style could hide punch line.
- Perhaps we could accept new jokes, or have interface for adding them.
Amazingly, though … the front-end code is in a completely different project. The front end project GETs and PUTs using the back end APIs. The key element that makes this different than other public APIs, like RapidAPI, is the “reaction” function. This function updates the elementID of the like or jeer as soon as you impact the button.
// Reaction function to likes or jeers user actions
  function reaction(type, put_url, elemID) {

    // fetch the API
    fetch(put_url, put_options)
    // response is a RESTful "promise" on any successful fetch
    .then(response => {
      // check for response errors
      if (response.status !== 200) {
          error("PUT API response failure: " + response.status)
          return;  // api failure
      }
      // valid response will have JSON data
      response.json().then(data => {
          console.log(data);
          // Likes or Jeers updated/incremented
          if (type === HAHA) // like data element
            document.getElementById(elemID).innerHTML = data.haha;  // fetched haha data assigned to haha Document Object Model (DOM)
          else if (type === BOOHOO) // jeer data element
            document.getElementById(elemID).innerHTML = data.boohoo;  // fetched boohoo data assigned to boohoo Document Object Model (DOM)
          else
            error("unknown type: " + type);  // should never occur
      })
    })
    // catch fetch errors (ie Nginx ACCESS to server blocked)
    .catch(err => {
      error(err + " " + put_url);
    });

  }
Hacks
AP required. Review the lambok annotations (https://projectlombok.org/features/).
- Write the POJO without using lambok
PBL foundational. Establish a POJO, JPA and APIs in your own project. You can begin with Jokes.
- Make new POJO attribute. FYI, as there is not database upgrade. I suggest deleting /volumes/sqlite.db to ensure schema is updated.
- Make a new API endpoint.
- Test your API using Postman. You should be able to test with localhost:port.
- Build frontend in different system.
Resources
Googling will find some references.
- Something free, but different than mine. Youtube. Here is another, but maybe less Youtube
- All of these cost money. 5 Best Spring Data JPA Courses for Java developers to Learn in 2022.