| Intro | Anatomy | Play | Ideation | Sign-Up | Login | Profile | Style | Deploy | Scrum |
Create A Ideation Page for Your Flask Full-Stack web application
Starting Your Flask Project
- Introduction
- What does Full Stack mean?
- Goals
- Brainstorming/Features
- Profile Setup
- Database Planning for Users: Teacher Example
Introduction
Picture this: You and your team have been assigned the exciting task of creating and deploying a full-stack application with multiple creative features. It’s easy to procrastinate on such a seemingly daunting project, especially when diving into unfamiliar frameworks and technologies feels overwhelming.
This is where planning comes in!
In the development of a web application, ideation is a crucial step where you conceptualize and plan the features and functionality of your project. For this tutorial, we’ll walk through the ideation process and code development of a full-stack web application using Flask, a powerful yet lightweight Python web framework.
If you want to get started coding, try exploring the Sign Up, Login, and Profile tabs, which walk though the frontend/backend code needed for a full stack application.
Ideation and Planning
The ideation phase involves defining the application’s objectives, designing its architecture, and planning the user experience. Here’s a brief overview of how to approach this stage:
-
Define the Application Goals: Determine the primary function of your application. Are you building a user management system, a content management platform, or a data analytics tool? Are you doing a combination of both? Clearly outlining the goals will guide your design and development process.
-
Design the User Interface (UI): Sketch out the layout and flow of your application. Think about the pages you need, such as a login page, dashboard, or data visualization pages. Define the user interactions and how they will navigate through the application.
-
Outline the Data Model: Decide on the data that your application will handle. What information do you need to store? How will you structure your database to manage this data efficiently?
-
Plan the Application Flow: Map out the interactions between the frontend and backend. Determine how the frontend will communicate with the backend, what API endpoints will be needed, and how data will be exchanged.
Code Process Overview
Once you have a clear ideation plan, it’s time to start coding. Here’s an overview of the key steps involved in the code process for a Flask full-stack application:
-
Set Up the Flask Project: Generate a template using flask_2025 or flask_portfolio to start your backend repository. Review the Flask Anatomy/Play tabs, Python and Flask and the READMEs for either flask_2025 and flask_portfolio to get started with setting up your flask app.
-
Create the Backend Logic: Develop the backend components, including routing, request handling, and database interactions. Define API endpoints for various functionalities, such as user authentication and data retrieval.
-
Develop the Frontend: Build the frontend components using HTML, SASS, and JavaScript. Create forms, buttons, and other UI elements that will interact with your backend through API calls. We can generate a template using portfolio_2025 to start your frontend repository.
-
Integrate Frontend and Backend: Connect the frontend with the backend by making HTTP requests to your API endpoints. Ensure that data flows correctly between the client and server, and handle any necessary data transformations.
-
Test and Debug: Thoroughly test your application to identify and fix any issues. Validate that all features work as expected and that the application handles edge cases gracefully.
-
Deploy the Application: Once development is complete and testing is successful, deploy your application. Deploy frontend on Github and backend on AWS (we will use a community server.)
By following these steps, you can effectively plan and execute a Flask full-stack web application, turning your ideas into a functional and user-friendly product.
What does Full Stack mean?
Before we get into starting our planning, what does building a full stack application entail?
Well, when we talk about “full stack” in web development, we’re referring to the entire set of skills and technologies needed to build a complete web application. Think of it like making a sandwich:
-
Front-End (The Top Slice of Bread)
- This is what users see and interact with. It’s the part of the website or app that includes buttons, forms, and other visual elements. Nighthawk coders us tools like HTML, SASS, and JavaScript to create this.
-
Back-End (The Filling)
- This is the logic that happens behind the scenes. It involves handling the data, and operations of the each request and response. The back-end communicates with the front-end and manages things like storing user data or checking for errors. Nighthawk coders us the Python language and Flask framework for filling.
-
Database (The Bottom Slice of Bread)
- This is where all the information is stored, such as user accounts, messages, or product details. Databases help keep track of this data in an organized way. Nighthawk coders will use SQLAlchemy and SQLite to build and manage the database.
-
Deployment and DevOps (Putting the Sandwich in a Bag)
- Once your sandwich (or web app) is ready, you need to put it in a bag (deploy it) so that people can enjoy it (use it). This involves setting up servers, making sure the app runs smoothly, and updating it as needed. The deployment tab in the navigation bar will be helpful for your backend deployment. For frontend deployment, check out Tools and Equipment and Github
So, building a full stack application means creating all parts of the “sandwich” so that it’s tasty and functional from top to bottom. You design the user interface, handle the logic and data storage, and make sure everything works together smoothly.
Goals
Think about what your idea for your project and discuss it with your team! Do you want to build a Geoguesser app? A stock management system? A fitness tracker? You have so many options! Once you brainstorm with your team, you can start organizing your thinking!
Let’s look at a quick example first:
Teacher wanted to build a educational web application that includes curriculum and resources for students in CSA, CSP, and CSSE. Teacher also wanted a database of students taking CSSE, CSP, and CSA with information about each student.
What would the teacher need to know about each student in this case?
- Name of Student (Who are they?)
- Github ID of Student (Is their ID valid? How much have they committed? Are they consistent? Do they have issues and pull requests?)
- Classes Student Enrolled in CTE Compsci Pathway (Do they have past coding experience in school?)
- KASM Server (Does Teacher need to provide the KASM server for the student?) Eg: School chromebooks don’t support VSCODE natively)
For a full-stack user management application, we need a login and sign up system to store username and password, as well as the other attributes listed above. Therefore, we can use the github id as the username, or, as called in the database, uid. Students need to have these attributes to log in.
- uid (Github ID)
- password
Also, to encourage students to be creative and expressive, we should also have them include a profile picture!
- pfp
Now we have a basic outline of user attributes!
Brainstorming/Features
Think about how you what pages you need for your web application. Since we’re building a user managment sysem, we need a login and sign up page. We can use Canva, Google Slides, and other tools to plan how to design these pages on our frontend.
We also need a profile page where users can change their attributes (change uid/password, add their classes, etc).
Here’s the mock up user interface I created before I first started working on the actual user profile page. We will reference this later!
Profile Setup
It’s important to note that you’re not limited to just three features. This is just a simple example, a foundation where you can build your code upon. What if you wanted to build an Exercise/Fitness Tracker with a user management system? You would need multiple pages to track sleep, exercise, stress, for each user, as well as a login, signup, and profile page.
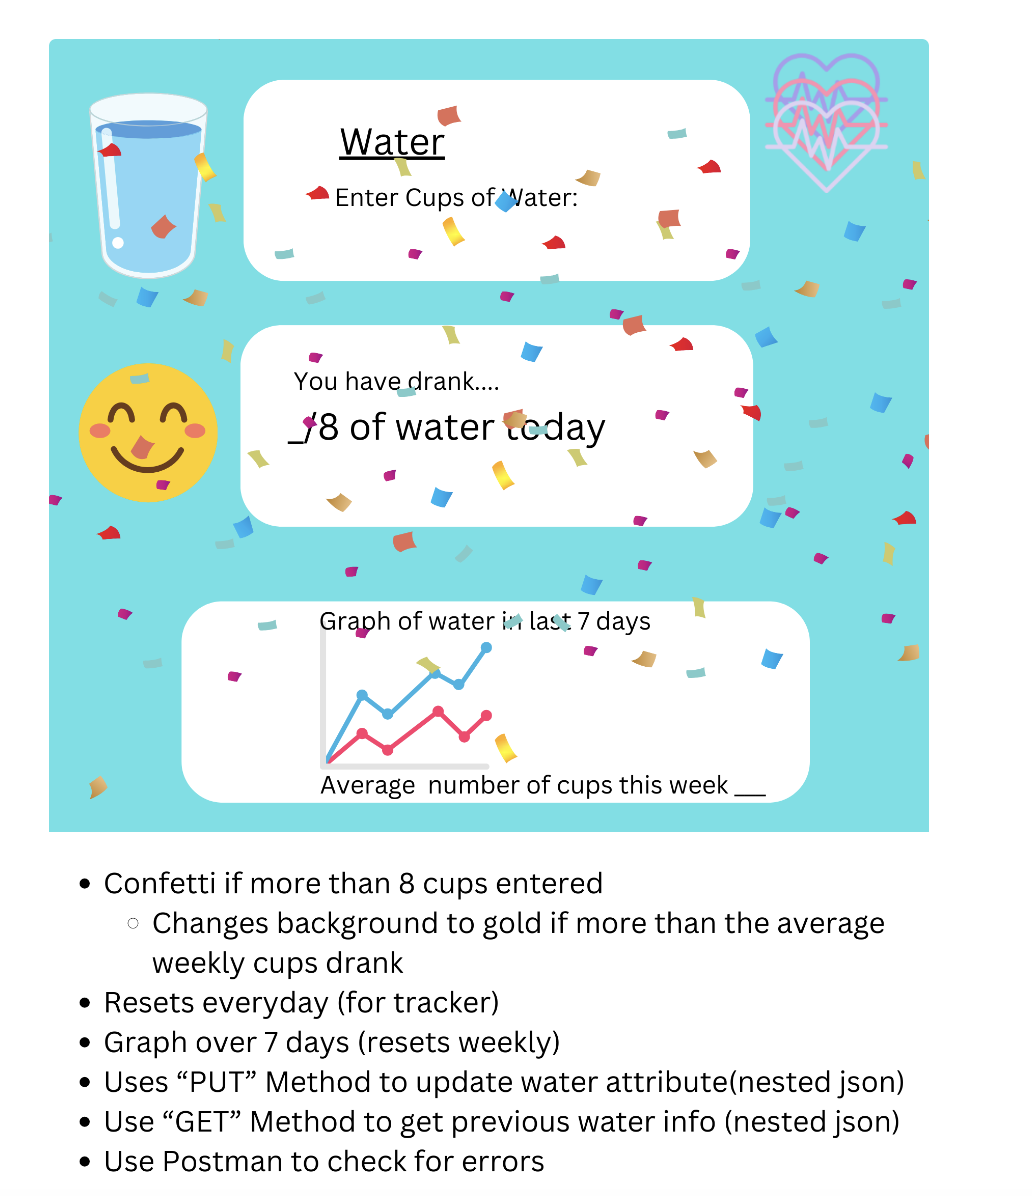
Here’s an example of the Canva my team and I created, excluding the create user, profile and login pages. There may be some terms you will see on the Canva pages that you won’t understand yet-that’s okay! We are just beginning the process.
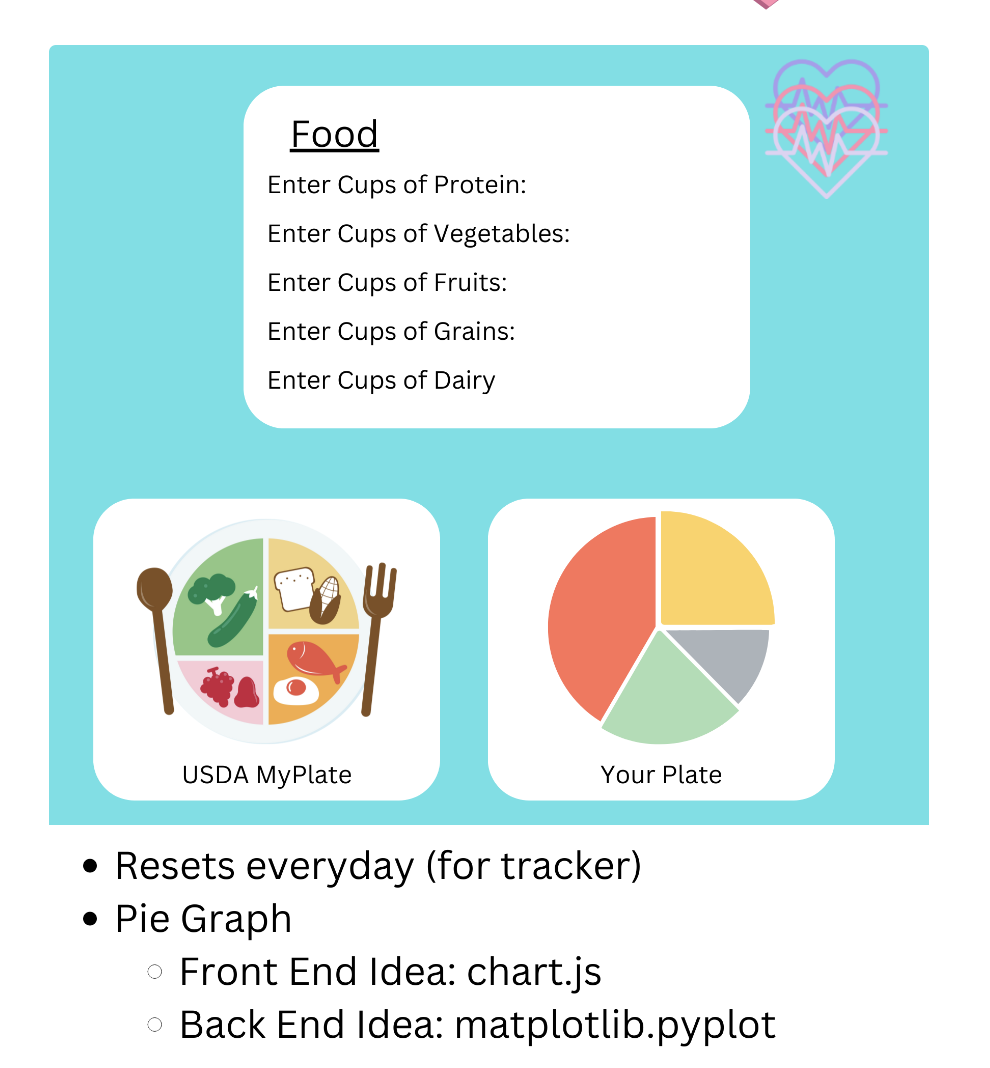
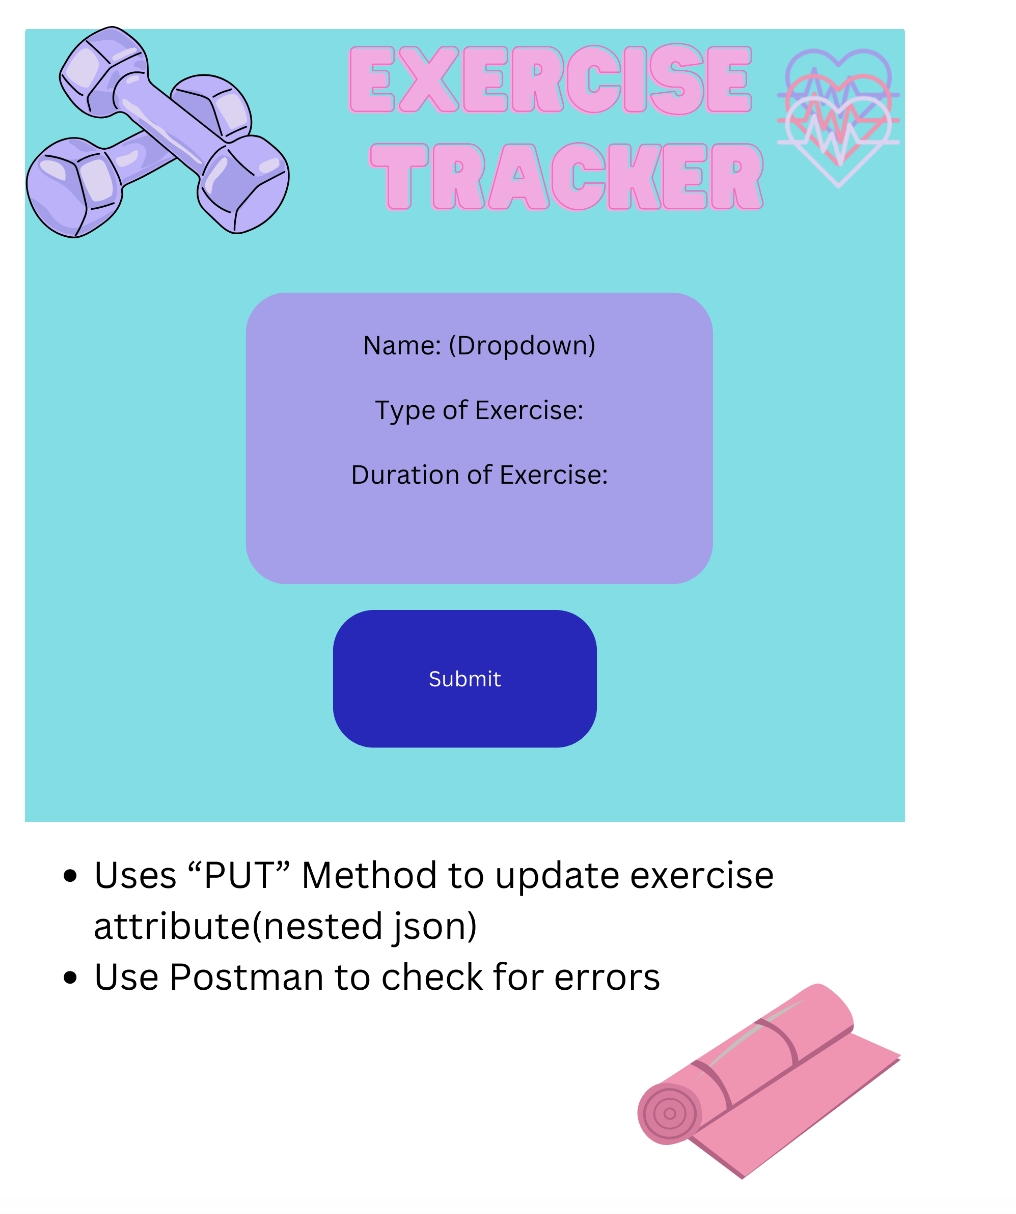
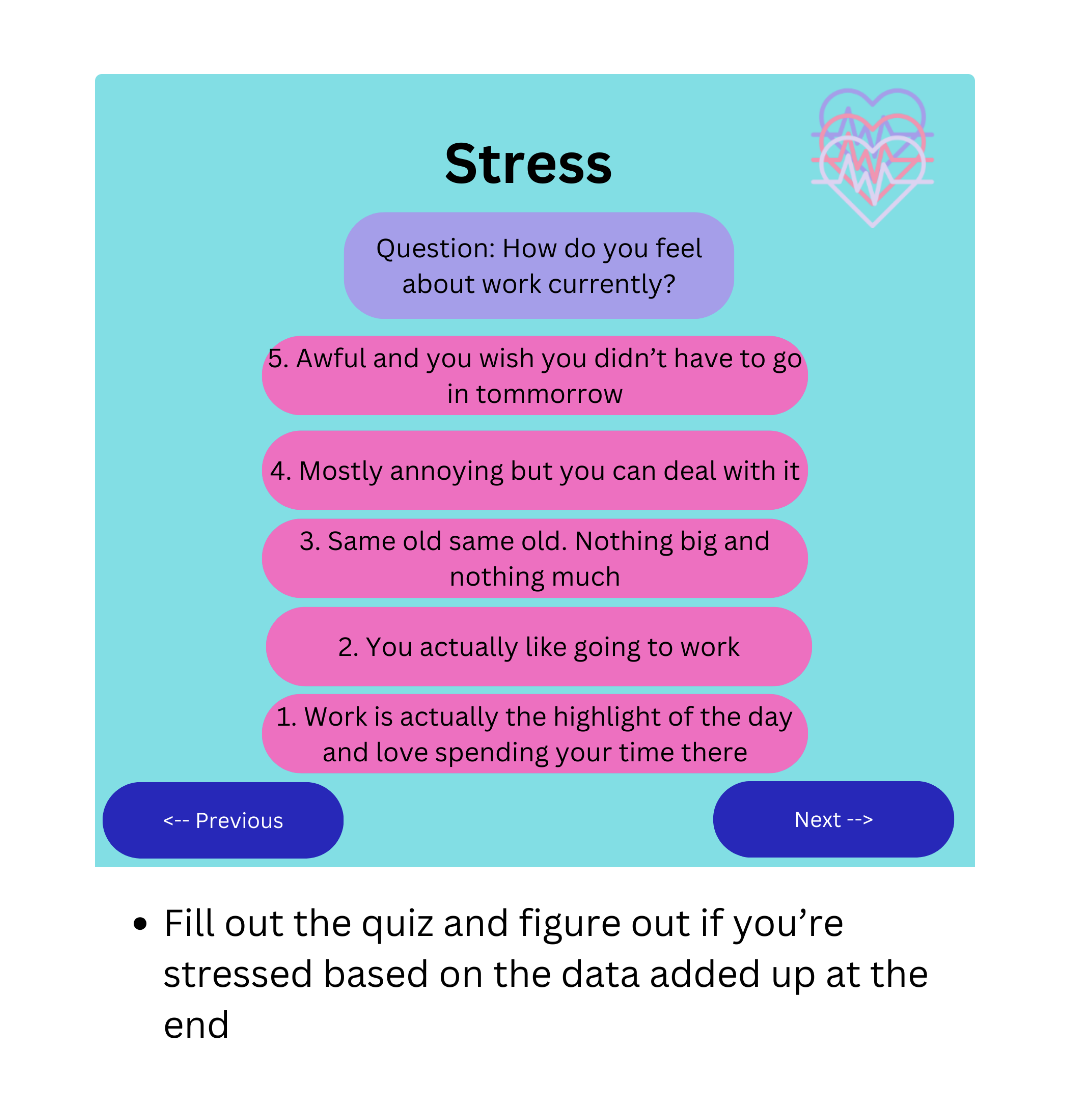
![]()
If your team has decided on their features and roles in the team, we can move on to the next part-translating raw ideas into practical outlines we can use! If you need help with organizing and working with your team, check out Agile Methodology and click on the Scrum tab in the navigation bar for more information.
Database Planning for Users: Teacher Example
When working with web applications, understanding how to interact with databases is crucial. Databases store and manage data. Let’s model the database for the users with the Teacher example by examining our attributes and their expected types. It’s important to note that the attributes we mentioned above need to be stored in the database for the Teacher to access information about each student with ease.
1) Name of Student
- Type: String
- Description: Stores the student’s name. Expected to be a string of letters and may include spaces, hyphens, or apostrophes. Ensure the system handles various name formats correctly.
2) Github ID of Student
- Type: String
- Description: Holds the student’s GitHub ID, a unique identifier for their GitHub account. This can include letters and numbers. Validate that this ID is a valid GitHub username.
3) Password
- Type: String
- Description: Stores the student’s password, which can include letters, numbers, and special characters. Ensure passwords are securely hashed before storage and implement strong password policies.
4) Classes Student Enrolled In (CTE Compsci Pathway)
- Type: Array of Strings
- Description: Lists the classes the student is enrolled in, specifically within the CTE Compsci Pathway. The attribute will be an array where each element is a string representing a class name or ID. This is where we use and join two databases—a user database and a section database—creating a relationship between users and sections.
- You might not need multiple databases in your project. A simple nested arrays approach can be used when dealing with a small number of users. For example, in a previous project, an exercise attribute stored information (such as duration and timing) in a small array. Each form entry (a small array) was combined into one large array for all entries. However, for managing many students in CSA, CSP, and CSSE, multiple databases are necessary to handle the relationship between users and sections effectively.
5) KASM Server
- Type: Boolean (True/False)
- Description: Indicates whether the student is associated with the KASM server. The value will be a boolean (True or False). Do they need one?
- (Yes → True, No → False)
6) Profile Picture (pfp)
- Type: Base64 String
- Description: Stores the student’s profile picture encoded as a Base64 string. This format allows images to be stored as text and easily transmitted. Handle encoding and decoding properly and ensure images are appropriately sized and validated.
Summary
In the backend, you’ll need to:
- Validate Input: Ensure each attribute meets the expected format and constraints, such as validating the GitHub ID and securing passwords.
- Store Data Appropriately: Use correct data types and formats, like hashing passwords and using Base64 encoding for images.
- Handle Arrays: Manage attributes like “Classes Student Enrolled In” as arrays to allow flexible enrollment and updates.
- Boolean Logic: Use boolean values for attributes like “KASM Server” to manage feature access or permissions.
By defining these attributes and their expected types clearly, you’ll establish a backend system that handles user data effectively and securely.
This might be a little confusing now, but we’re still in the learning process, so don’t worry! Check out this page for a more clear, in depth explanation of database modeling before we explore relationships. On this site, you will learn about entities, relationships, etc. You can also do your own research to find out more about what databases your project could have based on your project idea.
Now that you have a basic understand of databases and entity relationships, let’s look back at at the teacher example and our attributes We will have two databases-one for users, and one for sections. Each user can have one or many sections, or classes, they are enrolled in.
+---------------------+
|        User         |
+--------------------------------+
| - name: String                 |
| - uid: String                  |
| - password: String             |
| - sections: List<SectionID>    |
| - kasm_server_needed: Boolean  |
| - ProfilePicture: Base64 String|
+--------------------------------+
          |
          | 1
          |         (1 * repersents one to many)
          | *
+----------------------+
|      Section         |
+----------------------+
| - SectionID: Integer |
| - Abbreviation: String |
| - Name: String       |
+----------------------+
The above is a rough example of a UML diagram. DRAW.io is also easy to use to create a UML diagram for database planning. After you finish database planning with your team, create a UML diagram!
Code for Databases
Now it’s time to think about our ideas about databases translate into code. For our Flask framework, we are use SQLIte Database (Structured Query Language). SQL is the standard language used to interact with relational databases.
It’s important to note that for our Flask application, we are using SQLAlchemy as a driver, so we won’t be directly using SQL to manage our database. This is why you see python code in the user.py file under model.
Keep in mind that we imitate code provided for us to not only align with AP CSP standards, but also learn in a more organized way. Exploring code on our own is good, but that doesn’t mean we should completely veer away from our resources(eg use SQL instead of SQL Alchemy) It will make our lives harder if we don’t start with with the templates Teacher has provided!
If you want to see how this database relationship is translated to code, check out section.py and user.py under the model directory. It’s okay if all the code doesn’t make sense now, because we will learn more as we proceed through the Sign Up, Log In, and Profile tabs.
If you look under model, you will notice there is a pfp.py for model. Unlike users and sections doesn’t have it’s own database, however. It just has methods for decoding the base64 string and deleting the pfp, and uploading the pfp. If you look at the user database when if you log in as admin, you can see users with their profile image.
Databases don’t always have to have relationships with other entities. For example, in a wellness tracker application, one of my teammates used a database with multiple therapy centers. Based on location and other preferences, a user could find what therapy center suits them best using the data from the database. However, the therapy database had no relationship with the user database.
Ultimately, database planning/organization is up to you and your team!
Planning out Workflow
Now that we’ve planned out a user interface and database, it’s time to think about how the backend and frontend connect. But how does that even work?
Understanding Frontend-Backend Integration with an Analogy
Imagine a restaurant where the frontend is the dining area where customers sit and the backend is the kitchen where food is prepared. The API is the waiter who takes orders from customers and delivers them to the kitchen, then brings the food from the kitchen back to the customers.
Key Components:
- Frontend (Dining Area):
- Customers (Users): Interact with the menu, place orders, and receive food.
- Menu (User Interface): Displays the options available to customers (e.g., list of users, forms to add new users).
- Order Form (Forms and Buttons): Allows customers to place orders (e.g., submit data).
- Backend (Kitchen):
- Chefs (Server-side Logic): Prepare the food (process data, perform operations) according to user input.
- Order Processing (Endpoints): Different stations in the kitchen handle different tasks (e.g., fetching user data, adding new users).
- API (Waiter):
- Takes Orders (HTTP Requests): Receives requests from customers (frontend) and delivers them to the kitchen (backend).
- Brings Food (HTTP Responses): Delivers the prepared food from the kitchen (backend) to the customers (frontend).
If you need more help understanding, check out this video and this article for more information about how the frontend and backend work together!
Handling Profile Page Updates
Let’s think about a few examples for our profile page to understand how we handle user inputs.
1. Updating UID
- User Action: When the user enters a new UID on the form in the frontend.
- Backend Action: We need to update the UID in the database.
- Process: Replace the old UID with the new UID in the database so that we have the correct information.
2. Updating Name
- User Action: When the user enters a new name on the form in the frontend.
- Backend Action: We need to update the name in the database.
- Process: Replace the old name with the new name in the database so that we have the correct information.
3. Handling KASM Server Checkbox
- Reading User Data:
- User Action: Displaying the form with the KASM server checkbox.
- Backend Action: We need to read the user data to check if the KASM server is needed.
- Process: If the user needs a KASM server, the checkbox should be checked; if not, it should be unchecked.
- Updating KASM Server Requirement:
- User Action: When the user clicks or unclicks the KASM server checkbox.
- Backend Action: We need to update the
kasm_server_neededfield in the database based on the user’s input. - Process: Update the
kasm_server_neededstatus in the database so that we have the correct information.
Profile Setup
CRUD Operations
To achieve these actions, we use CRUD operations:
- Create: Adding new data.
- Read: Retrieving existing data.
- Update: Modifying existing data.
- Delete: Removing data.
By using CRUD operations, we ensure that user inputs on the profile page are accurately reflected in the database.
.
Create: POST Requests
- Description: This operation creates new data.
- Functionality:
- Creates new user with input data: When a client sends a POST request, the server receives the data (e.g., user information) and processes it. The code for sending the request should be on the frontend repository (flask_2025).
- Performs error checking: The server validates the input data to ensure it meets all necessary requirements (e.g., no missing fields, correct data types). The files under the api directory in the backend repository handle this(portfolio_2025).
- Sets up user object -> adds to user database: After validation, the server creates a new user object and stores it in the database. The files under the api directory in the backend repository handle this.
Read: GET Requests
- Description: This operation retrieves data.
- Functionality:
- Handles user retrieval requests: When a client sends a GET request, the server fetches the requested data from the database. The code for sending the request should be on the frontend repository (portfolio_2025).
- Data -> JSON + response: The server converts the data into JSON format and sends it back to the client as a response. This makes it easy for the client to parse and use the data. The files under the api directory in the backend repository handle this (flask_2025).
Update: PUT/PATCH Requests
- Description: This operation updates existing data.
- Functionality:
- Updates based on user input: When a client sends a PUT or PATCH request, the server receives the updated data and processes it. The code for sending the request should be on the frontend repository (portfolio_2025)
- Commits changes to user database: The server validates the input data and updates the existing user record in the database with the new information. The files under the api directory in the backend repository handle this (flask_2025).
Delete: DELETE Requests
- Description: This operation deletes data.
- Functionality:
- Handles user delete requests: When a client sends a DELETE request, the server identifies the user to be deleted. The code for sending the request should be on the frontend repository (portfolio_2025).
- Deletes user from database: The server removes the specified user from the database. The files under the api directory in the backend repository handle this (flask_2025).
Example Workflow
-
Create: A client application (e.g., a web or mobile app) sends a POST request to the server’s API endpoint (e.g.,
/api/users) with user data in the request body. The server validates and stores this data in the database. -
Read: The client sends a GET request to the server’s API endpoint (e.g.,
/api/users/john) to retrieve the user data. The server fetches the data from the database and returns it in JSON format. -
Update: The client sends a PUT request to the server’s API endpoint (e.g.,
/api/users/john) with updated user data. The server validates the new data and updates the user record in the database. -
Delete: The client sends a DELETE request to the server’s API endpoint (e.g.,
/api/users/john) to delete the user. The server removes the user from the database.
Diagram Explanation

The diagram illustrates how different HTTP methods correspond to CRUD operations:
- POST is used for creating new resources.
- GET is used for retrieving existing resources.
- PUT/PATCH is used for updating existing resources.
- DELETE is used for deleting resources.
These operations are fundamental to managing data in any application, ensuring that users can create, read, update, and delete data as needed.
Database and JSON Structure
A database is used to store and manage data in a structured way. In our web application, data is exchanged in JSON (JavaScript Object Notation) format. JSON is lightweight and easy to read and write, making it ideal for transmitting data from the frontend to the backend. Here is a site to learn more about JSON and databases.
Example JSON Structure for User Data
{
  "users": [
    {
      "uid": "john",
      "name": "John Doe",
      "kasm_server_needed": true,
      "profile_picture": "profile_pic.jpg",
      "sections": ["CSA", "CSP"]
    },
    {
      "uid": "jane",
      "name": "Jane Smith",
      "kasm_server_needed": false,
      "profile_picture": "profile_pic2.jpg",
      "sections": ["CSSE", "CSO"]
    }
  ]
}
Testing Backend API Logic
If you want to learn more about how backend APIs work with our framework, Flask take a look at this video to get a rough idea. This won’t be the exact way our code is organized in flask_portfolio and flask_2025, but try to understand the basic ideas.
Now that we’ve covered the backend API basics, it;s important to note that before forming out HTTP request in the frontend, we have to test if our API is ready to receive data, in the form of JSON, from the frontend. But how do we do that?
The answer is Postman!
Postman is a popular tool used for API development and testing. It allows developers to make HTTP requests to web servers, inspect responses, and debug APIs.
Check out the Postman Docs to learn more on how to get started. Postman is a really helpful tool to validate backend logic and help construct the HTTP request in the frontend. The teacher will also expect you to work with Postman in the future!
Process
Now that we’ve covered the ideation and planning, let’s talk about the process of coding the application-the hardest part!
What is an Iterative Coding Process?
For beginners, understanding the iterative coding process is crucial to becoming an effective and efficient developer. Here’s a simple explanation:
The Iterative Coding Process
The iterative coding process is a way of developing software by breaking down the project into smaller, more manageable parts and working on them in cycles. Instead of trying to build the entire project at once, you work on a small part, meet goals, and then move on to the next goal/part. This cycle repeats until the known project goals are finished. Here’s how it works step-by-step:
-
Plan: Identify a small part of the project to work on. This could be a feature, a function, or a module.
-
Develop: Write the code for this small part. Focus on getting it to work correctly.
-
Test: Check that the code works as expected. This involves running the code and making sure it does what it’s supposed to do.
-
Review: Look at what you’ve done and see if there are any improvements or changes needed. This could be fixing bugs, optimizing the code, or adding more features. Review includes test and input from another team member.
-
Repeat: Move on to the next small part of the project and repeat the process.
Benefits of Iterative Coding
- Manageable Chunks: By breaking down the project, you can focus on one thing at a time, which makes it easier to handle.
- Continuous Progress: You see progress with each iteration, which keeps you motivated.
- Early Detection of Issues: Since you’re testing and reviewing frequently, you can catch and fix problems early before they become bigger issues.
- Flexibility: You can adjust your goals and make new plans based on what you learn from each iteration. This makes it easier to adapt to changes or new requirements.
Example
Let’s say you’re building a simple to-do list app. Here’s how you might use the iterative coding process:
-
Plan: Decide to start with the feature that lets users add a new to-do item.
-
Issue: Make a GitHub issue that describe to-do item in breakdown of development steps of “Add”, “Edit”
-
Develop: Write the code that creates a new to-do item when the user enters text and clicks an “Add” button.
-
Test: Run the app and make sure that new to-do items appear in the list correctly.
-
Review: Check if the code is clean and efficient. Maybe you notice during the work to add the need to add “Delete” button to the to-do Issue.
-
Repeat: Move on to adding the “Edit” and “Delete” buttons as the next small part of the project.
By following this process, you gradually build the app, making sure each part works well before moving on to the next.
The iterative coding process helps beginners stay organized, make steady progress, and learn from each step, making the whole development experience more manageable and less overwhelming.
Even I used an iterative coding process and talked to Teacher for every step to build the login, signup, and profile! Check out pull requests for iKAN2025 for portfolio_2025 as an example. As you can see, the new design for the profile is much more streamlined than the old one because I changed and updated the form throughout the coding process.
Conclusion
Building a full-stack web application from ideation to deployment is a complex yet rewarding process. By breaking down the project into manageable steps and following a structured approach, you can turn your initial concepts into a fully functional application.
Key Takeaways:
-
Effective Planning: The ideation and planning phase is crucial for defining the application’s goals, designing the user interface, outlining the data model, and planning the application flow. This foundational work ensures that your development process is guided by clear objectives and a well-thought-out structure.
-
Step-by-Step Development: The coding process involves setting up the Flask project, creating backend logic, developing the frontend, integrating the two, and thoroughly testing the application. Each step builds upon the previous one, leading to a cohesive and well-integrated application.
-
Iterative Approach: Using an iterative coding process helps manage complexity, catch errors early, and remain flexible to changes. Regular testing and reviewing during each iteration ensure a high-quality end product.
-
Documentation and Task Management: Documenting your code and breaking tasks into smaller chunks make the development process more manageable and efficient. Clear documentation aids in collaboration and future maintenance, while smaller tasks help maintain focus and track progress.
-
Deployment and Real-World Testing: Deploying your application and ensuring it performs well in real-world conditions is the final step. This involves choosing a suitable hosting environment and handling deployment logistics to make your application accessible to users.
By following these guidelines, you can navigate the complexities of full-stack development with confidence and create amazing applications. Embrace the journey of learning and iteration, and you’ll find that even the most daunting projects become achievable milestones on your path to becoming a proficient developer!
Happy planning!