Flask/Python Deployment Guide
Description of key methods process used to deploy a Flask/Python website; AWS EC2, Docker, docker-compose, and Nginx
- Deployment Overview
- Server Setup and Initial Deployment
- Deployment Process
- Connect to EC2 through cloud
- Update, Upgrade, and Install packages
- Clone and Change Directory to project location
- Test Web Service
- Create Dockerfile to run Web Service
- Create docker-compose file share Web Service
- Running Docker using docker-compose.yml
- Verifying Web Application via Docker commands
- Testing localhost endpoint
- Test preparation for Docker Web Application using IP for Internet Access
- Final preparation the Docker Web Application using DNS for Internet Access
- Update Deployment, this process is after you change code
- Good Examples
Deployment Overview
Deploying a Web Application enables a Server and Web Application to be available to users on the Internet. Development Operations (DevOps) is understanding the tools and service used to enable the Web Application on the Internet. This process can use many different cloud services, as well as choice of many different tools. Here is an overview of what is covered in this procedure.
- EC2: Amazon Web Services is a cloud computing platform that the PUSD district has provided for their students to serve our Web Application.
- GitHub: The leading open platform to share a code across the Internet.
- Docker and docker-compose: Used to host a Web Application. A Docker container prepares an environment that contains the Web Application code and all the dependencies (requirements.txt for Python) Docker is an open platform for developing, shipping, and running applications.
- Nginx: In order to find a Web Application on a server, there needs to be a process that listens for the Web Application request and directs it to the Web Application service. Nginx is an open source software for web serving, reverse proxy, caching, load balancing, media streaming, and more.
- Certbot: Web traffic on internet is reliably served over Secure Hyper Text Transfer Protocol (https). Certbot is a free, open source software tool for automatically using Let’s Encrypt certifications.
- DNS: Natively, the web works off of IP addresses. Domain Name Services (DNS) allows the assignment of a friendly name to a Web Server. This name is built into Nginx/Certbot configuration files. Freenom is the cloud service described in this blog and has been used to register the nighthawkcodingsociety.com domain.
Key/Values required as you go through these procedures
Listed are Keys, you need to obtain “values” specific to your Web Application setup. It is important that you recognize the sample “values” as you work through these procedures, then replace them with the “values” that are specific to your Web Application use case.
- GitHub HTTPS link:
- IAM user:
- EC2 name:
- EC2 Public IPs:
- DNS Name:
- DNS Subdomain name(s)
- Docker Port:
- docker-compose, proxy pass Port:
- docker-compose, docker Image name:
- Nginx server file(s):
Server Setup and Initial Deployment
Development Operations (DevOps) begins with server setup.
Amazon Web Services (AWS): Electric Cloud Compute (EC2) Setup
Preparing and AWS EC2 instance is the process of creating a cloud computer. This process starts by logging into your AWS IAM user, searching for EC2.
- To get started, launch a new AWS EC2 instance to learn process and understand how to work with Linux. here are some key considerations.
- Choose an Amazon Machine Image (AMI), the class will be using Ubuntu you should check on last verified version with a Teacher before proceeding
- When it comes to picking memory or disk it is VERY important to pick Free Tier. As stated, this will only be used for testing and then it will be disposed for cost efficiency.
- When presented with access dialog for http and https, make sure you check these boxes. Remember you are making a Web application that will run over http and https.
- Name the security group (.pem) file after your self or team. It may be necessary to use SSH to access your EC2 instance.
- The remainder of the steps you can use the defaults, refer to AWS documentation for guidance: https://docs.aws.amazon.com/AWSEC2/latest/UserGuide/EC2_GetStarted.html
- At the end of this process you need to “Connect to Instance”. This will provide you a terminal like experience.
Deployment Process
Deployment begins with terminal connections. It is necessary to run commands to setup files to enable your Web Application to run on the Internet.
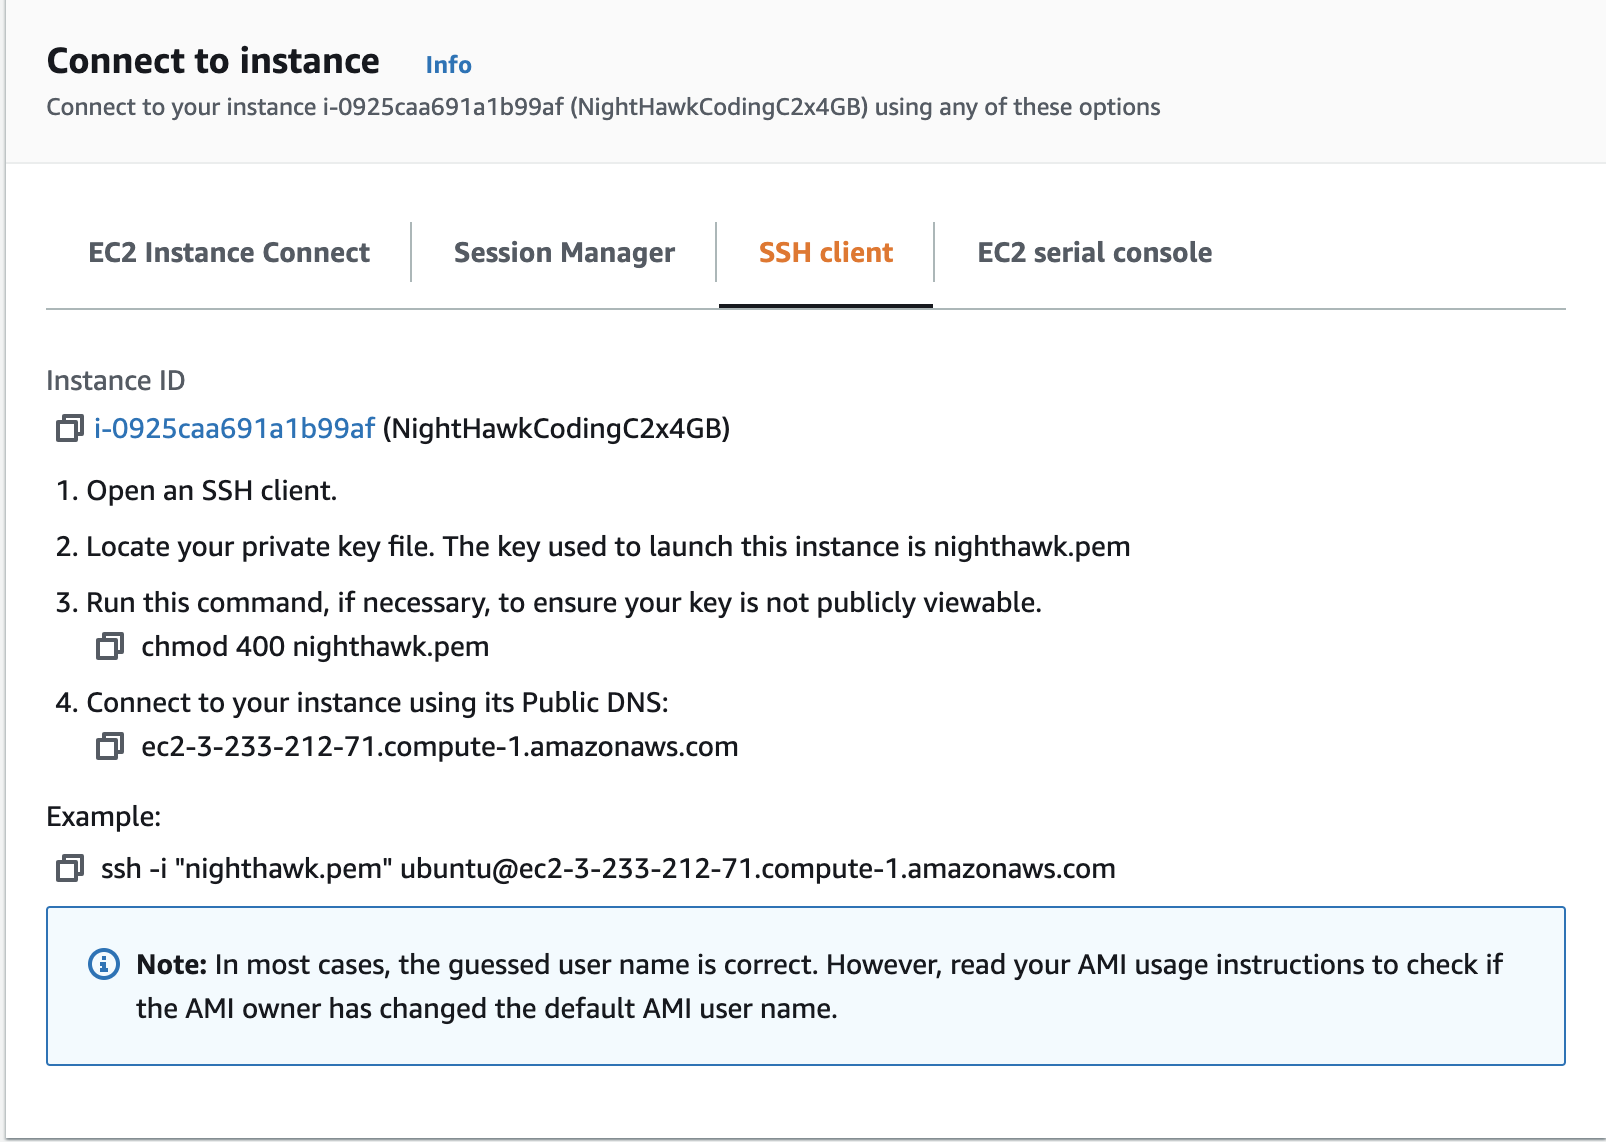
Connect to EC2 through cloud
Connect to an Ubuntu EC2 instance on AWS and then begin the system and software setup.
- Select your machine and press “Connect” at top middle.
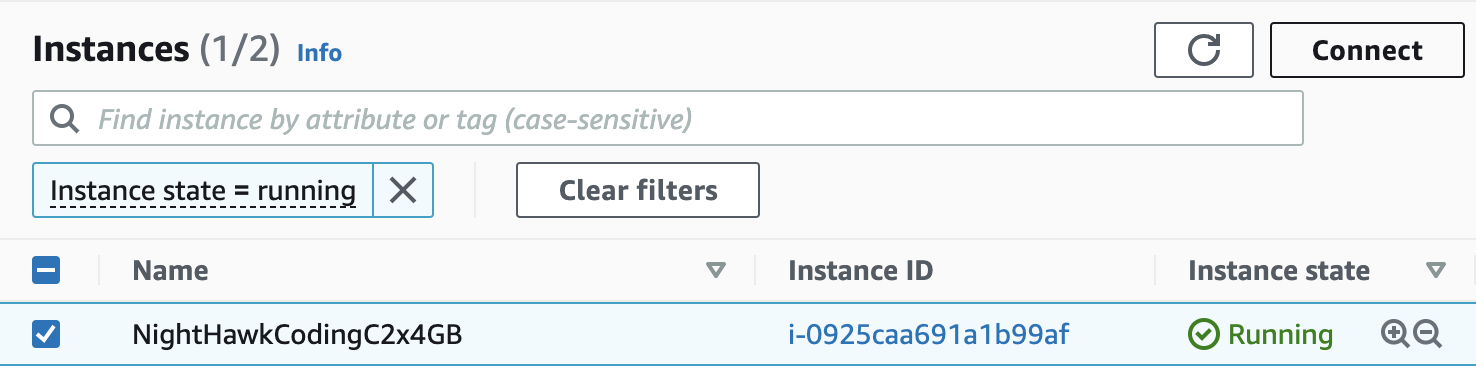
- On next screen ensure things are lined “EC2 Instance Connect” and press “Connect” at bottom.
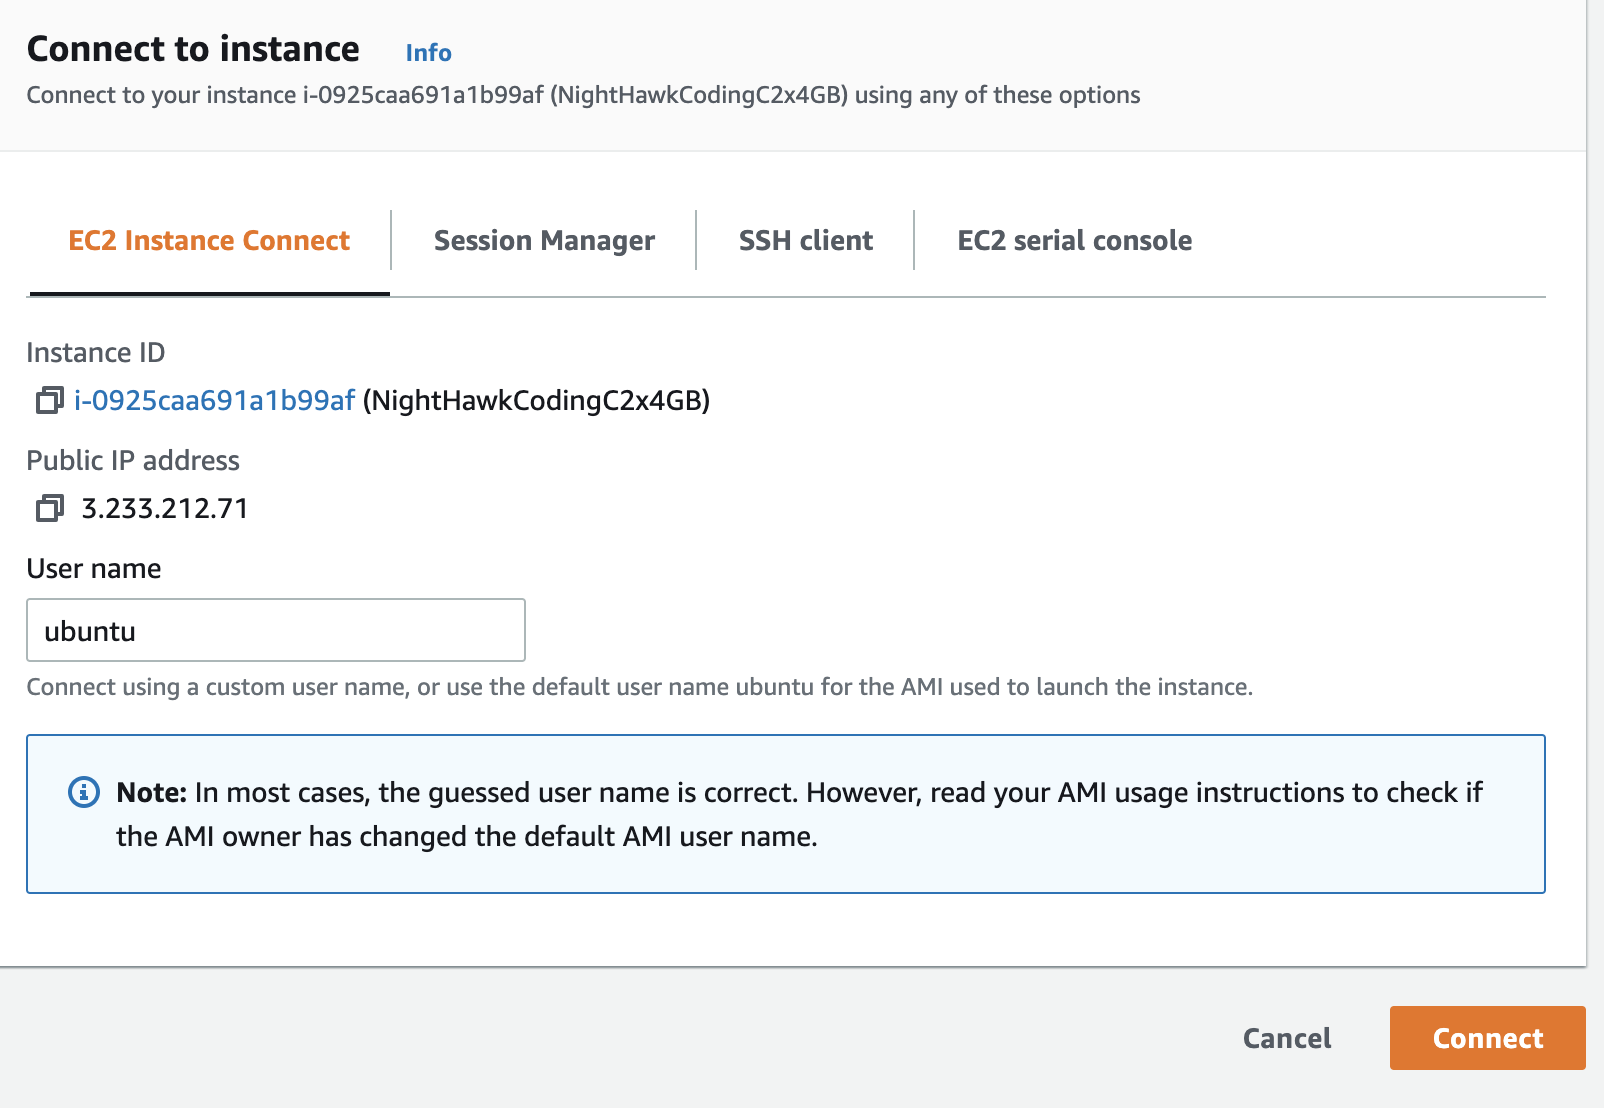
- Only if this fails you will need to connect from our Anaconda terminal, we need pem file so place it in your home directory.
- Either connection should work at home, school WIFI may be blocking, I have been trying to get this open. A Hot spot or VPN will solve connection errors.
Update, Upgrade, and Install packages
Terminal commands are shown, these commands will be run from Terminal after you connect to your EC2 instance. It is advised that you try to comprehend and learn these commands as you go through these procedures. Understanding steps is how you become a DevOps Engineer.
These commands update and then upgrade packages in your system.
$ sudo apt update; sudo apt upgrade
$ sudo apt install docker
$ sudo apt install docker-compose -y
$ sudo apt install html2text
$ sudo apt install python3-pip nginx
$ sudo pip3 install virtualenv
Clone and Change Directory to project location
This command moves your Web Application code onto you EC2 cloud computer. The example GithUb HTTPs Link is demonstration is: https://github.com/nighthawkcoders/flask_portfolio.git.
$ cd
$ git clone https://github.com/nighthawkcoders/flask_portfolio.git
$ cd flask_portfolio
- Clone needs to be repeated for each Web application on the EC2 instance (Team repository and each individual repository). If repo is named the same use option parameter at the end of clone command
git clone https://github.com/nighthawkcoders/flask_portfolio.git flask_portfolio_john, thencd flask_portfolio_john
Test Web Service
These steps will require you to understand a few new commands that will not be part of final deployment process. However, these commands will help you understand machine dependencies and validate your requirements.txt for completeness.
$ cd ~/flask_portfolio
$ virtualenv -p /usr/bin/python3 webapp
$ source webapp/bin/activate
$ pip install -r requirements.txt
$ python main.py
- Failed result. If you get a result that looks like the below, your requirements.txt needs work. In this instance, I would need to add flask to the requirements.txt.
(webapp) ubuntu@ip-172-31-1-138:~/flask_portfolio$ python main.py
Traceback (most recent call last):
  File "main.py", line 2, in <module>
    from flask import Flask, render_template
ModuleNotFoundError: No module named 'flask'
(webapp) ubuntu@ip-172-31-1-138:~/flask_portfolio$
- Correct result. A successful result will look like the following. At this point we will type “ctrl+c” and then at prompt “deactivate”, as we will now build and run a Docker File to deploy in more automated fashion.
(webapp) ubuntu@ip-172-31-1-138:~/flask_portfolio$ python main.py
 * Serving Flask app 'main' (lazy loading)
 * Environment: production
   WARNING: This is a development server. Do not use it in a production deployment.
   Use a production WSGI server instead.
 * Debug mode: on
 * Running on http://127.0.0.1:5000 (Press CTRL+C to quit)
 * Restarting with stat
 * Debugger is active!
 * Debugger PIN: 710-199-540
Create Dockerfile to run Web Service
A Dockerfile is a configuration used to run the Web Service. This is placed in a file called Dockerfile. It is best to add this to VS Code and pull it, or you can update in place with nano, vi, or vim editor and use command line commands to push it into your repository. The Dockerfile should be considered Code!
- Edit the Dockerfile
$ sudo nano Dockerfile - Insert the Dockerfile commands, note that they are similar to Bash commands performed earlier. Follow prompts on screen to save file when complete, look for Key/Value (GitHub HTTPS link) that requires change for your project.
FROM docker.io/python:3.9
WORKDIR /app
# --- Update environment and install python and pip ---
RUN apt-get update && apt-get upgrade -y && \
  apt-get install -y python3 python3-pip git
# --- Copy repo you updated with clone or pull ---
COPY . /app
# --- Install project specific dependencies ---
RUN pip3 install --no-cache-dir -r requirements.txt
RUN pip3 install gunicorn
# --- Setup args to run 3 workers and run on port 8080 ---
ENV GUNICORN_CMD_ARGS="--workers=3 --bind=0.0.0.0:8080"
# --- Allow port 8080 to be accessed by system ---
EXPOSE 8080
# --- Run Web Application in production style ---
CMD [ "gunicorn", "main:app" ]
Create docker-compose file share Web Service
A docker-compose file is a configuration used to share your Docker Web Service and resources with the Linux system. This file enable Linux to have access to the container and the persistent data application via the /volumes location.
- Once again it is best to add the docker-compose.yml in VS Code and pull it. You can edit it on the machine itself using vi, vim, or nano.
- The
image:needs to have unique name for each application on server (ie flask_john_v1)- The
ports:left value 8086 needs to be unique for each application on server (ie 8087:8080, 8088:8080, etc)- Change
device:to match path to volumes directory of your project. Verify this location is correct typingls /home/ubuntu/flask_portfolio/volumesthis should list filessqlite.db uploads
- Edit docker-compose.yml
$ sudo nano docker-compose.yml - Insert the docker-compose.yml Keys/Values.
version: '3'
services:
      web:
              image: flask_port_v1
              build: .
              ports:
                      - "8086:8080"
              volumes:
                      - persistent_volume:/app/volumes
volumes:
persistent_volume:
  driver: local
  driver_opts:
    o: bind
    type: none
    device: /home/ubuntu/flask_portfolio/volumes
    # replace just flask_portfolio
Running Docker using docker-compose.yml
At this point, it is best to review complete files on GitHub and for Docker and docker-compose: https://github.com/nighthawkcoders/flask_portfolio. Review the Key/Values mentioned in this document. Make sure your Docker and docker-compose files a personalized to your project.
- Ensure install of docker, docker-compose installed from earlier procedures
$ sudo apt install docker $ sudo apt install docker-compose -y - Make sure you are in project directory
$ cd ~/flask_portfolio/ - Run docker-compose
$ sudo docker-compose up -d - Output from docker-compose. When running this command, docker-compose will run all the Docker steps and build a Web Application running in a Docker container, a virtual environment.
Creating network "flask_portfolio_default" with the default driver
Building web
Step 1/9 : FROM docker.io/python:3.9
 ---> d0ce03c9330c
Step 2/9 : WORKDIR /app
.... LOTS of STEPs and OUTPUT ...
Successfully built 68d68ad9699b
Successfully tagged flask_port_v1:latest
WARNING: Image for service web was built because it did not already exist. To rebuild this image you must use `docker-compose build` or `docker-compose up --build`.
Creating flask_portfolio_web_1 ... done
Verifying Web Application via Docker commands
Here is a look at some of the commands behind the scenes. None of these are required to get things working, but show the results of the Docker and docker-compose.yml files and commands.
- docker-compose ps View the running Web process, “ps” is a linux command or option that provides information related to the processes on a system. Look at name and ports in relation to outputs of the docker-compose process and settings in docker-compose.yml file.
$ sudo docker-compose ps Name Command State Ports -------------------------------------------------------------------------------------------- flask_portfolio_web_1 gunicorn main:app Up 0.0.0.0:8086->8080/tcp,:::8086->8080/tcp - docker ps View a more comprehensive list of all the docker processes on the system. In this process reports, many of the alternate projects running on this AWS server are show (ie your Team Members). You should be able to identify your IMAGE and PORTS, as they should be unique according to your docker-compose.yml file.
$ sudo docker ps CONTAINER ID IMAGE COMMAND CREATED STATUS PORTS NAMES 749a93bc11ce flask_port_v1 "gunicorn main:app" 45 minutes ago Up 45 minutes 0.0.0.0:8086->8080/tcp, :::8086->8080/tcp flask_portfolio_web_1 89155782b853 java_springv1 "java -jar target/sp…" 6 days ago Up 6 days 0.0.0.0:8085->8080/tcp, :::8085->8080/tcp spring_portfolio_web_1 9415d6397d2e python_cspv1 "gunicorn main:app" 2 weeks ago Up 2 weeks 0.0.0.0:8082->8080/tcp, :::8082->8080/tcp nighthawk_csp_web_1 4bf324458bf6 python_laxv1 "gunicorn main:app" 5 weeks ago Up 5 weeks 0.0.0.0:8084->8080/tcp, :::8084->8080/tcp lax_web_1 7a6dff6425e9 python_ctev1 "gunicorn main:app" 5 weeks ago Up 5 weeks 0.0.0.0:8083->8080/tcp, :::8083->8080/tcp cte_web_1 abd77b8e77af java_csav2 "java -jar target/cs…" 5 weeks ago Up 5 weeks 0.0.0.0:8081->8080/tcp, :::8081->8080/tcp nighthawk_csa_web_1 - docker images This lists all of the docker images, or containers, that are used to serve the process shown above. The flask_port_v1 is the REPOSITORY is named in docker-compose.yml. The IMAGE ID is container for the running Web application.
$ sudo docker images REPOSITORY TAG IMAGE ID CREATED SIZE flask_port_v1 latest 68d68ad9699b 51 minutes ago 1.01GB java_springv1 latest e85a584b1836 6 days ago 523MB python_laxv1 latest 713c84a30d3b 5 weeks ago 1.16GB python_ctev1 latest 1608eaee06c7 5 weeks ago 1.18GB python_cspv1 latest b9bb27be863b 5 weeks ago 1.12GB java_csav2 latest 4055a9fd5ea7 5 weeks ago 570MB python 3.9 d0ce03c9330c 7 weeks ago 915MB alpine latest e66264b98777 8 weeks ago 5.53MB openjdk 16-alpine3.13 2aa8569968b8 17 months ago 324MB - docker volume ls This list volume names are the locations where application stores files that that the developer wants to keep. The volume name is specified in the docker-compose.yml file.
$ sudo docker volume ls
DRIVER    VOLUME NAME
local     flask_portfolio_persistent_volume
local     nighthawk_csa_persistent_volume
local     nighthawk_csp_persistent_volume
local     spring_portfolio_persistent_volume
Testing localhost endpoint
Verify everything is working with your docker configurations.
- Local Test of Web Application Endpoint. This should return HTML related to the home page of your Web site. If this fails, you need to review Docker and docker-compose configurations.
Failed to connectmeans you need to review your port assignments in docker-compose.yml and thedocker-compose psoutputs above.$ curl http://localhost:8086 - More readable view of Web Application Endpoint. This requires
sudo apt install html2text. This output is a form of Web Scrapping, as it pull text out of the HTML and makes it easier for us to read and identify the content.$ curl http://localhost:8086 | html2text - Congrats. If you are to this point you are successfully running your Web Application with Docker and verifying that it is running with Curl.
Test preparation for Docker Web Application using IP for Internet Access
Each student scrum team will perform Nginx test and verify Group Web Project is working on EC2 instance. This step is can only support a single Web Application at a time.
This Step is dependent on…
- EC2 Public IPs: 3.233.212.71
- Docker Port: 8086
Enable Nginx to retrieve default Web Application using IP Address from internet request (Reverse Proxy)!
- Install Nginx on Ubuntu servers
$ sudo apt install nginx - Go to location of Nginx server configuration files
$ cd /etc/nginx/sites-available - Open editor to Create your own “Nginx test configuration”.
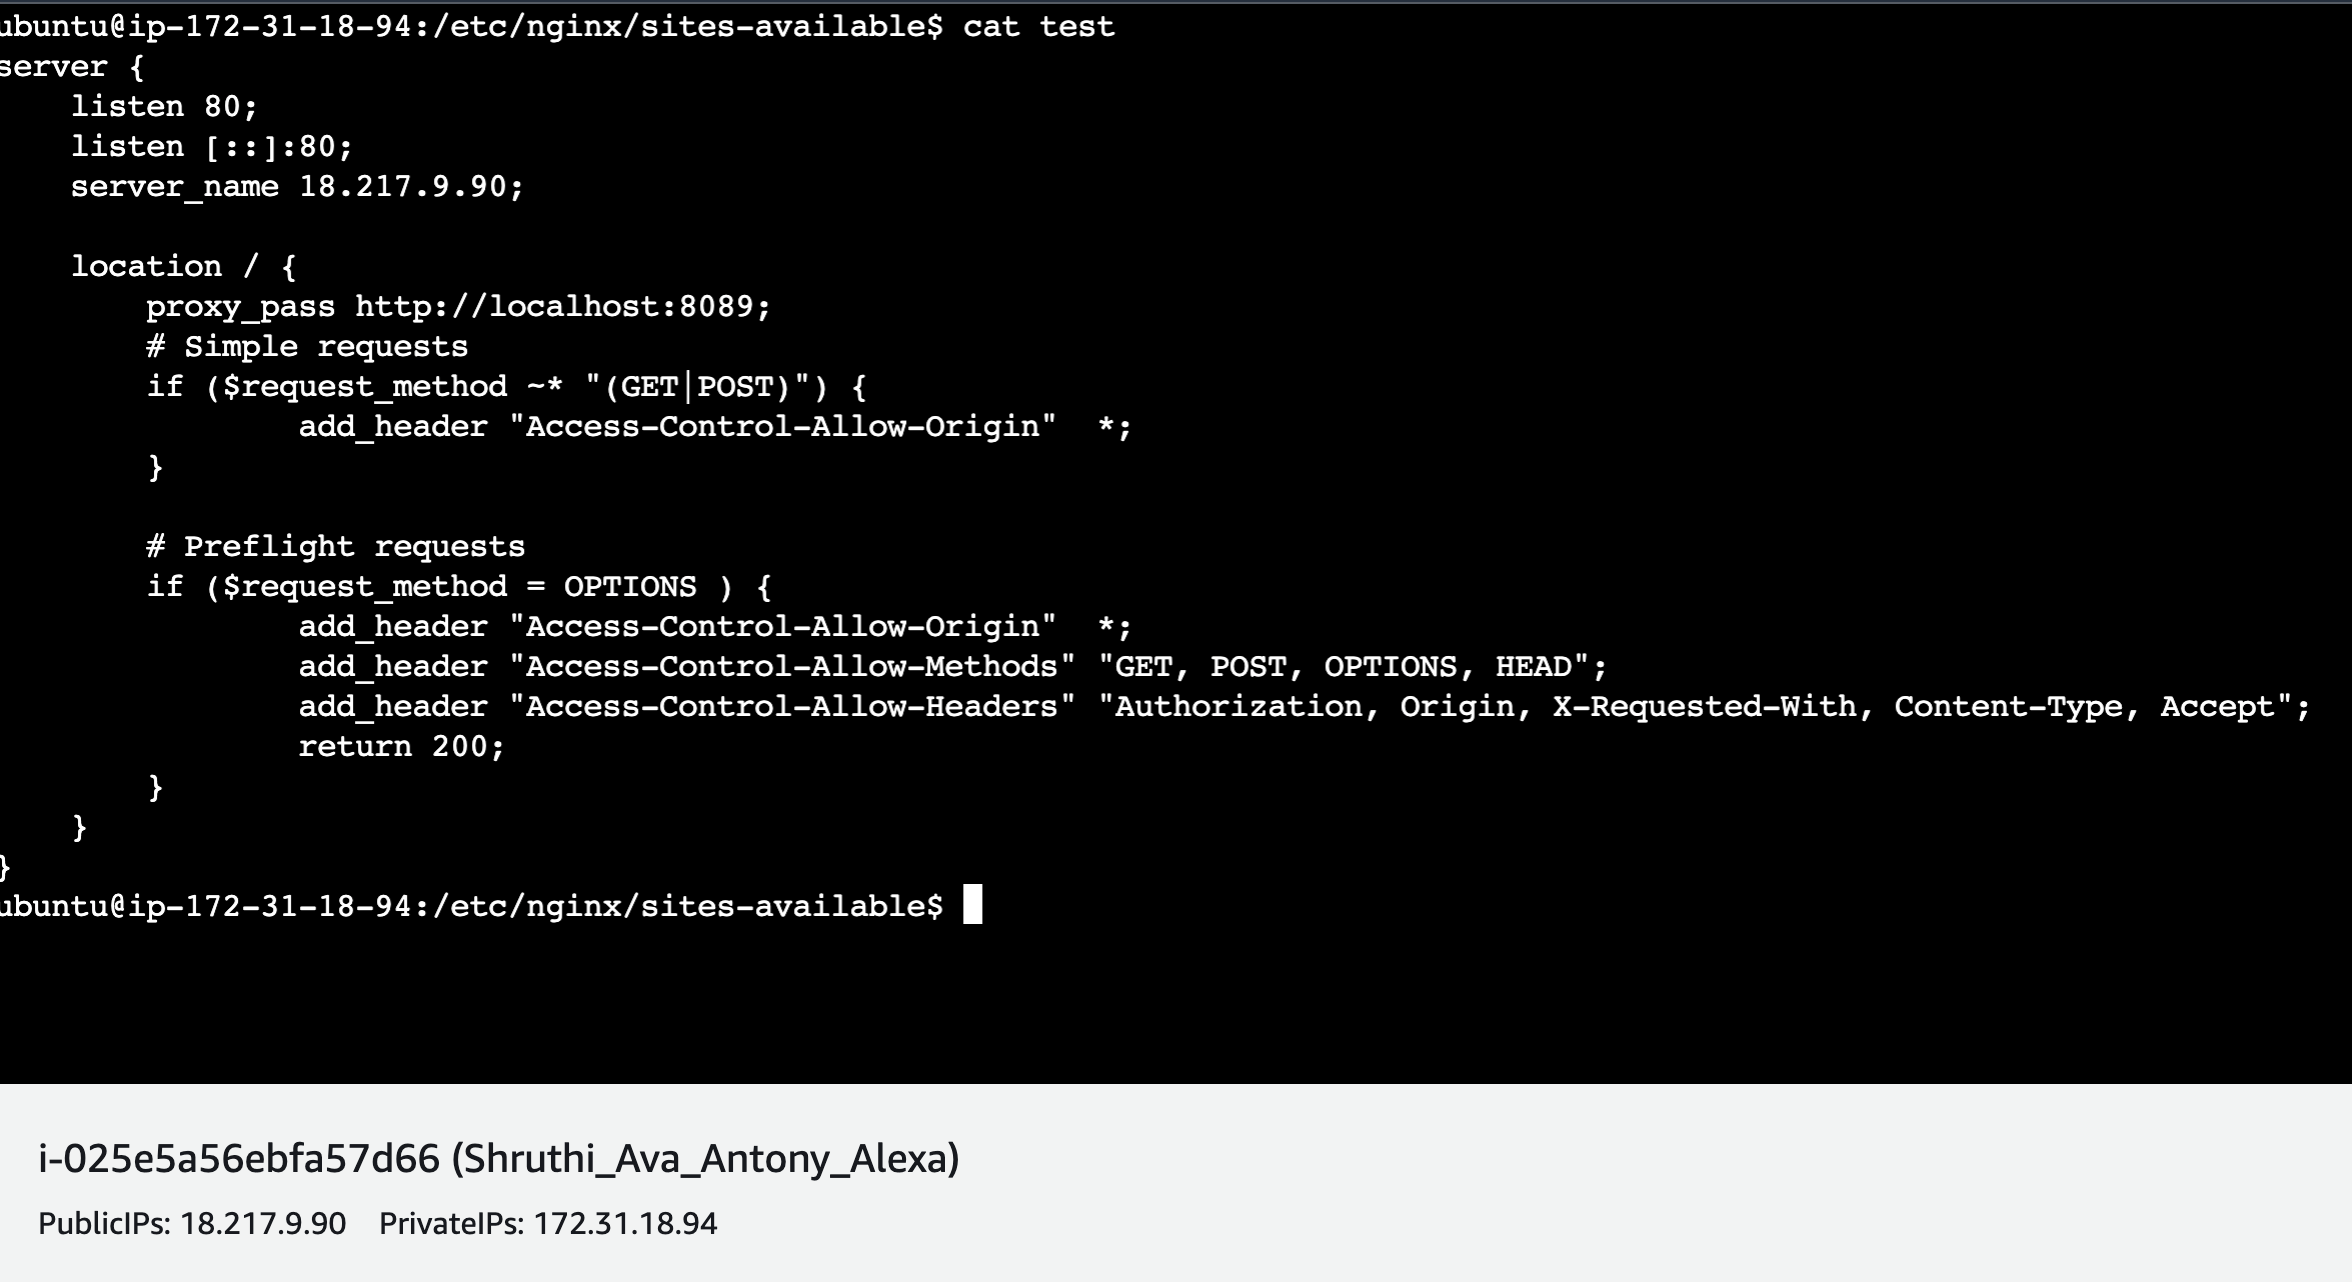
$ sudo nano test - Edit your own Nginx server configuration making modifications to:
- IP Address: 3.233.212.71
- docker-compose, proxy pass Port: 8086
server {
    listen 80;
    listen [::]:80;
    server_name 3.233.212.71;

    location / {
        proxy_pass http://localhost:8086;
        # Simple requests
        if ($request_method ~* "(GET|POST)") {
                add_header "Access-Control-Allow-Origin"  *;
        }

        # Preflight requests
        if ($request_method = OPTIONS ) {
                add_header "Access-Control-Allow-Origin"  *;
                add_header "Access-Control-Allow-Methods" "GET, POST, OPTIONS, HEAD";
                add_header "Access-Control-Allow-Headers" "Authorization, Origin, X-Requested-With, Content-Type, Accept";
                return 200;
        }
    }
}
Activating Nginx configuration
- Activate/enabled Nginx server configuration:
- nginx configuration file can be called what you want it to be.
$ sudo ln -s /etc/nginx/sites-available/[your config file] /etc/nginx/sites-enabled[your config file]
$ sudo nginx -t
- nginx configuration file can be called what you want it to be.
- If there are errors, something is wrong…
- Perhaps you are missing semicolon at the end of server)name or proxy_pass lines.
- Perhaps link to file in sites-enabled is bad as a result of bad syntax in
ln -acommand.- There are two directories
/etc/nginx/sites-availableand/etc/nginx/sites-enabled. - The 1st is for preliminary editing, the second is for activation. Perform
lsin/etc/nginx/sites-enabledand make sure all the names look correct. - Correct by
rmof mistake in/etc/nginx/sites-enabledwithout deleting original file in/etc/nginx/sites-available. Then repeatln -scommand.
- There are two directories
- If there are no errors, restart NGINX so the server to activate
/etc/nginx/sites-enabledfiles:$ sudo systemctl restart nginx
Testing HTTP endpoint
When completing this section, you will show that the Internet is resolving your Web application and port from an IP address (aka reverse proxy).
- Verify AWS Web application again. Make sure curl is still working on local machine. Make sure endpoint you placed in Nginx test file match.
$ curl http://localhost:8086 - Now test public IP on the internet. Go to a browser anywhere in the world and type your IP address:
http://3.233.212.71- Note. Address is Unsecure and you are using IP address versus Domain.
- Timeout problem. This means something is wrong with EC2 Public IP.
- Nginx Default page. This means Nginx is working, but something is wrong with you Nginx test configuration.
- Broken Gateway. This means Nginx is working, but something is wrong with Web Application endpoint on machine. This requires you to look at port configuration OR restart Docker.
Congratulations. If you have arrived at this point you now have capability to access your team Web Application from the Internet. Hurray!!!
Final preparation the Docker Web Application using DNS for Internet Access
There are additional steps to this preparation. We need to direct the internet to the AWS server running the Web Application, this is done using Domain Name Service (DNS). After being directed to the Web Server, the server needs to respond to the HTTP (Hyper Text Transfer Protocol) request. The proxy of HTTP to your Web Application is manged by Nginx. Finally, we will Secure HTTP (HTTPS), with a utility called Certbot.
DNS provider and setup
Each student scrum team is required to learn how to obtain a DNS provider and setup an independent domain.
A picture is included to show key elements in setting up a domain with a DNS provider. The nighthawkcodingsociety.com is using Freenom as its service provider. As you build your own DNS endpoint, you will need to obtain your own IP address mapped to a Domain.
This Freenom illustration is dependent on…
- DNS Name: nighthawkcodingsociety.com
- DNS Subdomain name(s): battleship.nighthawkcodingsociety.com. cowboys.nighthawkcodingsociety.com
A minimum configuration will have the two “A” type definitions using you Public IP address. These two are resolved with a single Web Application. The “CNAME” type is used for subdomains, these will resolve to a different Web Application.
Setup DNS mapping to your Public IP address now!!! This is needed to complete Nginx and Certbot configurations below. You will not be able to proceed until you have setup ‘A’ record.

- Open editor to Create your own “Nginx Web Application configuration” for your group project. This looks very similar to test configurations, but the change is the Domain names. These Domain names must be created through DNS provider and you must setup ‘A’ entries in DNS for them to work. For clarity, the name
nighthawkshould reflect your application name, domain or subdomain. The name needs to be unique for each web application (ie john_nighthawk for john.nighthawk.com).$ sudo nano nighthawk - Edit your own Nginx server configuration making modifications:
- DNS Name(s): nighthawkcodingsociety.com www.nighthawkcodingsociety.com
- docker-compose, proxy pass Port: 8086
server {
    listen 80;
    listen [::]:80;
    server_name nighthawkcodingsociety.com www.nighthawkcodingsociety.com;

    location / {
        proxy_pass http://localhost:8086;
        # Simple requests
        if ($request_method ~* "(GET|POST)") {
                add_header "Access-Control-Allow-Origin"  *;
        }

        # Preflight requests
        if ($request_method = OPTIONS ) {
                add_header "Access-Control-Allow-Origin"  *;
                add_header "Access-Control-Allow-Methods" "GET, POST, OPTIONS, HEAD";
                add_header "Access-Control-Allow-Headers" "Authorization, Origin, X-Requested-With, Content-Type, Accept";
                return 200;
        }
    }
}
- Or, or in addition, edit your own Nginx server configuration making modifications to subdomain file (0 to many). These Domain names must be created through DNS provider and you must setup ‘A’ or ‘CNAME’ entries in DNS for them to work:
- DNS Name(s): flask.nighthawkcodingsociety.com
- docker-compose, proxy pass Port: 8087
server {
    listen 80;
    listen [::]:80;
    server_name flask.nighthawkcodingsociety.com;

    location / {
        proxy_pass http://localhost:8087;
        # Simple requests
        if ($request_method ~* "(GET|POST)") {
                add_header "Access-Control-Allow-Origin"  *;
        }

        # Preflight requests
        if ($request_method = OPTIONS ) {
                add_header "Access-Control-Allow-Origin"  *;
                add_header "Access-Control-Allow-Methods" "GET, POST, OPTIONS, HEAD";
                add_header "Access-Control-Allow-Headers" "Authorization, Origin, X-Requested-With, Content-Type, Accept";
                return 200;
        }
    }
}
- Activate/enabled Nginx server configuration:
- nginx configuration file: nighthawk
$ sudo ln -s /etc/nginx/sites-available/nighthawk /etc/nginx/sites-enabled
$ sudo nginx -t
- nginx configuration file: nighthawk
- If there are no errors, restart NGINX so the server is an endpoint to the internet:
$ sudo systemctl restart nginx
Testing HTTP endpoint
Before finishing, this is a good opportunity to review everything you have done.
- Make sure curl is still working on local machine.
$ curl http://localhost:8086
$ curl http://localhost:8087
etc
- Now test unsecure HTTP endpoint on the internet. Go to a browser anywhere and type your DNS domain:
http://nighthawkcodingsociety.comorhttp://flask.nighthawkcodingsociety.com.- Timeout. This means something is wrong with EC2 Public IP.
- Nginx Default page. This means DNS is working, but something is wrong with you Nginx configuration.
- Broken Gateway. This means Nginx is working, but something is wrong with Web Application endpoint on machine, if this fails something is wrong with Web Application. This requires you to look at Docker and docker-compose configuration.
Certbot install and configuration
Each student scrum team will learn Certbot on on AWS EC2 test server, establish working https web application. The final configuration will be on AWS server managed by Teachers or Student DevOps Engineers.
$ sudo snap install core; sudo snap refresh core
$ sudo snap install --classic certbot
$ sudo ln -s /snap/bin/certbot /usr/bin/certbot
$ sudo certbot --nginx
Saving debug log to /var/log/letsencrypt/letsencrypt.log
Plugins selected: Authenticator nginx, Installer nginx

Which names would you like to activate HTTPS for?
- - - - - - - - - - - - - - - - - - - - - - - - - - - - - - - - - - - - - - - -
1: nighthawkcodingsociety.com
2: csa.nighthawkcodingsociety.com
3: csp.nighthawkcodingsociety.com
4: flm.nighthawkcodingsociety.com
- - - - - - - - - - - - - - - - - - - - - - - - - - - - - - - - - - - - - - - -
Select the appropriate numbers separated by commas and/or spaces, or leave input
blank to select all options shown (Enter 'c' to cancel):
Cert not yet due for renewal

You have an existing certificate that has exactly the same domains or certificate name you requested and isn't close to expiry.
(ref: /etc/letsencrypt/renewal/nighthawkcodingsociety.com-0001.conf)

What would you like to do?
- - - - - - - - - - - - - - - - - - - - - - - - - - - - - - - - - - - - - - - -
1: Attempt to reinstall this existing certificate
2: Renew & replace the cert (limit ~5 per 7 days)
- - - - - - - - - - - - - - - - - - - - - - - - - - - - - - - - - - - - - - - -
Select the appropriate number [1-2] then [enter] (press 'c' to cancel): 2
Renewing an existing certificate
Performing the following challenges:
http-01 challenge for nighthawkcodingsociety.com
http-01 challenge for csa.nighthawkcodingsociety.com
http-01 challenge for cso.nighthawkcodingsociety.com
http-01 challenge for flm.nighthawkcodingsociety.com
Waiting for verification...
Cleaning up challenges
Deploying Certificate to VirtualHost /etc/nginx/sites-enabled/nighthawk_society
Deploying Certificate to VirtualHost /etc/nginx/sites-enabled/nighthawk_csa
Deploying Certificate to VirtualHost /etc/nginx/sites-enabled/nighthawk_csp
Deploying Certificate to VirtualHost /etc/nginx/sites-enabled/nighthawk_flm

Please choose whether or not to redirect HTTP traffic to HTTPS, removing HTTP access.
- - - - - - - - - - - - - - - - - - - - - - - - - - - - - - - - - - - - - - - -
1: No redirect - Make no further changes to the webserver configuration.
2: Redirect - Make all requests redirect to secure HTTPS access. Choose this for
new sites, or if you're confident your site works on HTTPS. You can undo this
change by editing your web server's configuration.
- - - - - - - - - - - - - - - - - - - - - - - - - - - - - - - - - - - - - - - -
Select the appropriate number [1-2] then [enter] (press 'c' to cancel): 2
Traffic on port 80 already redirecting to ssl in /etc/nginx/sites-enabled/nighthawk_society
Traffic on port 80 already redirecting to ssl in /etc/nginx/sites-enabled/nighthawk_csa
Traffic on port 80 already redirecting to ssl in /etc/nginx/sites-enabled/nighthawk_csp
Traffic on port 80 already redirecting to ssl in /etc/nginx/sites-enabled/nighthawk_flm

- - - - - - - - - - - - - - - - - - - - - - - - - - - - - - - - - - - - - - - -
Your existing certificate has been successfully renewed, and the new certificate
has been installed.

The new certificate covers the following domains:
https://nighthawkcodingsociety.com,
https://csa.nighthawkcodingsociety.com,
https://csp.nighthawkcodingsociety.com, and
https://flm.nighthawkcodingsociety.com,

You should test your configuration at:
https://www.ssllabs.com/ssltest/analyze.html?d=nighthawkcodingsociety.com
https://www.ssllabs.com/ssltest/analyze.html?d=csa.nighthawkcodingsociety.com
https://www.ssllabs.com/ssltest/analyze.html?d=csp.nighthawkcodingsociety.com
https://www.ssllabs.com/ssltest/analyze.html?d=flm.nighthawkcodingsociety.com
- - - - - - - - - - - - - - - - - - - - - - - - - - - - - - - - - - - - - - - -

IMPORTANT NOTES:
 - Congratulations! Your certificate and chain have been saved at:
   /etc/letsencrypt/live/nighthawkcodingsociety.com-0001/fullchain.pem
   Your key file has been saved at:
   /etc/letsencrypt/live/nighthawkcodingsociety.com-0001/privkey.pem
   Your cert will expire on 2022-03-06. To obtain a new or tweaked
   version of this certificate in the future, simply run certbot again
   with the "certonly" option. To non-interactively renew *all* of
   your certificates, run "certbot renew"
 - If you like Certbot, please consider supporting our work by:

   Donating to ISRG / Let's Encrypt:   https://letsencrypt.org/donate
   Donating to EFF:                    https://eff.org/donate-le
Update Deployment, this process is after you change code
This procedure is a very short, as much of the deployment performed is persistent on your EC2/Ubuntu.
Goto Project directory
Check your docker processes. Make sure git has nothing to commit.
$ cd ~/flask_portfolio
$ sudo docker-compose ps
       Name                 Command        State                    Ports
--------------------------------------------------------------------------------------------
flask_portfolio_web_1   gunicorn main:app   Up      0.0.0.0:8086->8080/tcp,:::8086->8080/tcp

$ sudo docker ps
CONTAINER ID   IMAGE           COMMAND                  CREATED        STATUS        PORTS                                       NAMES
ee3fd0edfdcd   flask_port_v1   "gunicorn main:app"      6 weeks ago    Up 6 weeks    0.0.0.0:8086->8080/tcp, :::8086->8080/tcp   flask_portfolio_web_1

$ git status
On branch main
Your branch is up to date with 'origin/main'.

nothing to commit, working tree clean
Shutdown process and update source
Stop docker processes and git pull
$ sudo docker-compose kill  # run ps on docker-compose and docker and you should observe changes
Killing flask_portfolio_web_1 ... done
At this point your server is down, look at it from browser
502 Bad Gateway
Update code
$ git pull    # dialog will look as follows
remote: Enumerating objects: 42, done.
remote: Counting objects: 100% (42/42), done.
remote: Compressing objects: 100% (23/23), done.
remote: Total 33 (delta 17), reused 24 (delta 9), pack-reused 0
Unpacking objects: 100% (33/33), 7.42 KiB | 474.00 KiB/s, done.
From https://github.com/nighthawkcoders/flask_portfolio
   f0b6ba1..def0da9  main       -> origin/main

... These are the files you changed ...

model_jokes.py                                 |   4 ++--
requirements.txt                               |   8 ++++----
Rebuild and Restart Web Application
Force rebuild of docker container. This can take a couple of minutes.
$ sudo docker-compose build --no-cache
Building web
Step 1/9 : FROM docker.io/python:3.9
 ---> d0ce03c9330c
Step 2/9 : WORKDIR /app
 ---> Running in 3f705fefc681
Removing intermediate container 3f705fefc681
 ---> 9c6ebd23dcb1

... Build steps 1 through 9 ...

Step 9/9 : CMD [ "gunicorn", "main:app" ]
 ---> Running in 9ca595a79669
Removing intermediate container 9ca595a79669
 ---> 54ca7ab064b4
Successfully built 54ca7ab064b4
Successfully tagged flask_port_v1:latest
Run docker-compose
$ sudo docker-compose up -d
Recreating flask_portfolio_web_1 ... done
Now server is up, test in Browser for recent change
Python Home Page
Good Examples
git clone Plan what your name will be on shared server and this can be different than repo name by using 4th argument.
git clone <git_project> avaflaskproject # identifiable name
docker-compose.yml (sudo docker-compose up -d)
docker-compose.yml Setup before you clone, this needs to be versioned controlled. There are 3 edits!
services:
        web:
                image: flask_ava_v1  # identifiable name for shared machine
                build: .
                ports:
                        - "8089:8080" # port distinct from others
                volumes:
                        - persistent_volume:/app/volumes
volumes:
  persistent_volume:
    driver: local
    driver_opts:
      o: bind
      type: none
      device: /home/ubuntu/avaflaskproject/volumes  # name consistent with repo
Docker PS
sudo docker ps Verification shows practice of easy to identify owners and ports. At this point it is very clear to see who owns Ports.
CONTAINER ID   IMAGE              COMMAND               CREATED        STATUS        PORTS                                       NAMES
6f4572c00f22   flask_shruthi_v1   "gunicorn main:app"   3 hours ago    Up 3 hours    0.0.0.0:8083->8080/tcp, :::8083->8080/tcp   flaskpython_web_1
0dd6254cf662   flask_ava_v1       "gunicorn main:app"   17 hours ago   Up 17 hours   0.0.0.0:8089->8080/tcp, :::8089->8080/tcp   avaflaskproject_web_1
Nginx IP test file (sudo systemctl nginx restart)
nginx IP address test file There are 2 edits. Notice the Public IP address on screen. Identify that with configuration. Also, what application will run on the IP address?
Nginx sites-available (cd /etc/nginx/sites-available)
available directory names Notice names and how they can be identified. This is were you work on configurations.
ubuntu@ip-172-31-18-94:/etc/nginx/sites-available$ ls
ava_nighthawk  default  shruthi_nighthawk  test
Nginx file published to work with a domain (nano ava_nighthawk)
nginx domain name file This is identical to test file, but now it is working off of the domain versus the IP address.
server_name ava.nighthawkcodingsociety.com;
Nginx sites-enable (cd /etc/nginx/sites-enabled)
enabled directory names Notice how names point back to sites-available. This is setup with
ln -scommand. Whose file still needs to be published.ubuntu@ip-172-31-18-94:/etc/nginx/sites-enabled$ ls -l total 0 lrwxrwxrwx 1 root root 34 Sep 28 21:31 default -> /etc/nginx/sites-available/default lrwxrwxrwx 1 root root 44 Oct 2 20:19 shruthi_nighthawk -> /etc/nginx/sites-available/shruthi_nighthawk lrwxrwxrwx 1 root root 31 Oct 4 00:48 test -> /etc/nginx/sites-available/test