Create Performance Task WriteUp
Sample Writeup of Create Performance Task


- Row 1: Program Purpose and Function
- Row 2: Data Abstraction
- ROW 3. Managing Complexity.
- ROW 4. Procedural Abstraction
- ROW 5. Algorithm Implementation
- ROW 6. Testing
Row 1: Program Purpose and Function
Video Requirements
The video demonstrates the running of the program. You must show...
- Input
- Program Functionality
- Output
Video
Available on YouTube.
- User Management Video> Video Plan
- Create Title Page User Management Systeme
> Run the Web Application Users Databse - Highlight the URL - GitHub pages frontend URL
- Make captions to point out the two sections
- Read Users API / GET Method - Reads and Displays all rows from backend SQLite Table.
- Create User API / POST Method - Obtains input from screen and add a new row to backend table and displays row above.
- Add row as illustrated
Provide a Transition Page with title Direct API Access without Web Page Frontend
- Show API Layer through with Postman
> Run Postman
- Show or provide caption for URL - https://flask.nighthawkcodingsociety.com/api/users/- Make sure background is clear before pressing Send
- Switch to single line output and scroll through rows Provide a Transition Page with title Creating Table and Populating Test Data
- Show Python Backend through Debugging
- Show visual of SQLite Table
Run users.py in VSCode
- Delete instance/volumes/sqlite.db
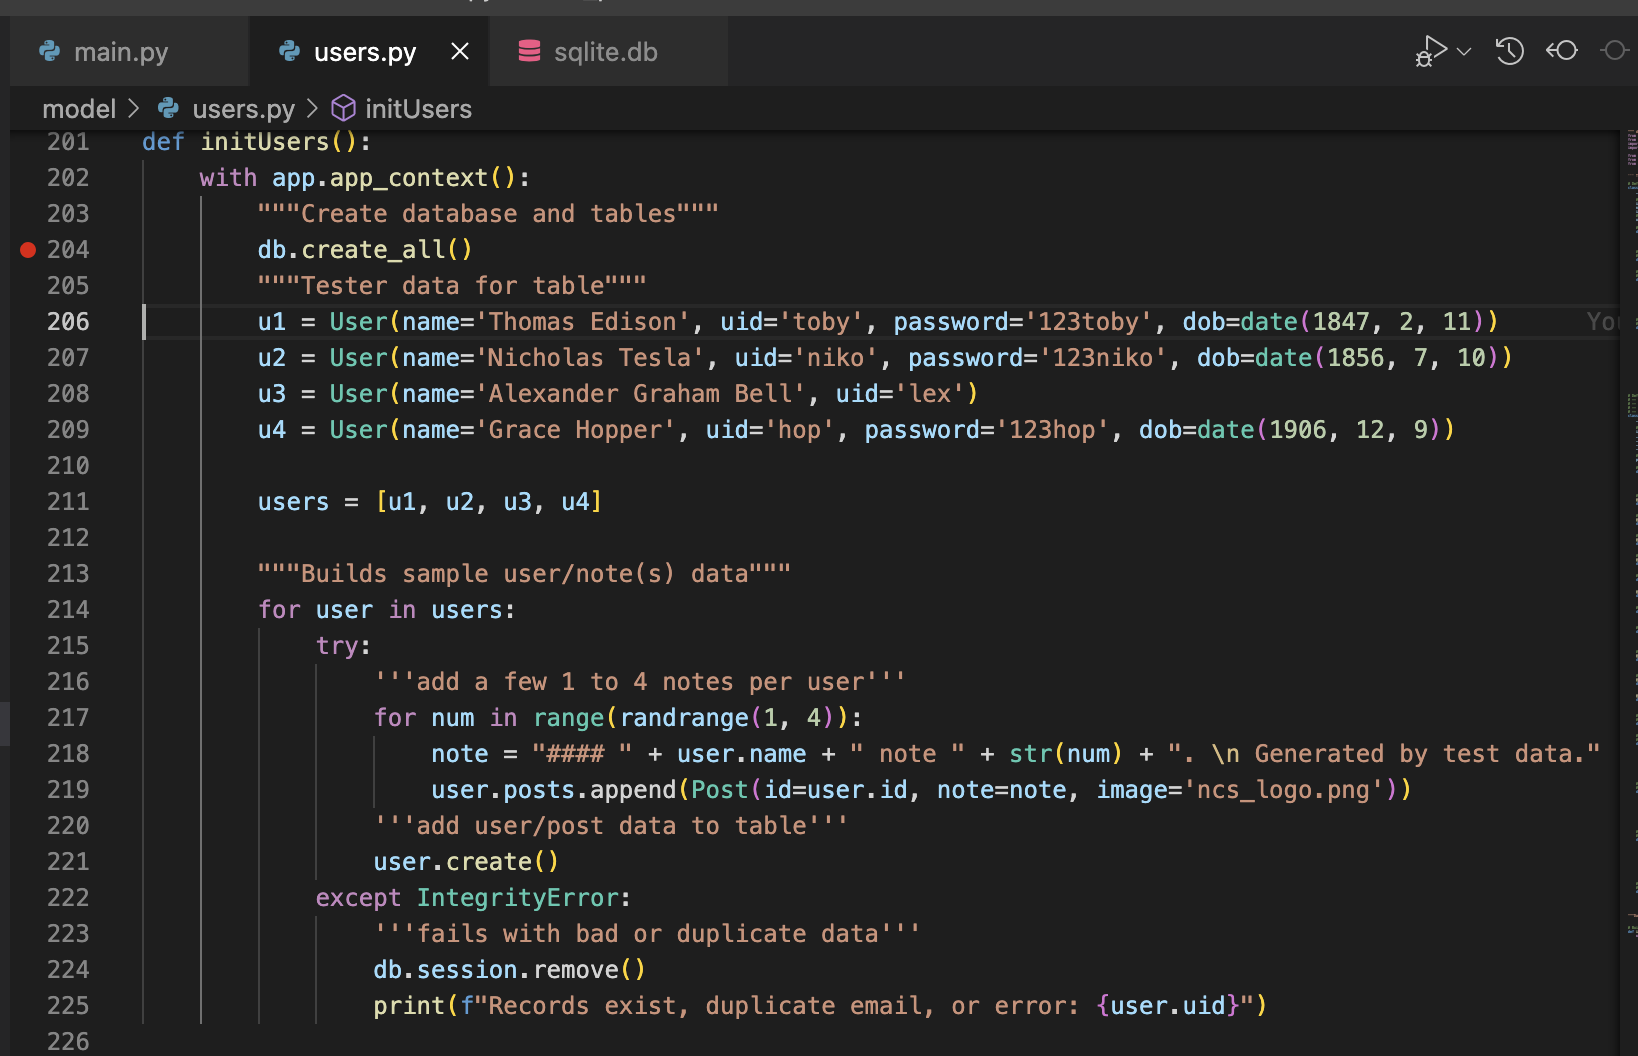
- Show/Set breakpoint on line 204
- Run main.py with Debug on
- Load Web Page
- Show Creation of database after Stepping ove line 204 in instance/volumes/sqlite.db
- Open Databas show as empty
- Continue Debugging
- Refresh Databaase
Provide End page The End
Wrtten Response
- Describes the overall purpose of the program.
- The purpose of this program is to add and display users and their identity information.
- The purpose could grow as Web Applications typically require user accounts. The purpose could grow, as the current features could serve as the basis of a future system, where users and identity information could be used to control access to the future Web Application features.
- Describes what functionality of the program is demonstrated in the video.
- Demo #1. Demonstrated first is the frontend JavaScript/HTML/CSS program. This program is used to Create and Read users. This has a public URL and is deployed on a GitHub pages server.
- Users are displayed when the page is loaded. The listing, which is in table format, contains common identity information required for a user/account system.
- The information in the page is actually read from a different web application, the backend system. The users are retrieved from a backend web application, which is hosted on an entirely different server. The users are stored in an SQLite Database and retrieved from this other web application via a backend Web API endpoint, using a GET method
- Additionally, in the video shows the process for adding/creating new user information, this is with an API and enpoint using a POST Method. After the POST, the information input on screen is validated and updated in the backend SQLite database, also it is updated on frontend Web page.
- Demo #2. Demos the capability of testing the backend API server without the need of the frontend Web Page. This show that it is accessing a public URL, this web application is hosted on an AWS EC2 server.
- Demo #3 (Did not make time cut). The final demo illustrates how to create and modify the database while developing on a localhost. Using Visual Studio Code, eliminating Frontend, API layers, and Servers... The Developer process allows for the creating of the database table and and adding rows to the users table on localhost.
- Demo #1. Demonstrated first is the frontend JavaScript/HTML/CSS program. This program is used to Create and Read users. This has a public URL and is deployed on a GitHub pages server.
- Describes the input and output of the program demonstrated in the video.
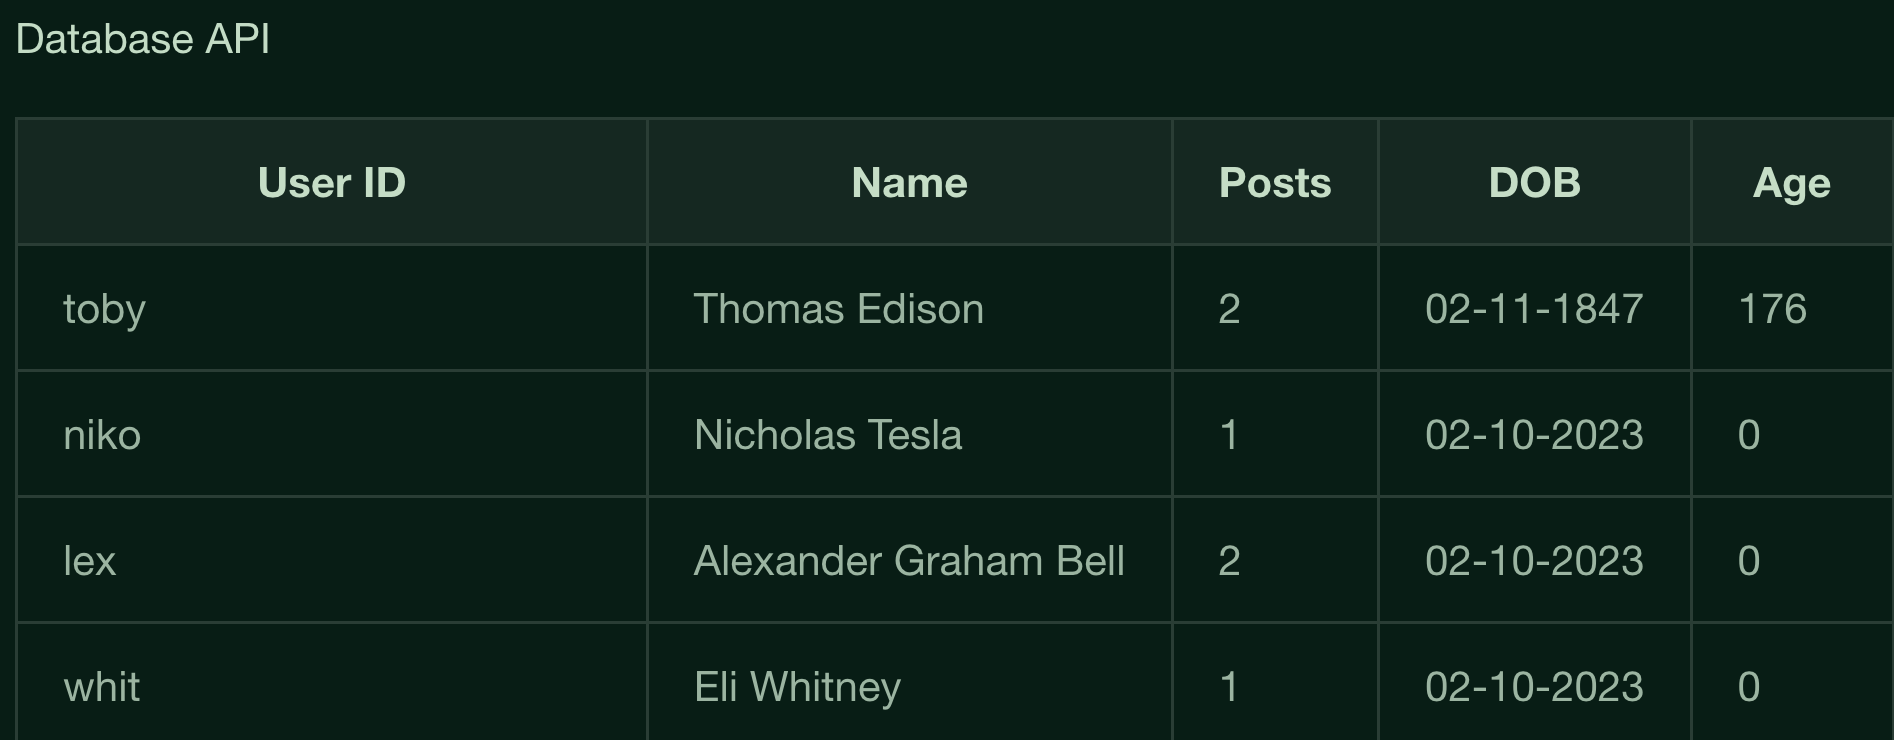
- In Demo #1, on page load JavaScript obtains data using the backend GET API, the response from the API containing JSON. This JSON file is a collection containing a list of key/values which is iterated over in a JavaScript for loop row by row, each row outputs a corresponding to a row on the Web Page. The resulting table contains each user and their corresponding columnar data.
- In the seconde part of Demo #1, demos creating new user information using the backend POST API enpoint. In this case, the data input is passed in the request body. The backend receives the API, validates, and unpacks the JSON data into a Python User object. The User object contains a method to Create a new row in the SQLite table. After data is validated, the row is created. The created row is repacked in JSON and returned as a response to the JavaScript sequence. On return, the data is displayed in the HTM.
- includes two program code segments:
- one that shows how data has been stored in this list (or other collection type).
- There are two comments in the code that show how data is stored: User Model Class, User Model Tester.
- The collection type used to illustrated Data Abstracition is an SQLite database.
- The User Model Class code defines a
class User(db.Model)which inherits database functionality, through db.Model. This is the file that defines schema for database as well as a template for an object that represent a row of data in the database. - The User Model Tester code defines a function
def initUsers(). This function creates a database table using the schema from the User Model Class, aka tablename and db.Column definitions assist in definition of the table. - The User Model Tester instantiates User objects and then adds each of the User objects to a temporary list. The list is used iterate through a process of creating records in the
userstable. - Each User object needs goes through a process of validation. Adding records is guarded with a try/except block to catch errors. This guard will fail errors and duplicates, but it will continue (error or success)until every record in the list is processed.
- The user.create() method in the User class creates a new row in the database table. It validates, adds and then commits the object to the table.
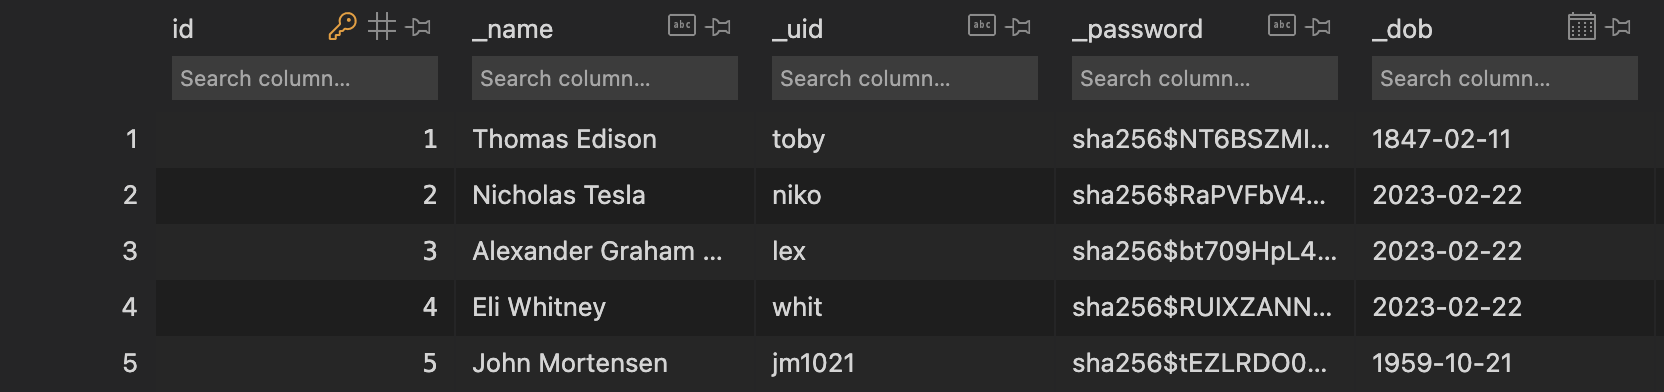
- After the creation of the table and adding rows to the to the table, this data is now ready for use in other parts of the program.
- A visual of the database is shown by screen capture below with comment users table.
- one that shows how data has been stored in this list (or other collection type).
""" Code Segment #1 abstracting Data into a collection"""
# Import Section
from datetime import date
import json

from sqlalchemy.exc import IntegrityError
from werkzeug.security import generate_password_hash, check_password_hash

from flask import Flask
from flask_sqlalchemy import SQLAlchemy

# Dependency Section
app = Flask(__name__)
# Setup SQLAlchemy object and properties for the database (db)
dbURI = 'sqlite:///volumes/sqlite.db'
app.config['SQLALCHEMY_TRACK_MODIFICATIONS'] = False
app.config['SQLALCHEMY_DATABASE_URI'] = dbURI
app.config['SECRET_KEY'] = 'SECRET_KEY'
db = SQLAlchemy()

""" User Model Class """
class User(db.Model):
    __tablename__ = 'users'  # table name is plural, class name is singular

    # Define the User schema with "vars" from object
    id = db.Column(db.Integer, primary_key=True)
    _name = db.Column(db.String(255), unique=False, nullable=False)
    _uid = db.Column(db.String(255), unique=True, nullable=False)
    _password = db.Column(db.String(255), unique=False, nullable=False)
    _dob = db.Column(db.Date)

    # Defines a relationship between User record and Notes table, one-to-many (one user to many notes)
    posts = db.relationship("Post", cascade='all, delete', backref='users', lazy=True)

    # constructor of a User object, initializes the instance variables within object (self)
    def __init__(self, name, uid, password="123qwerty", dob=date.today()):
        self._name = name    # variables with self prefix become part of the object,
        self._uid = uid
        self.set_password(password)
        self._dob = dob

    # a name getter method, extracts name from object
    @property
    def name(self):
        return self._name

    # a setter function, allows name to be updated after initial object creation
    @name.setter
    def name(self, name):
        self._name = name

    # a getter method, extracts email from object
    @property
    def uid(self):
        return self._uid

    # a setter function, allows name to be updated after initial object creation
    @uid.setter
    def uid(self, uid):
        self._uid = uid

    # check if uid parameter matches user id in object, return boolean
    def is_uid(self, uid):
        return self._uid == uid

    @property
    def password(self):
        return self._password[0:10] + "..." # because of security only show 1st characters

    # update password, this is conventional setter
    def set_password(self, password):
        """Create a hashed password."""
        self._password = generate_password_hash(password, method='sha256')

    # check password parameter versus stored/encrypted password
    def is_password(self, password):
        """Check against hashed password."""
        result = check_password_hash(self._password, password)
        return result

    # dob property is returned as string, to avoid unfriendly outcomes
    @property
    def dob(self):
        dob_string = self._dob.strftime('%m-%d-%Y')
        return dob_string

    # dob should be have verification for type date
    @dob.setter
    def dob(self, dob):
        self._dob = dob

    @property
    def age(self):
        today = date.today()
        return today.year - self._dob.year - ((today.month, today.day) < (self._dob.month, self._dob.day))

    # output content using str(object) in human readable form, uses getter
    # output content using json dumps, this is ready for API response
    def __str__(self):
        return json.dumps(self.read())

    # CRUD create/add a new record to the table
    # returns self or None on error
    def create(self):
        try:
            # creates a person object from User(db.Model) class, passes initializers
            db.session.add(self)  # add prepares to persist person object to Users table
            db.session.commit()  # SqlAlchemy "unit of work pattern" requires a manual commit
            return self
        except IntegrityError:
            db.session.remove()
            return None

    # CRUD read converts self to dictionary
    # returns dictionary
    def read(self):
        return {
            "id": self.id,
            "name": self.name,
            "uid": self.uid,
            "dob": self.dob,
            "age": self.age,
            "posts": [post.read() for post in self.posts]
        }

""" User Model Tester """
# Builds working data for testing
def initUsers():
    with app.app_context():
        """Create database and tables"""
        db.create_all()
        """Tester data for table"""
        u1 = User(name='Thomas Edison', uid='toby', password='123toby', dob=date(1847, 2, 11))
        u2 = User(name='Nicholas Tesla', uid='niko', password='123niko')
        u3 = User(name='Alexander Graham Bell', uid='lex', password='123lex')
        u4 = User(name='Eli Whitney', uid='whit', password='123whit')

        users = [u1, u2, u3, u4]

        """Builds sample user/note(s) data"""
        for user in users:
            try:
                user.create()
            except IntegrityError:
                '''fails with bad or duplicate data'''
                db.session.remove()
                print(f"Records exist, duplicate email, or error: {user.uid}")
""" users table, created by User Model Tester """
Continuing with Data Abstraction
-
one that shows the data in this same list being used as part of fulfilling the program’s purpose.
- Shown below is a fragment of code showing the Frontend obtain an API response, inside the response is a the collection received. See response.json().then(data => ...) to see how the JSON is obtained from API response into the "data" variable.
- The JSON response was formed in the backend, this data was abstracted from an database.
- The JavaScript syntax, via lambda expression, allows the data to be abstracted into a JavaScript variable.
- Each data[row] is passed as a parameter to the add_row function.
-
identifies the name of the variable representing the list being used in this response.
- the variable is called "data"
-
describes what the data contained in this list is representing in the program.
- JavaScript supports a data.key notation as illustrated in the
add_row(data)function, this allows abstraction of the data from its key which is then assigned into innerHTML of the page and in the HTML table. - Keys shown are uid, name, dob, and age, these name correspond to schema of columns in the database.
- JavaScript supports a data.key notation as illustrated in the
/* Code Segment #2 showing Data abstraction being used */

// response contains valid result
response.json().then(data => {
    //add a table row for the new/created userid
    for (let row in data) {
        add_row(data[row]);
      }
})


// HTML table row and columnar data generation
function add_row(data) {
    const tr = document.createElement("tr");
    const uid = document.createElement("td");
    const name = document.createElement("td");
    const dob = document.createElement("td");
    const age = document.createElement("td");


    // obtain data that is specific to the API
    uid.innerHTML = data.uid;
    name.innerHTML = data.name;
    dob.innerHTML = data.dob;
    age.innerHTML = data.age;

    // add HTML to container
    tr.appendChild(uid);
    tr.appendChild(name);
    tr.appendChild(dob);
    tr.appendChild(age);

    resultContainer.appendChild(tr);
  }
/* Sample Output */
ROW 3. Managing Complexity.
Data creation and storage is used to illustrate "managing complexity". Since input is coming from users, data needs to be validate prior to adding it to the system. By creating a User object, data can be stagged and validated utilizing methods that are defined in the collection/object discussed in this section.
- includes a program code segment that shows a list being used to manage complexity in the program.
- The User API code show managing complexity with the
uo (User Object)which is a type of list or more commonly called a collection data structure. - The
class _Create(Resource):has methoddef post(self):contains the variablebody. This is populated with the user input. This collection contains a list of all the keys and values input by user in one varialble. The variablebodycontains the user input including: uid, name, dob - The inputbodyafter it passes initial checks for errors is used to create a User objectuo = User(name=name, uid=uid). This uo object, user object, is used in managing the complexity of gathering the user data. The methoddef post(self)checks data and adds it to the uo object, only after it ensures only clean data enters the "uo" object.
- The User API code show managing complexity with the
""" Code Segment for Managing Complexity """

# Import Section
from flask import Blueprint, request, jsonify
from flask_restful import Api, Resource # used for REST API building
from datetime import datetime

# Dependency Section
user_api = Blueprint('user_api', __name__,
                   url_prefix='/api/users')
# API docs https://flask-restful.readthedocs.io/en/latest/api.html
api = Api(user_api)

""" User API"""
class UserAPI:
    class _Create(Resource):
        def post(self):
            ''' Read data for json body '''
            body = request.get_json()

            ''' Avoid garbage in, error checking '''
            # validate name
            name = body.get('name')
            if name is None or len(name) < 2:
                return {'message': f'Name is missing, or is less than 2 characters'}, 400
            # validate uid
            uid = body.get('uid')
            if uid is None or len(uid) < 2:
                return {'message': f'User ID is missing, or is less than 2 characters'}, 400
            # look for password and dob
            password = body.get('password')
            dob = body.get('dob')

            ''' #1: Key code block, setup USER OBJECT '''
            uo = User(name=name,
                      uid=uid)

            ''' Additional garbage error checking '''
            # set password if provided
            if password is not None:
                uo.set_password(password)
            # convert to date type
            if dob is not None:
                try:
                    uo.dob = datetime.strptime(dob, '%Y-%m-%d').date()
                except:
                    return {'message': f'Date of birth format error {dob}, must be mm-dd-yyyy'}, 400

            ''' #2: Key Code block to add user to database '''
            # create user in database
            user = uo.create()
            # success returns json of user
            if user:
                return jsonify(user.read())
            # failure returns error
            return {'message': f'Processed {name}, either a format error or User ID {uid} is duplicate'}, 400
- explains how the named, selected list manages complexity in the program code by explaining why the program code could not be written, or how it would be written differently, without using this list.
- The "uo" object, after it is created contains data from the user input, as well as a method to Create,
`uo.create()a record in the table. The object both stores data and activates code. - Additionally, there is a method to set the password,
uo.set_password(password). This method abstracts complexity of password encryption. - Also, there is a method to set the date of birth,
uo.dob = datetime.strptime(dob, '%Y-%m-%d').date(). Behind the scenes this calculates anageattribute for the user. - Ultimately, after object is generated and all data is verified, the
uo.create()method is called and a new row is committed into the database table. In this step, all the commands required to interact with the SQL database have been abstracted into the "uo" object. - There are ways to write the
class Usercode differently! Primarly to make the code into a imperative sequence and perform everything done within the object into a serialized form of commands. However, this would minimize the possibilities for code reuse. For instance, in a User Management System there would be a need to Update user records, as well as the described Create user functionality. The User class and creating auoobject could contain leveraged methods to support Update functionality. For instance, the samepasswordanddobmutator/setter methods would work for update. Thus, an Update API would be able to use these abstracted methods with similar code. - The concept of passing a list of Key/Value pairs through JSON, as illustrated with
bodyvariable is a foundation piece for REST API development. - The concept of creating/updating a user object (
uo) is common to Object Oriented Programming (OOP). This enables the management of an Object (ie user object), which is a list or series of data elements, along with the code to mutate and access that data in a reusable and reliable object. All things in code can be done in alternative ways, but OOP is great way to manage complexity on a list of attributes describing a User. - Any additions to attributes managed in User class would require code additions, but the places of addition is well defined, ordered, and understood by the developer. Key methods like uo.create() would not be changed.
- After data creation, objects from the class can be used for a mariad of other purposes. Obtaining a Database List or Collection using the User Class with its database properties allow for things like querying the data. In API preparation there is a need for code that returns a response of all uo objects to the frontend.
- The "uo" object, after it is created contains data from the user input, as well as a method to Create,
""" Method that returns all User Objects to frontend """
def get(self):
    users = User.query.all()    # read/extract all users from database
    json_ready = [uo.read() for uo in users]  # prepare output in json
    return jsonify(json_ready)  # jsonify creates Flask response object,  specific to APIs with response and dat
ROW 4. Procedural Abstraction
In a user system there is a need to store a password. However, it is not appropriate to store a password without encryption. This requires Procedural Abstraction.
-
includes two program code segments:- one showing a student-developed procedure with at least one parameter that has an effect on the functionality of the procedure. - See code for Procedural Abstraction for abstracting password hashing below.
- the code fragment below shows a procedure that sets the password in the user object ```self._password```. It receives a parameter ```password``` from the caller of the method. - the password is hashed before it is saved in the object using ```generate_password_hash``` method. this method is part of the ***werkzeug.security*** library. - the library suppors encryption of a ```password``` into ***sha256 hashed*** password as a result- one showing where the student-developed procedure is being called.
- See code for Procedural Abstraction fragments for calling password hashing below OR see this code in full context in Code Segment for Managing Complexity above
- the
uo.set_password(password)is prefaced with setting up password in lines before the call. The password is one attribute in the larger User object. - the
passwordis initially obtained from input - this input
passwordis passed as a parameter to the User objects set_password method as shown in the code. This results in plain text password be hashed and stored in the self._password variable within the object.
- one showing where the student-developed procedure is being called.
-
describes what the identified procedure does and how it contributes to the overall functionality of the program.
- a User System requires a password to validate identity of the user
- the set_password method is focussed on supporting the user identity securely
- a second method
def is_password(self, password):is added below to support authentication. This method is used actually validate identity. This method has a dependency that the hashed password is stored, it compares the password passed as a paramter versus the hashed password retained in the object (self._password). It returns true if passwords match, otherwise it returns false. - together the set and is methods can be used to manage passwords and validate identity of the users
""" Procedural Abstraction for abstracting password hashing """

# update password, this is conventional setter
def set_password(self, password):
    """Create a hashed password."""
    self._password = generate_password_hash(password, method='sha256')

# check password parameter versus stored/encrypted password
def is_password(self, password):
    """Check against hashed password."""
    result = check_password_hash(self._password, password)
    return result
""" Procedural Abstraction fragments for calling password hashing """

from flask import request

# Dependencies for object creation
body = request.get_json()
name = body.get('name')
uid = body.get('uid')
uo = User(name=name, uid=uid)
# Dependencies for obtaining password from user input
password = body.get('password')

''' Call to set_password method '''
uo.set_password(password)
ROW 5. Algorithm Implementation
The most highly visible algorithm in this program is the code that displays the users table in HTML. This contains all the elements required:sequencing, selection, iteration requirements of this Algorithm.
- includes a program code segment of a studentdeveloped algorithm that includes
- See code for Algorithm Implementation, program code segment below.
- sequencing: this function has a order
- selection: .catch, and if are all selection conditions
- iteration: a for loop is used to display all users
- explains in detailed steps how the identified algorithm works in enough detail that someone else could recreate it.
- the function defines the algorithm is called
read_users()which has the purpose of displaying all users in the database table. - in JavaScript, the fetch() method is used to make a request to the server, this begins the sequence
-
var url = "https://flask.nighthawkcodingsociety.com/api/users"is the endpoint for API -
method: GETmeans that we intend to retrieve information -
mode: corsstates that API is cross origin -
Content-Type: application/jsondescribes how we are passing and receive data
-
- in JavaScript, the response of the fetch(), using GET method contains status and data. This continues the sequence and will move to portion of algorithm where select and iteration are used.
-
response.statuscontains valid respone 200, or all other respones. - the selection statement
if (response.status !== 200) {traps all normal error conditions and builds an HTML container to display those errors to user. Normal errors are handled by endpoint, such as invalid date. - the
.catchat bottom of procedure is another type of selection statement that traps all errors that are unexpected. This would be errors that do not reach the endpoint, such as server being down. - passing by the guards allows the sequence of code to progress to
response.json().then(data => {. This is a lamda expression that extracts the data and enables JavaScript to load the information that is returned by the server onto the web pages. - the iteration statement
for (let row in data) {extracts each row from the data. The row is JSON and work as key/value pairs. - each iteration will make a call to
add_row(data[row]);which loads the data from that row on screen - To view add_row() functions see Algorithm Implementation, code segement execulted within iteration below.
-
- the function defines the algorithm is called
/* Algorithm Implementation, program code segment */

// Display User Table, data is fetched from Backend Database
var url = "https://flask.nighthawkcodingsociety.com/api/users"

function read_users() {
  // prepare fetch options
  const read_options = {
    method: 'GET', // *GET, POST, PUT, DELETE, etc.
    mode: 'cors', // no-cors, *cors, same-origin
    cache: 'default', // *default, no-cache, reload, force-cache, only-if-cached
    credentials: 'omit', // include, *same-origin, omit
    headers: {
      'Content-Type': 'application/json'
    },
  };

  // fetch the data from API
  fetch(read_fetch, read_options)
    // response is a RESTful "promise" on any successful fetch
    .then(response => {
      // check for response errors
      if (response.status !== 200) {
          const errorMsg = 'Database read error: ' + response.status;
          console.log(errorMsg);
          const tr = document.createElement("tr");
          const td = document.createElement("td");
          td.innerHTML = errorMsg;
          tr.appendChild(td);
          resultContainer.appendChild(tr);
          return;
      }
      // valid response will have json data
      response.json().then(data => {
          console.log(data);
          for (let row in data) {
            console.log(data[row]);
            add_row(data[row]);
          }
      })
  })
  // catch fetch errors (ie ACCESS to server blocked)
  .catch(err => {
    console.error(err);
    const tr = document.createElement("tr");
    const td = document.createElement("td");
    td.innerHTML = err;
    tr.appendChild(td);
    resultContainer.appendChild(tr);
  });
}
/* Algorithm Implementation, code segement execulted within iteration */

function add_row(data) {
    const tr = document.createElement("tr");
    const uid = document.createElement("td");
    const name = document.createElement("td");
    const posts = document.createElement("td")
    const dob = document.createElement("td");
    const age = document.createElement("td");


    // obtain data that is specific to the API
    uid.innerHTML = data.uid;
    name.innerHTML = data.name;
    posts.innerHTML = data.posts.length;
    dob.innerHTML = data.dob;
    age.innerHTML = data.age;

    // add HTML to container
    tr.appendChild(uid);
    tr.appendChild(name);
    tr.appendChild(posts);
    tr.appendChild(dob);
    tr.appendChild(age);

    resultContainer.appendChild(tr);
  }
ROW 6. Testing
The frontend makes two HTTP method calls (post, get) to the backend API endpoint. A single API endpoint is defined in the
clase UserAPIit is at the bottom of code sequenceapi.add_resource(_CRUD, '/'). The supported backend methodspost(self), get(self)can be found inside of theclass _CRUD(Resource):.
- describe two calls to the selected procedure identified in written response 3c. Each call must pass a different argument(s) that causes a different segment of code in the algorithm to execute.
- See First endpoint fetch, HTTP POST function create_user() below.
- See Second endpoint fetch, HTTP POST function read_users() below.
- Both calls are using same JavaScript fetch url endpoint variable
url = "https://flask.nighthawkcodingsociety.com/api/users", but activate different HTTP methods as options. The HTTP methods are activated by API selection login in the backend of the API controller/definition.- The first call has a data structure (user input) in
bodyand uses thePOSToption aas its HTTP method.- The second call sends the
GEToption as its HTTP method.
-
describes the condition(s) being tested by each call to the procedure.
- See Single API endpoint class UserAPI below, containing api.add_resource(_CRUD, '/')
- The first, API POST method, is directed to the Python Restful API resource
def post(self):within the class _CRUD(Resource). This Creates a new row in the backend database. - The second, API GET method, is directed to the Python Restful API resource
def get(self):within the class _CRUD(Resource). This Reads data from the backend database.
-
identifies the result of each call.
- The first, creates a record and performs
return jsonify(user.read())which contains the newly created user row. Alternately, it could return one of several errors, for instancereturn {'message': f'User ID is missing, or is less than 2 characters'}, 400based off of an invalid User ID input. On succesfull return the data is loaded and displayed by the JavaScript Web server - The second, produces a list of users from a database query
users = User.query.all(), turns the query into a Python list, using list comprenhensionjson_ready = [user.read() for user in users]. Then it returns a Status code and on success returns JSON datareturn jsonify(json_ready). On return the data is loaded and displayed by the JavaScript Web server
- The first, creates a record and performs
// single API edpoint is called
var url = "https://flask.nighthawkcodingsociety.com/api/users"
// First endpoint fetch, HTTP POST
function create_user(){

    const body = {
        uid: document.getElementById("uid").value,
        name: document.getElementById("name").value,
        password: document.getElementById("password").value,
        dob: document.getElementById("dob").value
    };
    const postOptions = {
        method: 'POST',
        body: JSON.stringify(body),
        headers: {
            "content-type": "application/json",
            'Authorization': 'Bearer my-token',
        },
    };
    fetch(url, postOptions)
        // response is a RESTful "promise" on any successful fetch
        .then(response => {
        // check for response errors
        if (response.status !== 200) {
        // ...
        }
        // response contains valid result
        response.json().then(data => {
            // receives a JSON item
            add_row(data);
        })
    });
}
// Second endpoint fetch, HTTP GET
function read_users() {
    // prepare fetch options
    const read_options = {
      method: 'GET', // *GET, POST, PUT, DELETE, etc.
      // ...
    };

    // fetch the data from API
    fetch(url, read_options)
      // response is a RESTful "promise" on any successful fetch
      .then(response => {
        // check for response errors
        if (response.status !== 200) {
        // ...
        }
        // valid response will have json data
        response.json().then(data => {
            // receives a JSON array
            for (let row in data) {
              // process each row
              add_row(data[row]);
            }
        })
    });
  }
from flask import Blueprint, request, jsonify
from flask_restful import Api, Resource # used for REST API building
from datetime import datetime

user_api = Blueprint('user_api', __name__,
                   url_prefix='/api/users')

# API docs https://flask-restful.readthedocs.io/en/latest/api.html
api = Api(user_api)

class UserAPI:
    class _CRUD(Resource):  # this class exposes supported HTTP methods (post, get, etc)
        def post(self):
            ''' Read data for json body '''
            body = request.get_json()

            ''' Avoid garbage in, error checking '''
            # validate name
            name = body.get('name')
            if name is None or len(name) < 2:
                return {'message': f'Name is missing, or is less than 2 characters'}, 400
            # validate uid
            uid = body.get('uid')
            if uid is None or len(uid) < 2:
                return {'message': f'User ID is missing, or is less than 2 characters'}, 400
            # look for password and dob
            password = body.get('password')
            dob = body.get('dob')

            ''' #1: Key code block, setup USER OBJECT '''
            uo = User(name=name,
                      uid=uid)

            ''' Additional garbage error checking '''
            # set password if provided
            if password is not None:
                uo.set_password(password)
            # convert to date type
            if dob is not None:
                try:
                    uo.dob = datetime.strptime(dob, '%Y-%m-%d').date()
                except:
                    return {'message': f'Date of birth format error {dob}, must be mm-dd-yyyy'}, 400

            ''' #2: Key Code block to add user to database '''
            # create user in database
            user = uo.create()
            # success returns json of user
            if user:
                return jsonify(user.read())
            # failure returns error
            return {'message': f'Processed {name}, either a format error or User ID {uid} is duplicate'}, 400

        def get(self):
            users = User.query.all()    # read/extract all users from database
            json_ready = [user.read() for user in users]  # prepare output in json
            return jsonify(json_ready)  # jsonify creates Flask response object, more specific to APIs than json.dumps


    # UserAPI RESTful API endpoint
    api.add_resource(_CRUD, '/')