Flask Security using JSON Web Tokens (research reqd)
Manage access and roles to a backend Python Flask using JSON Web Tokens JWT
Flask Security using JSON Web Tokens (JWT))
JWT concepts via ChatGPT with added illustrations
To implement a JWT-based authentication system with a JavaScript frontend and a Python Flask backend, you can follow these steps:
JSON Web Token (JWT) is a popular way to authenticate users in a web application. It is a compact, URL-safe means of representing claims to be transferred between two parties. The claims in a JWT are encoded as a JSON object that is digitally signed using JSON Web Signature (JWS). Here is an example of how you might use JWT for authentication in a JavaScript application:
- Frontend: In the JavaScript frontend, you can use the fetch API to send a request to the backend with the user credentials. The client sends a login request to the server with the user’s credentials (e.g., username and password). On a successful login, the backend returns a JSON Web Token (JWT) that the frontend can store in local storage.
- Frontend/Client/Origin: https://myclient.github.io
- Backend/Server/Host: flask.nighthawkcodingsociety.com
- Backend: On the Python Flask backend, you can write an API endpoint that accepts the user credentials, verifies them, and returns a JWT. You can use a library such as PyJWT to encode and decode the JWT. If the credentials are valid (CORS, cross-site, etc), the server generates a JWT and sends it back to the client. Here ae some samples of required credentials.
- Sec-Fetch-Mode: cors
- Sec-Fetch-Site: cross-site
- Frontend: The client stores the JWT in a cookie. For subsequent requests, the frontend can send the JWT in the Authorization header, allowing the backend to verify the authenticity of the request. Here is cookie in Chrome Inspect properties
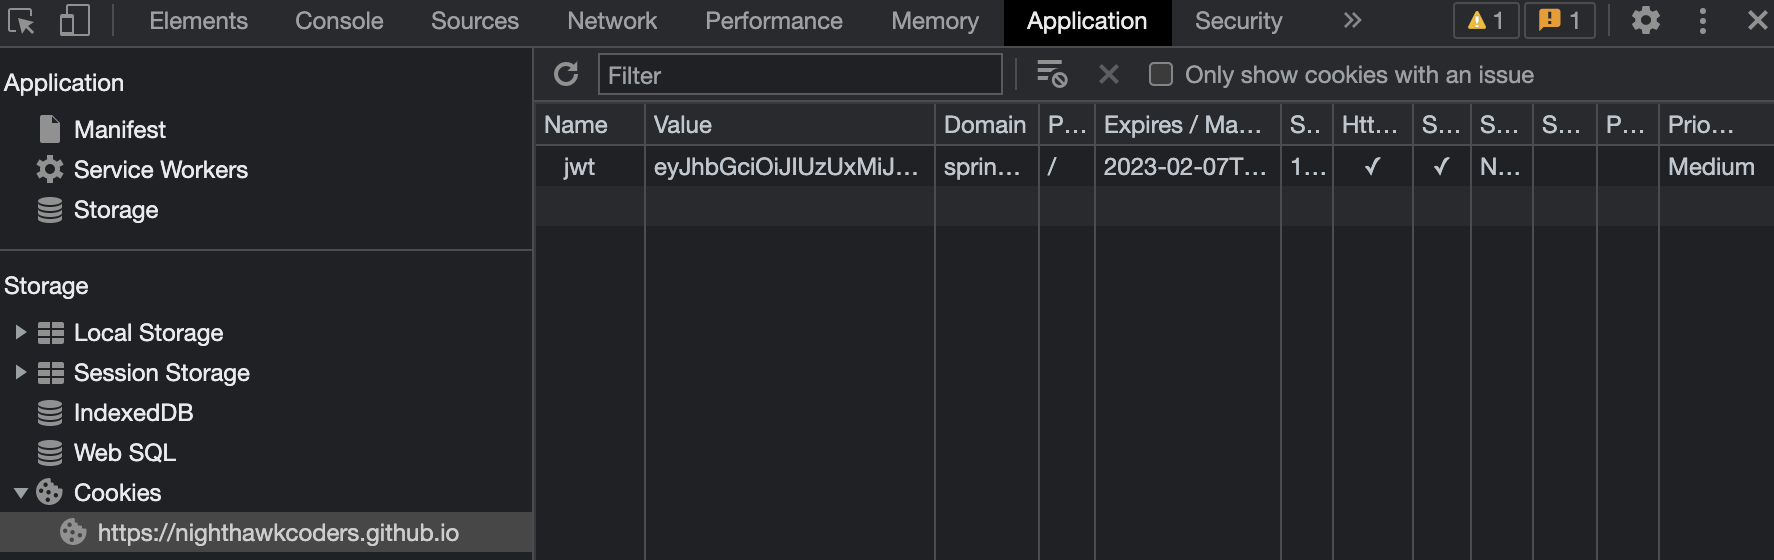
- Sample Cookie. jwt=eyJhbGciOiJIUzUxMiJ9.eyJzdWIiOiJqbTEwMjFAZ21haWwuY29tIiwiZXhwIjoxNjc1ODA0MTg2LCJpYXQiOjE2NzU3ODYxODZ9.rHoLxTcBJOBv36gH5qNI1VhgGv2Jub1OPtpddf1-fHd84BcL5MeGxiBhi2M0MpEJcuhTjeC2TYWVaOjT7ek0tg; Path=/; Max-Age=3600; Expires=Tue, 07 Feb 2023 17:09:46 GMT; Secure; HttpOnly; SameSite=None; Secure
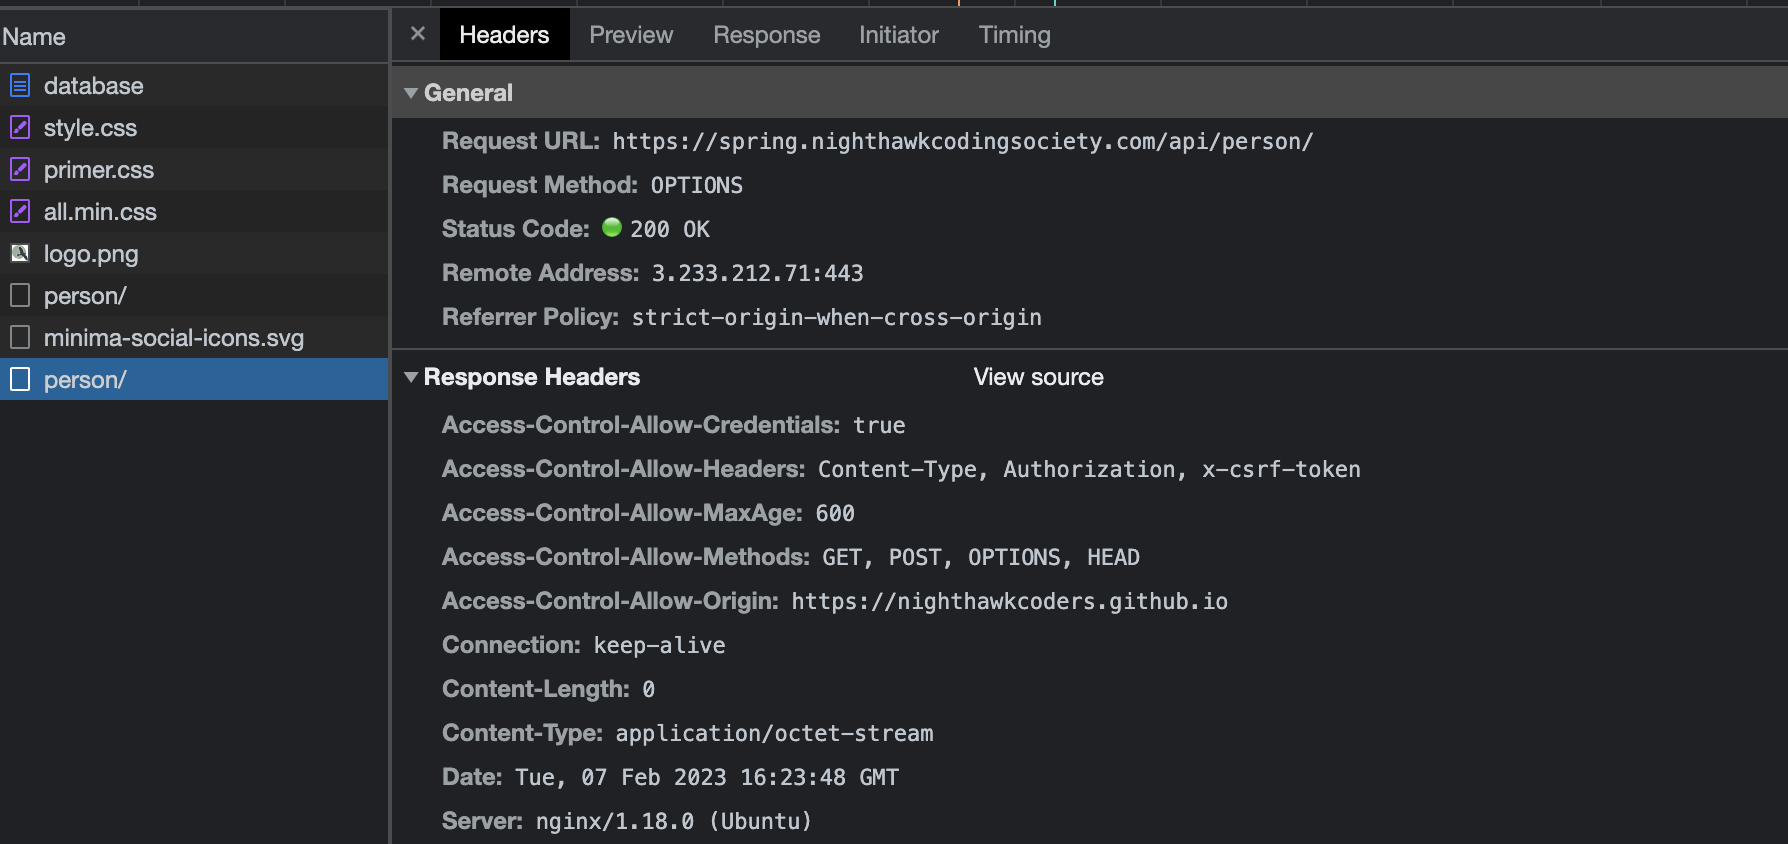
- Backend: On the backend, you can write code that checks the JWT in the Authorization header on every incoming request. If the JWT is valid, the backend determine the identity of the user and allows the request to proceed. Here is successful response.
- Frontend: When the user logs out, the frontend needs to remove the JWT.
A JWT consists of three parts, separated by dots (.). The first part is the header, which specifies the algorithm used to sign the JWT (e.g., HS256). The second part is the payload, which contains the claims. The third part is the signature, which is used to verify that the sender of the JWT is who it claims to be and to ensure that the message wasn’t changed along the way.
It is important to use HTTPS when transmitting JWTs to ensure that the JWT is not intercepted by an attacker. It is also a good idea to use short-lived JWTs (e.g., with an expiration time of one hour) and to refresh them frequently to reduce the risk of unauthorized access.
Storing JWT
There are a few different options for storing a JWT in a JavaScript application:
- Cookies: You can store the JWT in a cookie and send it back to the server with each request. This is a simple and widely-supported option, but it has some limitations. For example, you can’t access cookies from JavaScript on a different domain, and some users may have cookies disabled in their browser settings.
- Local storage: You can store the JWT in the browser’s local storage (localStorage) or session storage (sessionStorage). This option allows you to access the JWT from JavaScript on the same domain, but it is vulnerable to cross-site scripting (XSS) attacks, where an attacker can inject malicious code into your application and steal the JWT from the storage.
- HttpOnly cookie: You can store the JWT in an HttpOnly cookie, which is a cookie that can only be accessed by the server and not by client-side JavaScript. This option provides some protection against XSS attacks, but it is still vulnerable to other types of attacks, such as cross-site request forgery (CSRF).
ChatGPT says … It is generally recommended to use a combination of options to provide the best security for your application. For example, you could store the JWT in an HttpOnly cookie and also in local storage, and use JavaScript to send the JWT from local storage to the server with each request. This way, you can still access the JWT from JavaScript on the same domain, while also protecting against XSS attacks.
However, for implementation we we will use ** #3 HttpOnly Cookie **.
Key Configuration Areas
Nginx configuration snippet (Client to this Server):
Nginx. Focus on add_header in preflight section that allow cross domain (github.io) to access server. ```java location / { proxy_pass http://localhost:8085;
    # Preflighted requests
    if ($request_method = OPTIONS ) {
            add_header "Access-Control-Allow-Credentials"  "true";
            add_header "Access-Control-Allow-Origin"  "https://myclient.github.io";
            add_header "Access-Control-Allow-Methods" "GET, POST, OPTIONS, HEAD";
            add_header "Access-Control-Allow-MaxAge"  600;
            add_header "Access-Control-Allow-Headers" "Content-Type, Authorization, x-csrf-token";
            return 200;
    }

} ```
Python. JWT / Authenticate API
Python. Build an API to respond with a Cookie. This will have type, path, age, and allow for cross-origin (sameSite).
- Response Cookie: {“jwt”, jwt}
- HTTP Only: true
- Secure: true
- Path: “/”
- Max Age: 3600
- Same Site: “None, Secure” /
Python. Security Config
Setup access control credentials
- “Access-Control-Allow-Credentials”, “true”
- “Access-Control-Allow-ExposedHeaders”, “*”, “Authorization”
- “Access-Control-Allow-Headers”, “Content-Type”, “Authorization”, “x-csrf-token”
- “Access-Control-Allow-MaxAge”, “600”
- “Access-Control-Allow-Methods”, “POST”, “GET”, “OPTIONS”, “HEAD”
- AllowedOrigins: “https://myclient.github.io, http://localhost:4000”
Authenticate with JWT in a JavaScript application:
This example sends a POST request to the /authorize endpoint with the user’s credentials in the request body. If the login was successful, the server will return a 200 OK response with the JWT set to Application properties.
/// URL for deployment
var url = "https://flask.nighthawkcodingsociety.com"
// Comment out next line for local testing
// url = "http://localhost:8085"
// Authenticate endpoint
const login_url = url + '/authenticate';


function login_user(){
    // Set body to include login data
    const body = {
        email: document.getElementById("uid").value,
        password: document.getElementById("password").value,
    };

    // Set Headers to support cross origin
    const requestOptions = {
        method: 'POST',
        mode: 'cors', // no-cors, *cors, same-origin
        cache: 'no-cache', // *default, no-cache, reload, force-cache, only-if-cached
        credentials: 'include', // include, *same-origin, omit
        body: JSON.stringify(body),
        headers: {
            "content-type": "application/json",
        },
    };

    // Fetch JWT
    fetch(login_url, requestOptions)
    .then(response => {
        // trap error response from Web API
        if (!response.ok) {
            const errorMsg = 'Login error: ' + response.status;
            console.log(errorMsg);
            return;
        }
        // Success!!!
        // Redirect to Database location
        window.location.href = "/APCSA/data/database";
    })
}
You can then use the JWT for authentication in subsequent fetch requests as the browser sends JWT in the Authorization header. Here is an example, but there is ** Nothing Unique ** in this example, as client/browser send authorization to server, just make sure to capture errors.
// prepare HTML result container for new output
  const resultContainer = document.getElementById("result");

  // prepare URL
  var url = "https://flask.nighthawkcodingsociety.com/api/person/";
  // Uncomment next line for localhost testing
  // url = "http://localhost:8085/api/person/";

  // set options for cross origin header request
  const options = {
    method: 'GET', // *GET, POST, PUT, DELETE, etc.
    mode: 'cors', // no-cors, *cors, same-origin
    cache: 'default', // *default, no-cache, reload, force-cache, only-if-cached
    credentials: 'include', // include, *same-origin, omit
    headers: {
      'Content-Type': 'application/json',
    },
  };

  // fetch the API
  fetch(url, options)
    // response is a RESTful "promise" on any successful fetch
    .then(response => {
      // check for response errors and display
      if (response.status !== 200) {
          const errorMsg = 'Database response error: ' + response.status;
          console.log(errorMsg);
          const tr = document.createElement("tr");
          const td = document.createElement("td");
          td.innerHTML = errorMsg;
          tr.appendChild(td);
          resultContainer.appendChild(tr);
          return;
      }
      // valid response will contain json data
      response.json().then(data => {
          console.log(data);
          for (const row of data) {
            // tr and td build out for each row
            const tr = document.createElement("tr");
            const name = document.createElement("td");
            const id = document.createElement("td");
            const age = document.createElement("td");
            // data is specific to the API
            name.innerHTML = row.name;
            id.innerHTML = row.email;
            age.innerHTML = row.age;
            // this build td's into tr
            tr.appendChild(name);
            tr.appendChild(id);
            tr.appendChild(age);
            // add HTML to container
            resultContainer.appendChild(tr);
          }
      })
  })
  // catch fetch errors (ie ACCESS to server blocked)
  .catch(err => {
    console.error(err);
    const tr = document.createElement("tr");
    const td = document.createElement("td");
    td.innerHTML = err + ": " + url;
    tr.appendChild(td);
    resultContainer.appendChild(tr);
  });
Hacks
This is first time that a nighthawkcoding society apps are under JWT. There are some best practices, but these are simply preliminary thoughts. These can be done in your project or on mine.
- GitHub Pages Application
- Make a Login and SignUp option in upper left corner of page. To handle this well it may require some them adjustment. Login or Name should alway be displayed in upper right corner, review csa.nighthawkcodingsociety.com for example.
- Only block or present login/signup page when someone fails on a fetch of something that is unauthorized.
- Flask Application
- Add Roles to authentication
- Bring JavaScript or Flask/Jinja2 Admin operations into this page. Some Jinja2 exists in the flask_portfolio project,
- Blog or Video on your successes and how you got there.
Hack Helpers for Flask
Additional user and security elements.
- Flask-Security is a Flask extension that provides many security features, including user authentication and authorization. It allows you to easily integrate user authentication into your Flask application by providing a set of pre-built views and forms for login, registration, password reset, and more.
- To use Flask-Security with your own user database, you will need to configure the extension to use your database instead of the default SQLite database. Here are the steps you can follow to configure Flask-Security to use your own user database:
- Install Flask-Security and the necessary database driver. For example, if you are using PostgreSQL, you would install Flask-Security and the psycopg2 driver with the following commands:
- Add to requirements.txt: Flask-Security, psycopg2-binary, Flask-JWT-Extended
- Add Flask-Security extension in your Flask application: __init__py
from flask_security import Security, SQLAlchemyUserDatastore
from flask_sqlalchemy import SQLAlchemy
from flask_jwt_extended import JWTManager, create_access_token, jwt_required


app = Flask(__name__)
app.config['SQLALCHEMY_DATABASE_URI'] = 'your_database_uri'
app.config['SQLALCHEMY_TRACK_MODIFICATIONS'] = False
app.config['SECRET_KEY'] = 'your_secret_key'
app.config['JWT_SECRET_KEY'] = 'your_secret_key'
jwt = JWTManager(app)

db = SQLAlchemy(app)
security = Security(app, SQLAlchemyUserDatastore(db))
-
This initializes the extension with a SQLAlchemyUserDatastore, which is responsible for interacting with your database.
-
Define your User and Role models in your application. These models should inherit from the SQLAlchemy db.Model class and implement the necessary fields and methods required by Flask-Security. For example: RoleMixin and UserMixin
class Role(db.Model, RoleMixin):
    id = db.Column(db.Integer(), primary_key=True)
    name = db.Column(db.String(80), unique=True)
    description = db.Column(db.String(255))

class User(db.Model, UserMixin):
    id = db.Column(db.Integer, primary_key=True)
    email = db.Column(db.String(255), unique=True)
    password = db.Column(db.String(255))
    active = db.Column(db.Boolean())
    confirmed_at = db.Column(db.DateTime())
    roles = db.relationship('Role', secondary=roles_users, backref=db.backref('users', lazy='dynamic'))
- Create a SQLAlchemyUserDatastore and initialize the Flask-Security extension:
user_datastore = SQLAlchemyUserDatastore(db, User, Role)
security = Security(app, user_datastore)
- The create_access_token() function creates a JWT with the user’s ID as the token’s identity. You can customize the contents of the token by passing additional parameters to the function. For example, to include the user’s email in the token, you can do:
access_token = create_access_token(identity=user.id, additional_claims={'email': user.email})
- Define a route for user authentication, where the user provides their email and password in the request body. In this example, we’ll assume that the email and password are stored in the User model we defined earlier.
from models import User

@app.route('/login', methods=['POST'])
def login():
    email = request.json.get('email', None)
    password = request.json.get('password', None)

    user = User.query.filter_by(email=email).first()

    if not user or not user.check_password(password):
        return jsonify({'message': 'Invalid credentials'}), 401

    access_token = create_access_token(identity=user.id)
    return jsonify({'access_token': access_token}), 200
- Use the @login_required and @roles_accepted decorators to secure endpoints in your Flask views. The @login_required decorator ensures that only authenticated users can access the endpoint, while the @roles_accepted decorator ensures that only users with the specified roles can access the endpoint.
@app.route('/protected', methods=['GET'])
@jwt_required()
def protected():
    return jsonify({'message': 'This is a protected endpoint!'})

@app.route('/admin')
@roles_accepted('admin')
def admin():
    return 'This is a secured endpoint for users with the admin role only!'
- Restrict access to the admin endpoint to users with the admin role, you need to create a role with the name admin and assign it to the appropriate user(s):
# create an admin role
admin_role = user_datastore.create_role(name='admin', description='Administrator')

# create a user with the admin role
admin_user = user_datastore.create_user(email='admin@example.com', password='password')
user_datastore.add_role_to_user(admin_user, admin_role)

# commit the changes to the database
db.session.commit()
- To implement authentication and return a JWT (JSON Web Token) in Flask, you can use the Flask-JWT-Extended extension. Here’s an example of how to implement authentication and return a JWT: