Cloud Workspace Automation Plan
The primary goal is to provide cloud-based Student Desktops for use in the classroom, accessed through District-issued Chromebooks. This cloud computing approach offers cost savings over traditional on-premise desktops and ensures rapid access to up-to-date hardware/software through cloud providers.
- Desktop Usage
- Automation Planning
- Automation Terraform and AWS CLI
- TBD Plans
Desktop Usage
Primarily, most students have brought their own laptop to school (MacOs or Windows). To provide access to all students, the AWS/Kasm Cloud Desktop solution was created. These Fall 2023 numbers reflect the usage of cloud computers. For the year we have had 43 users, 34 remain active. Cloud computing requests have been both temporary and permanent.
| Class/Section | Periods | Classroom(s) | Number of Students | Cloud Desctop |
|---|---|---|---|---|
| AP Computer Science A | 2 | A101 | 60 | 3 |
| AP Computer Science Principles | 4 | A101,A153 | 150 | 23 |
| AP Computer Science Software Engineering | 2 | A153 | 44 | 17 |
Cloud Computing Traditionally, classrooms have been serviced by on premise desktops; costs can be high, and the aging of machines can be rapid. The purpose of this project is to create workspaces, similar to laptops/desktops, but in the cloud. The students would use their District issued Chromebook to access these cloud workspaces, which would enable them to perform coding work in their Computer Science Pathway. The early cost number analysis has indicated that this could be much more affordable in a 5 year cycle, plus aging amd maintenace of equipment is now outsourced to the cloud provider.
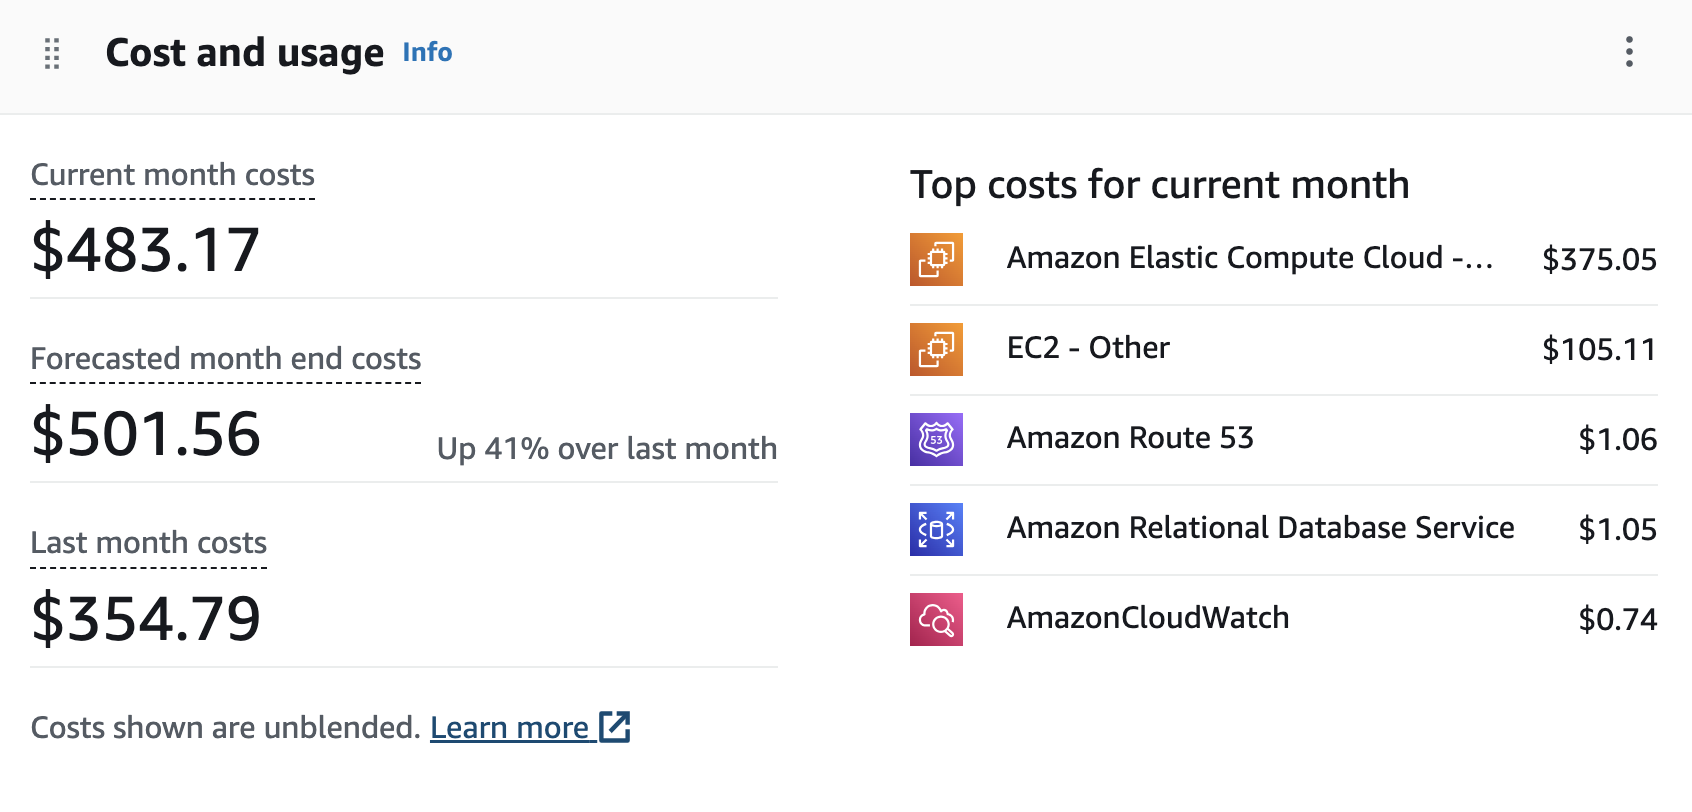
Monthly Services/Breakdown
This shows total cost of about 2 machines per year. 10 months x $500 = $5000
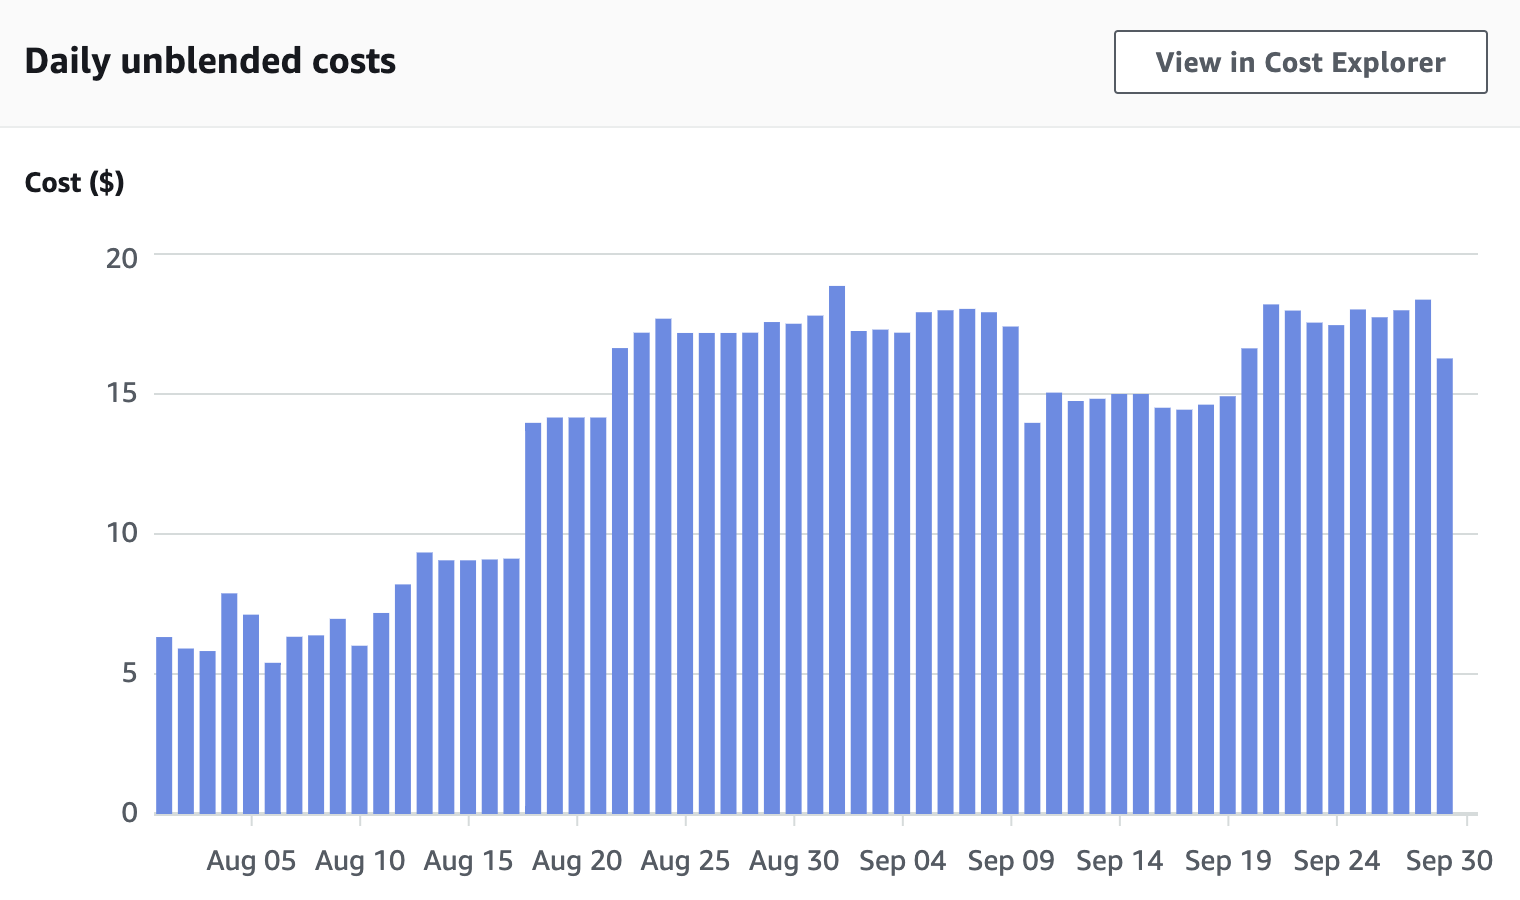
Daily Usage
This shows ramp up ‘till mid August, cost savings from turning off machines 12-midnight to 6am on September 9th, and then adding other educational services on September 19th. Last day is always partial
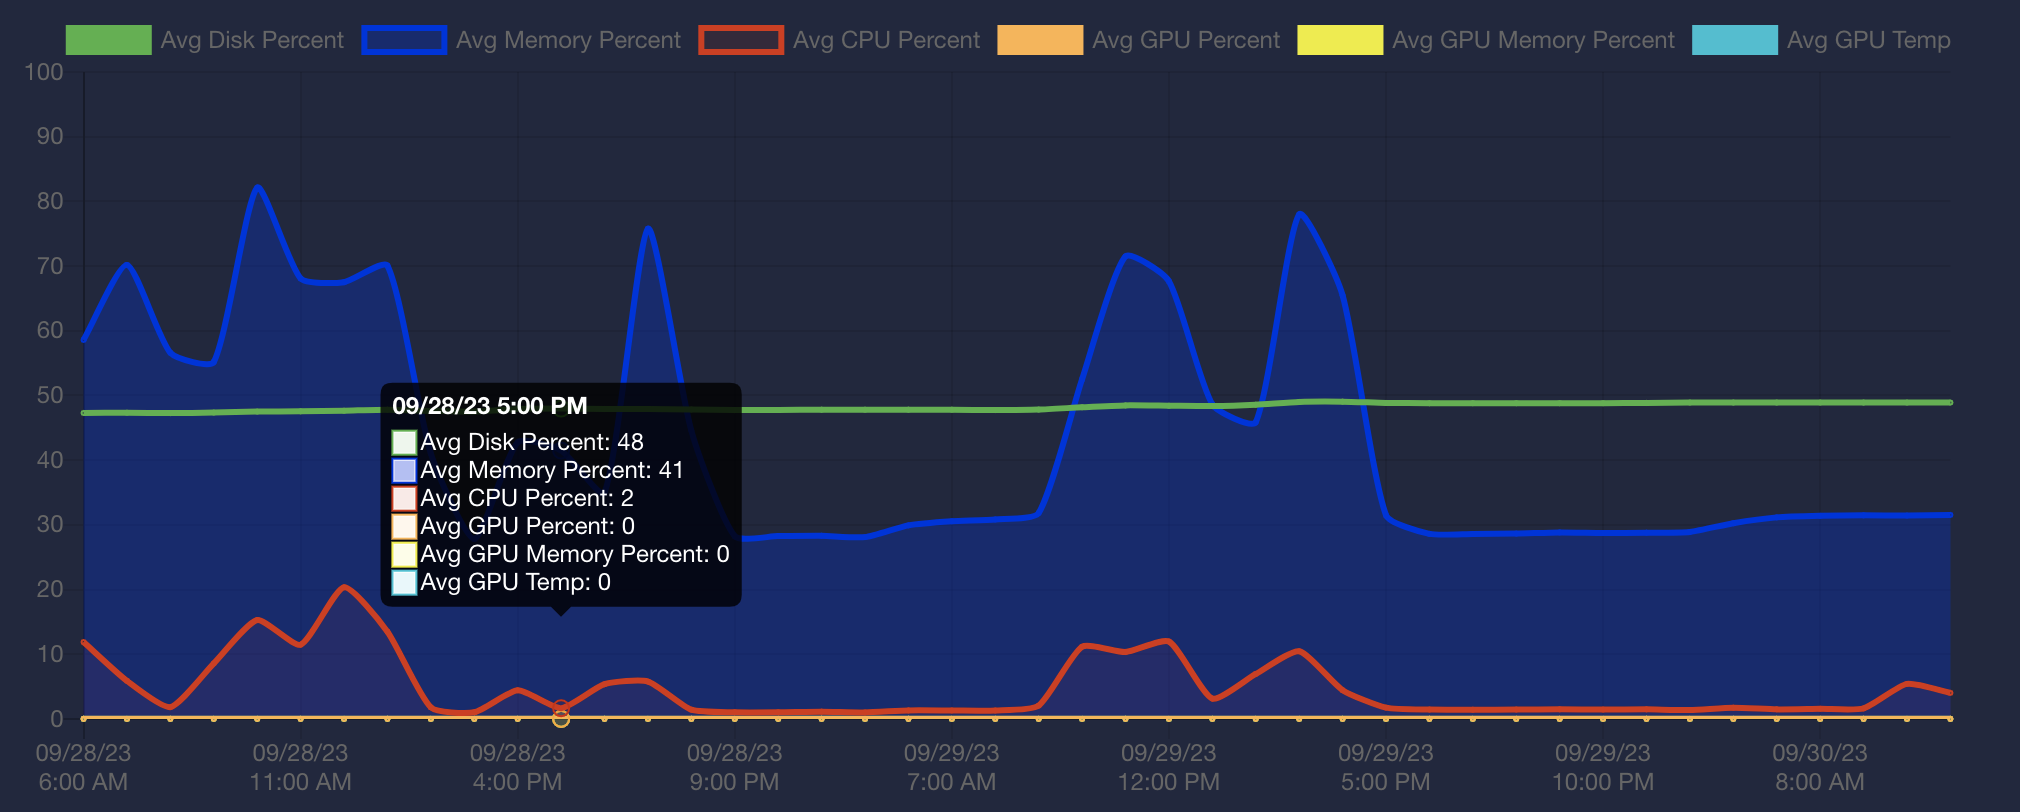
Usage Patterns
In existing Kasm configuration, single server, there is intent to have no more than 3 active users on a single server machine.
Graph show usage of 1 of 11 machines in network from Thu morning to Sat morning.
- Peaks are during Thursday and Friday class time
- There is a Thu night “homework” access, showing home access
- Friday night to Saturday have no usage
Server / User Last Session
This first table show last sessions on kasm101. All during school hours.
| Server | Username | Last Session |
|---|---|---|
| kasm101 | arnavnadar | 2023-09-29 14:31:38 |
| kasm101 | zidaneahmed01 | 2023-09-29 11:20:10 |
| kasm101 | adibricks | 2023-09-29 09:55:54 |
This table shows that only two sessions of the 11 machines and 34 users were established on Friday night. Showing that system could be optimized by using multi-server and establishing servers according to demand.
| Server | Username | Last Session |
|---|---|---|
| kasm200 | noratheturtle | 2023-09-29 21:47:04 |
| kasm104 | deanphillips24 | 2023-09-29 20:14:53 |
| kasm202 | tanisha | 2023-09-29 14:45:40 |
| kasm203 | ashwinv93 | 2023-09-29 14:34:09 |
| kasm301 | jasonguan1012 | 2023-09-29 14:33:26 |
Automation Planning
This automation plan set out to create cloud-based AWS EC2’s and provision them with Kasm workspaces. After many experiments with manual configurations, a recipe for servers and tools was created. The recipe was converted to Terraform plans and Kasm/Docker containers to produce cloud-desktops to meet Computer Science tools needs.
The automation process involves setting up AWS EC2 instances with Ubuntu Linux images and provisioning them with Kasm workspaces. A Kasm workspace, built on docker containers, provides an operating system, desktop environment, and software development tools for the Computer Science classroom students.
Automating Cloud Setups The following illustration assumes a Terraform recipe being pushed to each AWS EC2, the EC2 instances are provisioned with Ubuntu Linux images. The names Kasm1.ncs.com, Kasm2.ncs.com, ... represent cloud machines connected to a Kasm registry, the registry is a means of providing containerized desktop software. Each image + Kasm containerized software provides an operating system, desktop environment, and software development tools.
Diagram illustrating AWS EC2 instances with Kasm workspaces
            AWS EC2 Ubuntu Linux instances (1 to N)
            ----------------------------------------
            |-> Kasm1.ncs.com 5 logins/3 sessions <-|
            |                                       |
            |-> Kasm2.ncs.com 5 logins/3 sessions <-|
Terraform-->|                                       |<->Kasm
 (recipe)   |-> Kasm3.ncs.com 5 logins/3 sessions <-| workspace
            |                                       |
            |-> Kasm4.ncs.com 5 logins/3 sessions <-|
            |                                       |
            |-> KasmN.ncs.com 5 logins/3 sessions <-|
            ^ ------------------------------------- ^
            ^                                       ^
         AWS CLI                               Kasm Registry
           VPC                                     HTTP
Terraform recipe The term recipe is used to describe all the elements needed to build the AWS EC2 Ubunto images. Terraform is the tool that drives the process, AWS CLI is tool chain that delivers the content. A Terraform recipe, as in a cooking recipe, has many steps, intermediate processes, and outcomes. These steps, processes, and outcomes are detailed and form the majority of the content in this document.
Kasm workspace In this context, the term workspace is used to describe the process of defining and delivering a computing environment that users can use to access a simulated desktop and development applications. Kasm registry is a distribution marketplace that works over HTTP. A workspace is defined by a Docker/DevOps engineer and is distributed as a Docker container, a workspace recipe, through the Kasm registry. A workpace adminstrator installs Kasm workspace on the Kasm instance. The installed Kasm workspace, after installation, can be run by a user to initiate a session on the AWS EC2 Ununtu Linux instance.
Scaling and Management To scale the number of students using the workspaces, each machine can have up to 5 user logins per instance (for free license), but based on resources consumed, it would adequately serve 3 active sessions. There are many additional Terraform, AWS and/or Kasm features to allocate resources, scale resources, and timeout inactive workspace sessions. Additionally, machines can be put to sleep, for instance 12am to 6am daily to save on cost;woken up based off of demand weekends and holidays. All the machines are on a AWS Virtual Private Cloud (VPC), in this type of an environment Amazon has provided many additional tools and process to manage usage and control costs.
Setup Requirements (Part 1 - System Setup)
System setup These are features requirements that get the Kasm system running on AWS EC2 Ubuntu. The following specifications have been captured by a proof of concept analysis. Terraform is the selected tool for building recipes, AWS is the infrastructure, and GitHub will be used for version control.
AWS EC2 Instances
AWS instances are spread over 3 regions. By default, AWS only allows 5 public IP addresses per region. Because of this limitation, this inital configuration uses 3 regions to obtain 11 machines to server 33 simultaneous users. This limitation would be overcome by refactoring to multi-server Kasm configuration.
To set up the first 5 AWS EC2 instances, we will use the following specifications:
- Region Oregon (us-west-2)
- Instance t2.medium (2 x CPU, 4 Gib RAM)
- Architecture x86
- Use “Kasm” key pair in Oregon VPC
- Storage 60 Gib gp3 general purpose SD
- Allow SSH, HTTP, HTTPS
To setup next 4 AWS EC2 instance, we will use the same configuration with the following modifications.
- Region N. Virginia (us-east-1)
- Instance t2.medium (2 x CPU, 4 Gib RAM), but identier is specific to VPC
- Use “Kasm” key pair in N. Viginia VPC
To setup final 2 AWS EC2 instance, we will use the same configuration with the following modifications. Note, cost is slightly more expensive using California.
- Region N.California (us-west-1)
- Instance t2.medium (2 x CPU, 4 Gib RAM), but identier is specific to VPC
- Use “Kasm” key pair in N.California VPC
Pool of Kasm workspaces
Additionally, we will install Kasm version 1.13.1 using the provided scripting commands. We will have a pool of servers kasm10<N>, kasm20<N>, kasm30<N>. The pool of servers required is based of off the number of Users divided by 5. Each kasm instance will only support 5 users, 3 simulaneous access.
To perform proof of concept we will build kasm workspace (kasm100 to kasm104, kasm200 to kasm2003, kasm300 to kasm301). The kasm101` machine is used to test the features Kasm workspaces with the automated installs.
# Reference: https://Kasmweb.com/docs/latest/install/single_server_install.html
cd /tmp
curl -O https://Kasm-static-content.s3.amazonaws.com/Kasm_release_1.13.1.421524.tar.gz
tar -xf Kasm_release_1.13.1.421524.tar.gz

# Automate prompts for EULA, Swap Partition,and Port
sudo bash Kasm_release/install.sh --accept-eula --swap-size 8192 -L 8443
Setup Requirements (Part 2 - Networking)
Networking To enable user-friendly internet access, we will allocate AWS EC2 elastic IPs and set up DNS subdomains using AWS Route 53. Nginx will be configured to reverse proxy requests to the appropriate Kasm workspaces.
Note, qw have enabled setup and verification of these steps in Terraform.
AWS EC2 elastic IPs, permanent ips
Each AWS EC2 Ubuntu Kasm instance requires a Virtual Private Cloud VPC elastic IP address. This will result in allocation of IP address that needs to be assigned to server.
- Region: Oregon (us-west-2)
- Name: Kasm1
- Allocation ID: i-0ef40a9caee208041 (Kasm1 ec2 instance ID)
AWS Route 53, Kasm DNS names to elastic IPs plan
AWS Route 53 requires setting up a DNS subdomain for each Kasm server elastic ip address. This example shows description of keys and values used in Route 53.
- Hosted Zone: nighthawkcodingsociety.com
- Record Name: Kasm100.nighthawkcodingsociety.com
- Type: A
- Routing Policy: Simple
- Alias: No
-
Value/Route traffic to: 35.165.133.250 300 - TTL (seconds): 300
Illustrate Domain Name Service (DNS)
|-------------------------------------->|
| Request, client asks                  |
|  "kasm100.nighthawkcodingsociety.com" |
|-------------------------------------->|
|         Bidirectional map             |
|-------------------------------------->|
|  Response, DNS resolve                |
|   "100.21.190.187"                    |
|<--------------------------------------|
Illustrate using dig to request
$ dig Kasm100.nighthawkcodingsociety.com

; <<>> DiG 9.10.6 <<>> Kasm100.nighthawkcodingsociety.com
;; global options: +cmd
;; Got answer:
;; ->>HEADER<<- opcode: QUERY, status: NOERROR, id: 9961
;; flags: qr rd ra; QUERY: 1, ANSWER: 1, AUTHORITY: 0, ADDITIONAL: 1

;; OPT PSEUDOSECTION:
; EDNS: version: 0, flags:; udp: 512
;; QUESTION SECTION:
;Kasm100.nighthawkcodingsociety.com. IN	A

;; ANSWER SECTION:
Kasm100.nighthawkcodingsociety.com. 300	IN A	35.165.133.250

;; Query time: 123 msec
;; SERVER: 2603:8001:4f00:4079::1#53(2603:8001:4f00:4079::1)
;; WHEN: Sat Sep 30 19:15:13 PDT 2023
;; MSG SIZE  rcvd: 79
Route 53 Sample from AWS
|Record name|Type|Routing policy|Differentiator|Alias|Value/Route traffic to|TTL| |———–|—-|————–|————–|—–|———————-|—| |kasm100.nighthawkcodingsociety.com|A|Simple|-|No|35.165.133.250|300| |kasm201.nighthawkcodingsociety.com|A|Simple|-|No|18.211.176.115|300| |kasm300.nighthawkcodingsociety.com|A|Simple|-|No|54.193.89.2|300|
Terrform Route 53 reference
Terraform aws_route53_record reference
Nginx configuration to reverse proxy Kasm DNS name to port
Nginx needs to be configured to route Kasm1.nighthawkcodingsociety.com request to port 8443.
- FYI, port can be setup with -L option during automated Kasm install.
Nginx needs to be installed on EC2 instance.
sudo apt install nginx
Illustrate Nginx to Kasm workspace
Nginx Request:        Reverse Proxy Pass:      Kasm Workspace
"kasm1.ncs.com"  ----> https://localhost:8443     Endpoint:
    ^                           |                     ^
    |                           |                     |
    |     requsts               |                     |
    |<------------------------->|      proxy          |
          responses             |<------------------->|
Nginx Request: Represents the initial request from the client to access the Kasm workspace using the domain name “kasm1.nighthawkcodingsociety.com.”, abbreviated as “kasm1.ncs.com” in illustration
Reverse Proxy Pass: Indicates the role of Nginx as a reverse proxy, forwarding the request to the appropriate Kasm workspace endpoint.
Kasm Workspace Endpoint: Represents the endpoint of the Kasm workspace (application), accessible through HTTPS on port 8443.
Certbot certificates for DNS name to HTTPs
Certbot providesfree certificates to application endpoints that serve their content over HTTPS
Install Certbot
sudo snap install core; sudo snap refresh core
sudo snap install --classic certbot
sudo ln -s /snap/bin/certbot /usr/bin/certbot
Assign certificate to nginx hosts.
sudo certbot --nginx --non-interactive --agree-tos -m Kasm1.nighthawkcodingsociety.com
Setup Requirements (Part 3 - Kasm workspaces)
Kasm workspaces will be defined and delivered as Docker containers through the Kasm registry. For Terraform automation the primary requirement is to add a registry to the default configuration that point to the Del Norte HS registry …
GitHub Registry location: https://nighthawkcoders.github.io/kasm_registry/1.0/
Automation Terraform and AWS CLI
To manage the automation, we will install Terraform and AWS CLI. The AWS CLI will be configured with AWS credentials, and we will verify access to AWS services using sts, s3, and s3api commands.
Tool installation and verification. This is a preparation step prior to using Terraform. Below are commands to configure Amazon Web Service Command Line Interface awscli, verify configuration sts, and test the Simple Storage Service s3 and s3api.
Terraformis a tool that lets you build, change, and version cloud resources safely and efficiently.AWS CLI(Amazon Web Service Command Line Interface) is a tool to manage your AWS services.
The steps below are simple instructions to install, setup, and verify these automation tools on your desktop.
#
# Automation key tools
$ brew install terraform
$ brew install awscli

# Credentials setup (~/.aws/credentials)
$ aws configure  # prompts with keys. user adds values values
# Find User Access Keys in AWS IAM, answer as follows
<<dialog #begin
AWS Access Key ID [****************PQML]:
AWS Secret Access Key [****************Smcy]:
Default region name [us-west-2]:
Default output format [json]:
dialog #end

# Credentials verification with Security Token Service (sts)
$ aws sts get-caller-identity
# Notice return of IAM user
<<stsoutput #begin

  UserId: ****************2B6D7
  Account: ******879144,
  Arn: arn:aws:iam::******879144:user/j***21

stsoutput #ends

# Verify access to view a service, using s3 -
$ aws s3 ls
# This is a list of s3 buckets, notice terra-auto directory
<<s3output #begin
2022-09-28 13:38:43 aws-cloudtrail-logs-542024879144-84383535
2022-08-09 07:00:27 elasticbeanstalk-us-west-1-542024879144
2023-05-25 12:47:32 loginzeen
2022-05-19 01:52:48 prehistoric-pals
2023-07-31 14:14:25 terra-auto
s3output #ends

# Verify and play with commands to write to a service, using s3api
$ aws s3api list-objects --bucket terra-auto
$ aws s3api put-object --bucket terra-auto --key myfile.py
$ aws s3api list-objects --bucket terra-auto
Terraform Architecture
This breakdown shows the hierarchical relationship between the variables, main module and its sub-modules. The main module calls the EC2, Kasm, Networking, Security, etc. to set up key portions of system.
Terraform Module Breakdown for EC2 Instances and Kasm Workspaces
#0. Variables
|---> Centralizes Configuration Settings
|---> Defines Input Variables Used Across Sub-Modules

#1. Main (Root Module)
|---> Creates AWS EC2 Instances
|---> Configures inbound traffic, sets up elastic ips
|---> Installs Kasm and network tools on EC2

#2. Network.tf
|---> Sets Up DNS in Route 53

#3. Nginx
|---> Configure nginx template through file provision
|---> Moves nginx.conf file into appropriate system location
|---> Depends on main.tf and network.tf

#4. Future, Security and Workspace setups
|---> Defines Kasm roles, Policies, and Security Groups
|---> Input Variables: permissions, security_groups, etc.
|---> Round-robin user population across instances (Terraform?)

#5. Reboot
|---> Checks that resources have been created, depends on nginx.tf
|---> Performs reboot, validates services are activated
Terraform Test plan
1st Stage - EC2 Instances Only:
Create a folder for your test (e.g., stage1).
- Place your variable.tf and main.tf files in the folder.
- Run
terraform initto initialize the project. - Run
terraform planto see what resources will be created. - If the plan looks good, run terraform apply to create the EC2 instances.
- Manually check the AWS Management Console to ensure that the EC2 instances are created with the correct tags and elastice IPs.
- Terraform provides the
terraform destroycommand, which you can use to destroy all the resources created by a specific Terraform configuration. Run this before moving on to next test. - Check that created EC2’s and Elastic IPs are gone.
2nd Stage - EC2 Instances and Route 53 Records:
Create a new folder for this test (e.g., stage2).
- Run
terraform initin this folder. - Run
terraform planto see what resources will be created. - If the plan looks good, run terraform apply to create the Route 53 records.
- Manually check the AWS Management Console to ensure that the Route 53 records are created correctly.
- Run
terraform destroy - Check that created EC2’s and Elastic IPs are gone.
3rd Stage - EC2 Instances, Route 53 Records, and Nginx Configurations:
Run final test from version control folder.
- Run
terraform initin this folder. - Run
terraform planto see what resources will be created. - If the plan looks good, run terraform apply to create the Nginx configurations.
- Manually check the AWS Management Console to ensure that the Nginx configurations are created in correct location.
- Test access of each EC2 instance from internet (eg. kasm2.nighthawkcodingsociety.com)
- Test access to Kasm workspaces by logging in.
- Leave these running and start testing Kasm registry and workspaces if all is well.
Version Control of Terraform files
At the very start of the project, we would like to use version control for all the Terraform elements. Long term we would expect to have a frontend/backend system to manage and monitor Kasm workspaces.
- A repository has been created, expectaion is to manage main.tf, ec2.tf, etc.
- The repository was built from a Python/Flask backend server template. It will be used for wide variety of Classroom devOps. Terraform special requirements and directory setup is required.
- The
awsclientry has been added to the requirements.txt
Terraform CLI installation reference
Nighthawkcoders DevOps GitHub Nighthawkcoders DevOps GitHub
Terraform file provision
Mostly, configurations identified in the Kasm process are key-value pairs or installation of tools. Nginx looks a bit different.
The Networking file for Nginx requires Kasm1 to be changed, this is the only difference in configuration per system (Kasm1, Kasm2, …); simply changing the server_name subdomain. This could require the use of the Terraform file provisioner feature. Listed are the template file and steps required for the change.
server {
    server_name Kasm1.nighthawkcodingsociety.com;
    listen 80;

    location / {
         # The following configurations must be configured when proxying to Kasm Workspaces

         # WebSocket Support
         proxy_set_header        Upgrade $http_upgrade;
         proxy_set_header        Connection "upgrade";

         # Host and X headers
         proxy_set_header        Host $host;
         proxy_set_header        X-Real-IP $remote_addr;
         proxy_set_header        X-Forwarded-For $proxy_add_x_forwarded_for;
         proxy_set_header        X-Forwarded-Proto $scheme;

         # Connectivity Options
         proxy_http_version      1.1;
         proxy_read_timeout      1800s;
         proxy_send_timeout      1800s;
         proxy_connect_timeout   1800s;
         proxy_buffering         off;

         # Allow large requests to support file uploads to sessions
         client_max_body_size 10M;

         # Endpoint of service
         proxy_pass https://localhost:8443;
    }
}
Nginx configuration file is placed in /etc/nginx/sites-available and then is symbolically linked to /etc/nginx/sites-enabled.
- nginx filename:
Kasm1 - file path:
/etc/nginx/sites-available/
Activate Kasm1 reverse proxy DNS request to Application Endpoint
rm -f /etc/nginx/sites-enabled/Kasm1
ln -s /etc/nginx/sites-available/Kasm1 /etc/nginx/sites-enabled
sudo systemctl restart nginx
Security and Workspace Assignment:
Kasm images are setup to support each student id and temporary password. Users of Kasm workspaces are not required to go through AWS identity and management system, they interact with Kasm workspace using Kasm system URL.
Diagram illustrating Kasm Workspaces Login Page
Browser URL https://Kasm1.nighthawkcodingsociety.com/

Login
---------------          Kasm
| You user ID |          Workspaces
---------------          The Container Streaming Platform
---------------------
| You user Password |
---------------------
Student login management
Kasm Developer API will be used to perform a round-robin assignment of Users to Kasm systems (EC2 instances). A previously developed user database will be queried to extract a JSON file which will contain unique id (ghid), username, etc. This JSON data will be sent to a Kasm system using Kasm developer API. At the end of user creation process, an email to the user with system and login credentials. At first login, student will be required to reset password.
- Kasm API Base Url: https://
/api/public/ - Database/JSON example create user: POST /api/public/create_user
{
   "api_key":"",
   "api_key_secret": "",
   "target_user": {
       "username" : "uniquq_ghid",
       "first_name" : "John",
       "last_name" : "M",
       "locked": false,
       "disabled": false,
       "organization": "Del Norte HS",
       "phone": "123-456-7890",
       "password": "TempPassword$"
   }
 }
Student database
Teacher has a student SQLite database running under Python with GitHub pages frontend. A Python backend is preferred, over Java, as AWS CLI has a Python BOTO module. Conversion from SQLite to RDS is trivial after RDS setup is established.
This database with a little modification to SQL schema and Python code, could support maintaining a list of users, APIs and calling Kasm developer APIs. The Python database currently supports standard CRUD operations that seem to map well to Kasm developer API. The frontend is managed under GitHub pages, which complies with Themes and their SASS CSS definitions.
APIs will be added to support requests and responses requirements of the Kasm API. This database will maintain the relationship of users to machines, produce reports. Starter requirements for student database follow …
- Report the list of users and Kasm relationship Illustration of Users Page
UserID	Name	       Kasm  System  Section Period
toby	Thomas Edison  true  Kasm1   CSSE    2
niko	Nicholas Tesla false desktop CSA     3
hop	    Grace Hopper   true  Kasm2   CSP     1
- Limit the number of students to a Kasm system
- 2 users maximum per period (P1-P5)
- 5 total users
System  Users P1 P2 P3 P4 P5 Note
Kasm1   5     1  1  1  1  1  ideal config
Kasm2   5     2  2  1  0  0  unbalanced, but OK
Kasm3   5     0  0  0  3  2  not allowed
Kasm4   2     0  0  2  0  0  machine with availability
-
Default password and reset to temporary password options
-
Build backend database. Start with SQLite database, move to RDS as project matures. To support database work, code starters have been added to Nighthawk coders devOps repo for User table within SQLite database.
References
Kasm workspace Architecture:
Kasm uses Docker to build workspaces and a GitHub registry to store and manage workspaces. Kasm workspaces start from a GitHub template, the template repository is infused with GitHub Pages actions. These actions build a user-friendly display of the constructed workspaces in the registry. Here are some key links to start on the journey of building workspaces within the registry. The SDLC consist of building Docker and support files, publishing to the registry, installing through the Kasm adminstrative interface on the EC2 instance, and then loading/testing on the Kasm desktop.
- Kasm workspace video https://www.youtube.com/watch?v=BGP69_f1wq0
- Kasm Registries video https://www.youtube.com/watch?v=Y6ggn9McIwI
- Be aware that Kasm system, Docker Workpaces must match versions (1.13.1)
- Default Kasm registry link: https://registry.Kasmweb.com/
Kasm requires a Registory for workspaces:
A Del Norte HS Computer Science Registry in Github has been created. Multiple locations and references in the repository are important to understand the different aspects of the registry. The Del Norte HS Computer Science Registry and its Kasm workspaces need to be developed to meet the needs of CSSE, CSP, and CSA classes. However, this work can be done asynchronously to the Terraform automation plan.
- Registry link: https://nighthawkcoders.github.io/Kasm_registry/. This link is placed into adminstrative workspaces on the Kasm1 to KasmN machines. Deployment can occur directly from a GitHub commit straight into the registered workspace, across many machines at once. Branching or Forking should be employed to avoid accidental deployments. But, the feature are in the system for success. As a strategy, a forked repo/registry could be used to manage test, then a pull request after testing could trigger production repo/registry update.
- Registry Config file. This is setup correctly for this projects purposes, but you should be aware that it is required for GitHub Pages. If registry is changed to nighthawkcodingsocity.com subdomain, then this file will need to be revised.
- GitHub for Registry. This contains the README for valuable information on setup and development. A Kasm workspace/docker developer would spend time here customizing code to support user requirements. Version Control for Docker workspaces is built into the Kasm registry and requirements should be learned from their materials and experience.
- GitHub Pages for Registry. This is a pretty view of the workspaces in the registry. The Kasm workspace registry is professionally designed, it has versions built into the URLs. By cursory review you could maintain 1.0 and 1.1 workspaces at the same time, to allow soft transitions to updates. GitHub Task collaboration was placed into each workspace allow adminstrators and users to add issues directly into GitHub. Tracking changes, and managing containerized desktops is built into the Kasm tools.
Kasm workspaces Docker layout
This below Docker file follows the Kasm format with the required head and tail sections; all customizations must be done in between. This shows setup starters for some of our required tools.
Chromeis added in this script. This was not included in bash script but is essential to GitHub Pages code-build-test-debug development lifecycle.VSCodeis shown below. In this example it is sourcing a directory installed by the Kasm image. Customizing our Kasm image can make installation process much easier.Anacondais show below. In this example you can see similarities in installation as compared to the script above. Of course, we should switch our implementation toMinicondato save space and avoid large GUI application which could impact our memory footprint. As with VSCode, we could fully manage a version of this package within our Kasm image to minimize Docker complexities.
FROM Kasmweb/core-ubuntu-focal:1.13.1
USER root
ENV HOME /home/Kasm-default-profile
ENV STARTUPDIR /dockerstartup
ENV INST_SCRIPTS $STARTUPDIR/install
ENV CONDA_DIR /opt/conda
ENV PATH $CONDA_DIR/bin:$PATH
WORKDIR $HOME

######### Customize Container Here ###########
# Install Google Chrome
COPY ./src/ubuntu/install/chrome $INST_SCRIPTS/chrome/
RUN bash $INST_SCRIPTS/chrome/install_chrome.sh  && rm -rf $INST_SCRIPTS/chrome/
# Install VSCode
COPY ./src/ubuntu/install/vs_code $INST_SCRIPTS/vs_code/
RUN bash $INST_SCRIPTS/vs_code/install_vs_code.sh  && rm -rf $INST_SCRIPTS/vs_code/
# Install Anaconda
RUN cd /tmp/ && wget https://repo.anaconda.com/archive/Anaconda3-2023.07-1-Linux-x86_64.sh \
    && bash Anaconda3-20*-Linux-x86_64.sh -b -p /opt/anaconda3 \
    && rm -r /tmp/Anaconda3-20*-Linux-x86_64.sh \
    && echo ‘source /opt/anaconda3/bin/activate’ >> /etc/bash.bashrc \
    && bash -c “source /opt/anaconda3/bin/activate \
        && conda update -n root conda  \
        && conda update --all \
        && conda clean --all” \
    && /opt/anaconda3/bin/conda config --set ssl_verify /etc/ssl/certs/ca-certificates.crt \
    && /opt/anaconda3/bin/conda install pip \
    && mkdir -p /home/Kasm-user/.pip \
    && chown -R 1000:1000 /opt/anaconda3 /home/Kasm-default-profile/.conda/ && conda install -y jupyter
######### End Customizations ###########

RUN chown 1000:0 $HOME
RUN $STARTUPDIR/set_user_permission.sh $HOME
ENV HOME /home/Kasm-user
WORKDIR $HOME
RUN mkdir -p $HOME && chown -R 1000:0 $HOME
USER 1000 (edi
Kasm workspaces have tool requirements
The provided shell script has been used in the classroom to install and verify tools on the user’s desktop. This is a good requirements guide for tools required for our Kasm workspace. The classroom workspace in the registry needs to support all tools for the code-build-test-debug development lifecycle.
Key thing to test in Kasm workspace…
makeon teacher or student repositories. The runsbundle exec jekyll servewhich helps validate ruby tool chain. This is the priority use case for August 16th.github commit and syncbe sure git operations are working and environment is or can be set.git config --global user.email <your email> git config --global user.name <your github id>sudo apt, if this can’t be used then tools need to be comprehensive.docker-compose upthis would be running Docker inside of Docker, but is in procedure to test locally prior to deployment. This can be tested with flask_portfolio or spring_portfolio repositoriescode flask_portfoliorun python web project. Specifically running python and doing pip installs and making sure VSCode python interpreter and shell interpreter are synchronized.code spring_portfoliorunning a web java project. Make sure we can get java version to support this task.workspace preservationlogin / logout, shutdown workspace, evaluate persistence.
The key concept in building a Docker workspace is understanding order and depenendies. That is illustrated in setup order within the script below…
- Install VSCode. The install_vscode() function illustrates download requirements and installation depencies.
- Install Ruby. The install_ruby() script is convention for Ubuntu command line installation.
- Install MiniConda The install_miniconda() shows this requires fetch and execute, it is not shown as working with apt.
Developer ToolsThe install_dev_tools() script highlights things that need to be on machine to support local build environments. Some of these are missing on our Kasm test environments.Conda EnvironmentThe setup_conda_environment() shows that ~/.bashrc needs to be updated to assist our development. For instance, if GEM lines are not in conda environment bundle install will overwrite system files at each user execution.Dev Tools in CondaThe install_dev_tools_in_conda() shows tools that should be setup after conda environment is activated. This avoids issues or conflict with system.
#!/bin/bash

# Function to check if a line exists in the .bashrc file
line_exists_in_bashrc() {
  grep -Fxq “$1" ~/.bashrc
}
# Function to add lines to the .bashrc file if they don’t exist
add_to_bashrc() {
  if ! line_exists_in_bashrc “$1”; then
    echo “$1" >> ~/.bashrc
  fi
}
# Function to install Visual Studio Code
install_vscode() {
  if ! command -v code &>/dev/null; then
    echo “Installing Visual Studio Code...”
    # Add VSCode repository and key
    wget -qO- https://packages.microsoft.com/keys/microsoft.asc | gpg --dearmor > packages.microsoft.gpg
    sudo mv packages.microsoft.gpg /etc/apt/trusted.gpg.d/microsoft.gpg
    sudo sh -c ‘echo “deb [arch=amd64] https://packages.microsoft.com/repos/vscode stable main” > /etc/apt/sources.list.d/vscode.list’
    # Update package index and install VSCode
    sudo apt update
    sudo apt install -y code
    echo “Visual Studio Code installed successfully.”
  else
    echo “Visual Studio Code is already installed.”
  fi
}
# Function to install ruby
install_ruby() {
# Check if ruby command is available
  if ! command -v ruby &>/dev/null; then
    echo “Installing Ruby...”
    sudo apt update
	  sudo apt install ruby-full build-essential zlib1g-dev
  else
    echo “Ruby is already installed.”
  fi
}
# Function to install MiniConda and Build environment
install_miniconda() {
  if ! command -v conda &>/dev/null; then
    echo “Installing MiniConda...”
    # Download MiniConda installer
    wget -q https://repo.anaconda.com/miniconda/Miniconda3-latest-Linux-x86_64.sh -O ~/miniconda.sh
    # Install MiniConda
    bash ~/miniconda.sh -b -p $HOME/miniconda
    rm ~/miniconda.sh
  else
    echo “MiniConda is already installed.”
  fi
}

# Common Developer tools for system
install_dev_tools() {
  echo “Installing Developer Tools...”

  # Common GNU tools
  sudo apt install build-essential
  sudo apt install make

  # Install Jekyll Development tools
  gem install jekyll bundler
}

# The environment_activate function effectively sets up the required environment configurations by adding lines to the .bashrc file only if they don’t already exist. This ensures that the modifications to the .bashrc file are performed only once and avoids duplication.
setup_conda_environment() {
  add_to_bashrc `# local environment requirement`
  add_to_bashrc ‘export PATH=“$HOME/miniconda/bin:$PATH”’
  add_to_bashrc ‘export GEM_HOME=“$HOME/gems”’
  add_to_bashrc ‘export PATH=“$HOME/gems/bin:$PATH”’
  conda init bash
}

# Specific Developer tools for GitHub Pages and Jupyter Notebooks
install_dev_tools_in_conda() {
  echo “Activate conda”
  source ~/.bashrc

  # Install Jupyter Development tools and nbconvert
  echo "Installing Jupyter Notebooks and nbconvert..."
  conda install -n base -y jupyter nbconvert
}

# Main script
install_vscode
install_ruby
install_miniconda
install_dev_tools
setup_conda_environment
install_dev_tools_in_conda
TBD Plans
Key items to add to this plan.
Web Filtering Policy
Kasm Workspaces built in Web Filtering configuration. Choose web content to black and whitelist based on URLs and Domain categorization: https://kasmweb.com/docs/latest/guide/web_filtering.html.
User Database Security and Feature
Add security to Web Database.
- User owner and Admin are only roles with rights to edit user identity
- Perform more detail analytics on Users, both around Kasm and around GitHub
Review AWS Security:
Adding a section on security to describe roles on AWS.
-
IAM Roles: Define the IAM roles and policies required for different user types, such as administrators, teacher. developers, and students. Ensure that each role has the least privilege necessary for their tasks.
-
Best Practices: AWS security best practices related to IAM, access keys, password policies, …
-
Currently blocking AWS
studentgroup from us-east-1, us-west-1, us-west-2. These regions will be reserved to teachers and those that adminstrate machines.
JSON that shows Allow Ohio, Deny all other regions. This was basis used to block student roles.
{
    "Version": "2012-10-17",
    "Statement": [
        {
            "Effect": "Deny",
            "NotAction": "ec2:*",
            "Resource": "*",
            "Condition": {
                "StringNotEqualsIfExists": {
                    "aws:RequestedRegion": "us-east-2"
                }
            }
        }
    ]
}
Terraform Life Cycle:
Include version control, test plan, and deployment plan for Terraform scripts:
-
Version Control: Explain how you will manage your Terraform code using version control systems like Git/GitHub, and how you will udates, forks, and merging.
-
Test Plan: Describe your testing strategy, including unit tests, integration tests, and end-to-end tests for the Terraform scripts. Specify how you will validate the correctness of the infrastructure.
-
Deployment Plan: Outline the steps for deploying the Terraform scripts to the test environment first, and how you will promote them to the production environment after successful testing. Make sure test environments are temporary and torn down quickly after validation save costs.
Investage and move to Kasm multi-server
Bypass limitations on AWS elastic IP and user larger servers.
- Move user home directories to S3 Buckets
- Start migration and development on new solutions: https://kasmweb.com/docs/latest/install/multi_server_install.html
- Enter into per user licensing with Kasm