VSCode, GitHub Pages Setup
A key to learning in this class is understanding how to make a GitHub Pages project. This guide will setup and run the project. At the end you will have a student Website that can be used for blogging classroom learnings and progress.
- Hacks
- Terminal and Linux Navigation (Reference for cd, pwd, mkdir, ..)
- Windows Subsytem for Linux (Windows/WSL only)
- MacOS Setup (MacOs Setup Only)
- Terminal Startup (All: WSL Ubuntu, MacOS, Cloud Ubuntu)
- Make personal Github Pages repository (All: WSL Ubuntu, MacOS, Cloud Ubuntu)
- Install tools to run Github Pages locally (All: WSL Ubuntu, MacOS, Cloud Ubuntu)
- VSCode Commit changes to pdate public GitHub Pages (All)
- Creat a Github Pages custom domain (Delayed)
Hacks
Installation Hack It is fundamental that you learn how to make your own blogging Website and make sure you begin your understanding of the following.
- Take note and describe the type of shell commands that you are using through Terminal in this installation procedure.
- wsl, cd, git, apt, brew, …
- In the Development process, developers use Version control. Annotate in notes what you have learned about Version Control while doing this setup process.
- Where are the files from GitHub placed on your local machine. How do you navigate to those files.
- Where are the files placed in the GitHub Cloud, how do you navigate to those files.
- How would you update your Template or Fork of student repository if teacher wanted you to pick up an update?
- Put into words the difference between viewing GitHub Pages running on localhost machine versus running on a deployed server.
- What is the localhost URL for your distribution? Can anyone else see it?
- What is the GitHub Pages URL for your distribution? Can anyone else see it?
- DNS is the address manager for the internet. Put into your own words how you changed the domain name of your student repository. Did you change the address?
Terminal and Linux Navigation (Reference for cd, pwd, mkdir, ..)
Windows, MacOS, and Kasm Cloud provide options for a Terminal. We will be setting up our specific environment, but we will all be working with a Linux shell inside of Terminal. This provides options where you will be running commands to mange files for code and push your code to Github.
Click for Linux navigation commands.
Learning how to move around in the terminal to access files will be very helpful and required while coding.
Windows Subsytem for Linux (Windows/WSL only)
WSL
WSL (Windows Subsystem for Linux) provides a Linux environment on a Windows computer. Linux is an open source operating system that consists of many distributions, such as Ubuntu Linux which we will install and use. Once we install Ubuntu Linux we will be able to run Linux/Unix commands. Ubuntu contains a package manager called apt that enables us to add Developer packages and libraries to the machine.
To get started, download WSL and Ubuntu (skip the following steps if you are using a Mac):
-
Open PowerShell as an administrator (Right click -> Run as administrator) and type:
wsl --install -
After the installation finishes, restart your computer
-
After restarting, a command prompt or PowerShell prompt may automatically open asking for a username. Enter a username and password to create your account.
If no prompt opens, open up PowerShell as an administrator and run:
wsl --install -d Ubuntu -
Open Command Prompt or PowerShell as a regular user (just click on Command Prompt or PowerShell), and type
wsl. The terminal’s prompt should change fromPS C:\Users\<username>to<username>@MSI:You are now ready to use Linux/Unix commands.
WSL (Reference, shows wsl commands)
As a WSL user you will need to refer to these Powershell commands when in trouble shooting issues or making changes to configuration. All of these commands work at PowerShell prompt PS C:\Users\<username>.
List all WSL commands
wsl -h
wsl -help
List all WSL distros that can be installed
wsl -l -o
To list installed WSL distros
wsl -l
wsl –list
To list installed WSL distros along with status and version
wsl -l -v
wsl -l –verbose
To run the default WSL distro
wsl
To run alternate listed distro
wsl -d distro_name
wsl –distribution distro_name
To shutdown a distro, this is like a reboot when it is acting up
wsl -t distro_name_to_shutdown
wsl –terminate distro_name_to_shutdown
To shutdown all disstros
wsl –shutdown
Set specific distro as default
wsl -s distro_name
wsl –set-default distro_name
WSL VSCode Install
VS Code provides a place to create and edit code. Follow the steps below to download VS Code onto your computer.
-
Install VS Code
-
When the installer asks to Select Additional Tasks, check “Add to PATH”.
-
Open VS Code. In the sidebar, click on “Extensions”. Search for “Remote Development extension pack” and install it.
MacOS Setup (MacOs Setup Only)
VS Code provides a place to create and edit code. Homebrew provides a developer tools installation manager.
MacOS VSCode, Homebrew Install
MacOS terminal by default is a shell that supports Linux/Unix commands. MacOS requires the addition of Homebrew which contains a package manager called brew that enables us to add Developer packages and libraries to the machine.
- VSCode install on MacOS.
- Install VSCode
- Homebrew install on MacOS. This installs a tool called “brew” which helps add and manage developer packages on MacOS.
- Follow the instruction and install Homebrew.
Terminal Startup (All: WSL Ubuntu, MacOS, Cloud Ubuntu)
This section is to used to use GitHub, sync code and test VSode installation.
Git Clone and VSCode Launch
Follow steps in order. References to WSL are not applicable if you have MacOS or Cloud Ubuntu.
-
Open Terminal (type
wslif you’re not in WSL already and on Windows/WSL) -
Move to your home directory with
cd -
Create and move into a vscode directory with:
mkdir vscode cd vscode -
Clone a repository, for example:
git clone https://github.com/nighthawkcoders/teacher.git -
Open the repository in VS Code with
code <repository name>(ex:code teacher); on Cloud you are required to open project after lanuching VSCode. Teacher will demonstrate. -
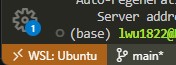
Wsl only!!! Check that VSCode is opened in WSL at the bottom left corner of the window:
Git Config
Run the following commands to configure user git connection to GitHub. This is required prior to pushing code to GitHub.
```bash
git config --global user.email <your email>
git config --global user.name <your github id>
```
Make personal Github Pages repository (All: WSL Ubuntu, MacOS, Cloud Ubuntu)
Create a personal repository. Teacher suggestion is to use Template to create your own repository.
Overview
You will want to create a personal Github Pages blog for this class. This is a place where you can code, complete the hacks, and record what you have learned.
click for Create Repository
-
Use Template to create student repository
-
Once your repository is created, click on the green “Code” button and copy the HTTPS link provided.
-
In Terminal, to your vscode directory (
cd ~/vscode). Then clone the repository withgit clone <link copied from step 3>. -
Open your repository in VS Code with
code <repository name>. Cloud Terminal requires you to open after lanuching VSCode. -
Now you can start code, code, coding!
Install tools to run Github Pages locally (All: WSL Ubuntu, MacOS, Cloud Ubuntu)
When you run your Github Pages blog locally, you will be able to see your website update with a URL that starts with http://localhost as you edit your code. This is helpful because you can test locally to see if your code works, and push error-free code to your repository.
Tools Installation Steps
Run the following commands below to setup your GitHub pages to run on your local machine (check out the comments if you’re interested in what the commands do). When we do setup there will be differences between WSL and MacOS.
If using Windows/WSL terminal
Perform steps in either option A or option B below to install required Ruby, Python, and Jupyter
# Option A -- MacOS install script, requires teacher repository
~/vscode/teacher/scripts/activate_ubuntu.sh
# Option B -- WSL/Ubuntu commands
# This section is for setting up Ruby, Python, and Jupyter Notebook on WSL (Ubuntu).

# Ugrade and install packages for Ubuntu
echo "=== Upgrade Packages ==="
sudo apt update
sudo apt upgrade -y

# Install Ruby and necessary development tools
echo "=== Install Ruby ==="
sudo apt install -y ruby-full build-essential zlib1g-dev

# Install Python 3 and pip
echo "=== Install Python ==="
sudo apt-get install -y python3 python3-pip python-is-python3

# Install Jupyter Notebook
echo "=== Install Jupyter Notebook ==="
sudo apt-get install -y jupyter-notebook

# Install Gems
export GEM_HOME="$HOME/gems"
export PATH="$HOME/gems/bin:$PATH"
echo 'export GEM_HOME="$HOME/gems"' >> ~/.bashrc
echo 'export PATH="$HOME/gems/bin:$PATH"' >> ~/.bashrc
gem install jekyll bundler
If using MacOS terminal
Perform steps in either option A or option B below to install required Ruby, Python, and Jupyter.
# Option A -- MacOS install script, requires teacher repository
~/vscode/teacher/scripts/activate_macos.sh
# Option B -- MacOS commands, perform steps manually
# This section is for setting up Ruby, Python, and Jupyter Notebook on macOS.

# Upgrade Homebrew and install xz (decompression utility)
echo "=== Upgrade Packages ==="
brew update
brew upgrade
brew install xz # decompression utility

# Install rbenv, Ruby 3.1.4, and configure it
echo "=== Install Ruby ==="
brew install rbenv
rbenv install 3.1.4
rbenv global 3.1.4

# Configure rbenv to initialize in the shell
echo 'if which rbenv > /dev/null; then eval "$(rbenv init - zsh)"; fi' >> ~/.zshrc

# Start a new terminal, test if Ruby 3.1.4 is set
rbenv versions

# Install Python and Pip using Homebrew
echo "=== Install Python ==="
brew install python

# Install Jupyter Notebook using Homebrew
echo "=== Install Jupyter Notebook ==="
brew install jupyter

# Install Gems
export GEM_HOME="$HOME/gems"
export PATH="$HOME/gems/bin:$PATH"
echo 'export GEM_HOME="$HOME/gems"' >> ~/.zshrc
echo 'export PATH="$HOME/gems/bin:$PATH"' >> ~/.zshrc
gem install jekyll bundler
If using Cloud Ubuntu
Perform steps in either option A or option B below to install Gems
# Option A -- Cloud install script, requires teacher repository
~/vscode/teacher/scripts/activate.sh
# Option B -- Ubuntu commands
# Install Gems
export GEM_HOME="$HOME/gems"
export PATH="$HOME/gems/bin:$PATH"
echo 'export GEM_HOME="$HOME/gems"' >> ~/.bashrc
echo 'export PATH="$HOME/gems/bin:$PATH"' >> ~/.bashrc
gem install jekyll bundler
Version Checks (All)
From here on commands should be the same on all classroom machines. Start a new terminal and make sure all versions of tools have taken effect.
# Show the active Ruby version, MacOS is 3.1.4
ruby -v

# Show active Python version, it needs to be 3.9 or better
python --version

####################### Apple Only ####################
# Only Apple Silicon M series, if Failure on python and pip
ln -s /opt/homebrew/bin/python3 /opt/homebrew/bin/python
ln -s /opt/homebrew/bin/pip3 /opt/homebrew/bin/pip
# Only Apple Interl Selecton, if failure on python and pip
sudo ln -s /usr/local/bin/python3 /usr/local/bin/python
sudo ln -s /usr/local/bin/pip3 /usr/local/bin/pip
##################### End Apple Only ###################

# Setup Python libraries for Notebook conversion
pip install nbconvert  # library for notebook conversion
pip install nbformat  # notebook file utility
pip install pyyaml  # notebook frontmatter

# Show Jupyter packages, nbconvert needs to be in the list
jupyter --version
# Show Kernels, python3 needs to be in list
jupyter kernelspec list # does not work on Cloud Ubuntu
Bundle Install and Make Steps (All)
Commands are the same for all Machines, Terminals, and Projects. We are all building GitHub pages websites in similar fashion.
-
Open your terminal in VS Code through View -> Terminal. Alternatively, the shortcut
Ctrl + `can be used. (Opening up VS Code’s terminal opens your student repository in the project directory.) -
Type
bundle installThis command installs the dependencies in your Gemfile. -
Type
makeThis runs the local server.
#### Apple only issue, "markdown" error ####
ln -s /opt/homebrew/share/jupyter/nbconvert ~/Library/Jupyter
- Go to the localhost link provided in the output:
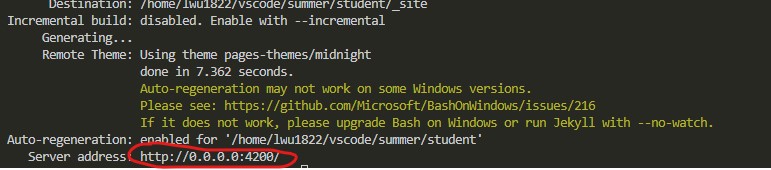
Now, whenever the blog is edited in VS Code, the local website will show the changes upon refresh (you could run make convert to check and ensure Juptyer Notebooks are built and up to date).
Make commands (local build: make, make clean, make stop, make convert)
These commands are used to build and manage a localhost version of website. The purpose of this is to verify and test code changes prior to pushing changes to GitHub Pages.
-
makeThis runs the local server -
make cleanstops the local server and cleans the files (recommended to use this to stop). This means you will be unable to access your blog on http://localhost until you runmakeagain. -
make stopstops the local server. -
make convertconverts Jupyter Notebook files, run this if your .ipynb files are not updating on the server.
VSCode Commit changes to pdate public GitHub Pages (All)
The VSCode saved files are only stored on your computer locally until you commit/sync the changes. If you go to your actual blog on the web (https://
Commit Changes, version control locally
This creates a version update in you local git database. Often developers commit several times before they sync/push. This allows lots of small changes that can be easily reviewed and rolled back. Review COMMITS in VSCode.
-
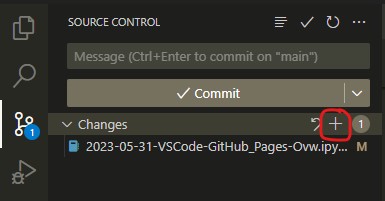
Click on the button that says “Source Control” in VS Code’s left sidebar
-
Click on the plus sign to stage your changes
-
Enter a message for your commit in the message box.
-
Click the “Commit button”
Sync Chaanges, update change in GitHub
This moves commit(s) from local git database to GitHub. This will create an Action in GitHub pages and trigger an update to the website, if code is without errors.
-
Click the Menu button and then click “Push”.

Creat a Github Pages custom domain (Delayed)
Do Not Continue
Stick with standard gihub.io domain. We will not be doing a custom domain at this time, but we will do this sometime during the year..
Overview
This process is used to change github.io to a custom domain, aka nighthawkcodingsociety.com.
AWS Route 53 is a DNS service that provides routing to web applications. When you enter a URL in your web browser, the request is sent to a DNS resolver. In our customization, the resolver finds a Route 53 server that can translate the URL’s domain intoan IP address. The Route 53 server sends the information back to the resolver, who then sends it to the browser. The browser is able to access the webpage through the IP address it has received.
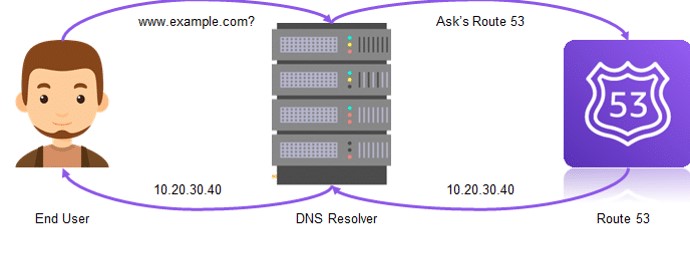
In addition, you can use Route 53 to create a subdomain that maps a Custom Domain to your Github Pages blog. In the example below, the domain https://lily.nighthawkcodingsociety.com/ will point to https://lwu1822.github.io/student/.
Steps
AWS
-
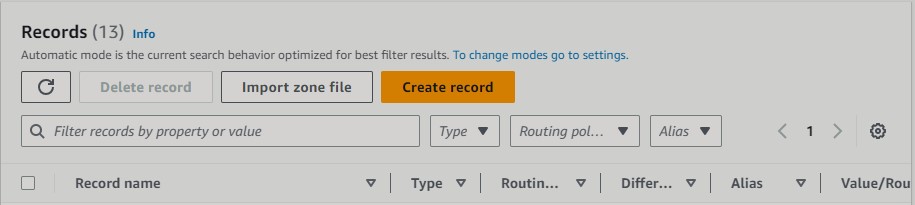
Go to AWS Route 53, and click on “Hosted zones”.
-
Click on “Create record”.
-
Create a subdomain in “Record name”. Change the “Record type” to CNAME. CNAME creates an alias that maps one domain name to another domain. Finally, in the “Value” section, enter your Github URL in the form of:
<username>.github.io. Be sure to omit the link to your repository (use<username>.github.ioinstead of<username>.github.io/student).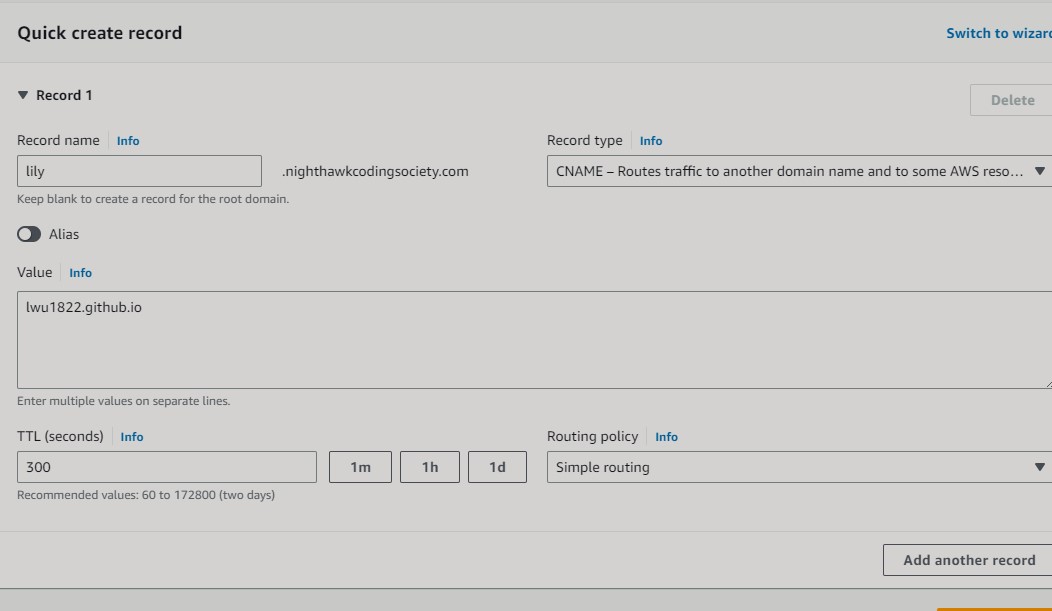
-
Click on “Create records”. Your record should look something like this:

Github Pages
-
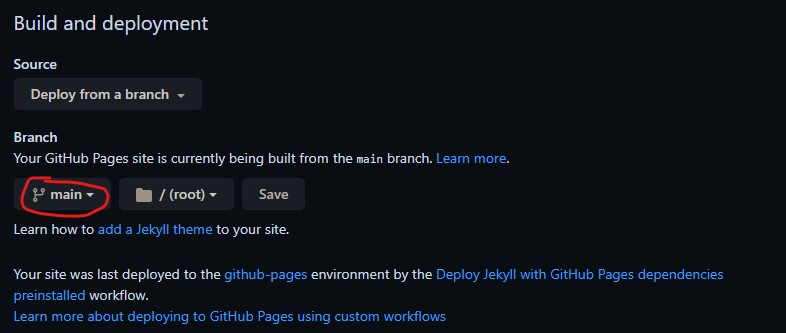
Create a Github pages repository and click on “Settings”.
-
In the sidebar, click on “Pages”. Under “Build and deployment”, ensure that the Github Pages is being built from the main branch. If you forked nighthawkcoders/student, you might need to specify that before you can move on to Step 3.
-
Enter the subdomain you configured in Hosted zones.

Github pages will run a DNS check. Once the check is successful, access your Github pages with your new subdomain name (ex: lily.nighthawkcodingsociety.com). The subdomain should redirect to your Github Pages blog.
Troubleshooting: If the check is unsuccessful, check to see that you did the “AWS” steps properly. Also check to see if you spelled the subdomain correctly in Github Pages. If that does not work, delete the record in AWS and create it again. (It took me multiple times to get it to work, even though I typed the correct domain name. So if you encounter this error, you may have to be patient.)
-
Click “Enforce HTTPS” so that the subdomain will be accessed over HTTPS.
BaseURL configuration
In _config.yml, change the line that says baseurl to:
baseurl: ""
This ensures that Github Pages is formatted correctly. This is because originally, the Github Pages site was under the subdirectory student (ex: lwu1822.github.io/student). After configuring a domain/subdomain, the baseurl would be “” since the URL would look like https://lily.nighthawkcodingsociety.com/ (no subdirectory).
As you edit this file you will observe the left panel of icons puts a help hint of ‘1’ on the Explorer icon. Later when you save (ctl-s or cmd-s) the help hint will move to the Source Control icon. You will need to commit this change and sync it to GitHub.
Troubleshooting DNS (dig)
dig is a Linux command that outputs DNS information, which can be used for troubleshooting.
Run dig <your subdomain> to check that the subdomain and the Github URL it points to is properly configured.
dig lily.nighthawkcodingsociety.com A

; <<>> DiG 9.16.1-Ubuntu <<>> lily.nighthawkcodingsociety.com A
;; global options: +cmd
;; Got answer:
;; ->>HEADER<<- opcode: QUERY, status: NOERROR, id: 14554
;; flags: qr rd ad; QUERY: 1, ANSWER: 5, AUTHORITY: 0, ADDITIONAL: 0
;; WARNING: recursion requested but not available

;; QUESTION SECTION:
;lily.nighthawkcodingsociety.com. IN    A

;; ANSWER SECTION:
lily.nighthawkcodingsociety.com. 0 IN   CNAME   lwu1822.github.io.
lwu1822.github.io.      0       IN      A       185.199.111.153
lwu1822.github.io.      0       IN      A       185.199.108.153
lwu1822.github.io.      0       IN      A       185.199.109.153
lwu1822.github.io.      0       IN      A       185.199.110.153

;; Query time: 0 msec
;; SERVER: 172.30.208.1#53(172.30.208.1)
;; WHEN: Thu Jun 15 22:45:36 PDT 2023
;; MSG SIZE  rcvd: 192
In the ANSWER SECTION, check to see that the CNAME line maps the subdomain to the Github URL.
The four IP addresses below the CNAME line are the IP addresses for Github Pages.
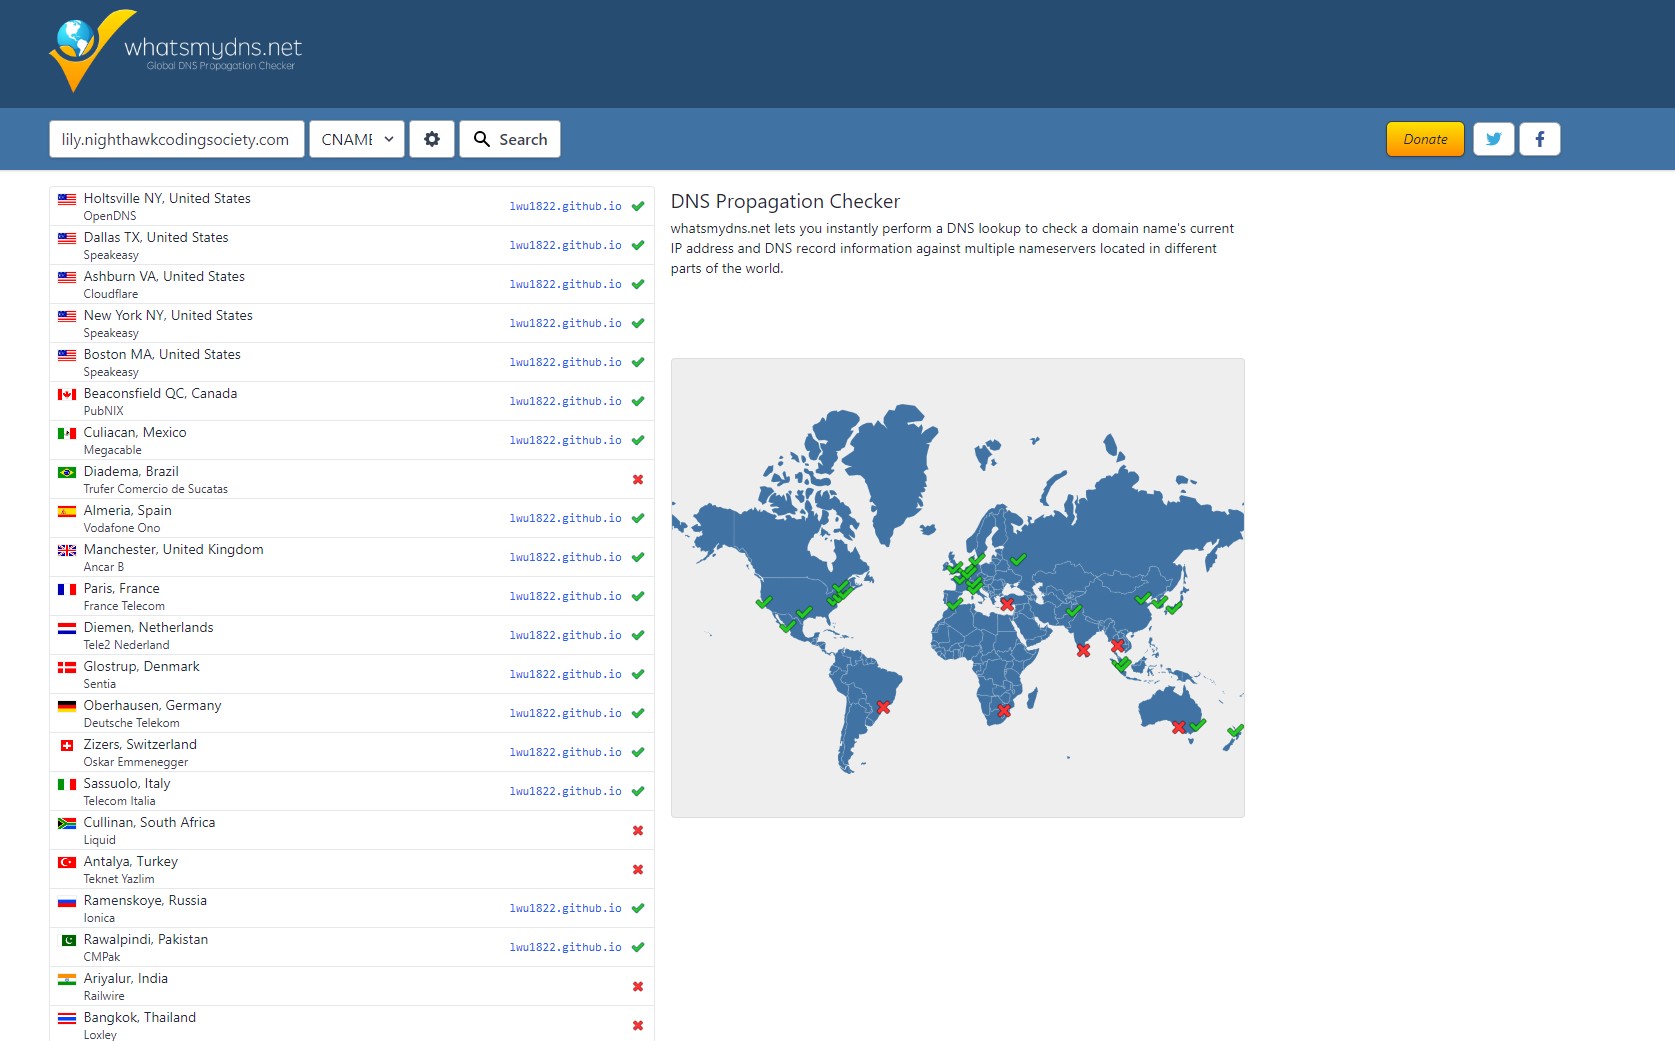
Troubleshooting DNS (whatsmydns)
In addition, you can also check to see if and where your subdomain is active through https://www.whatsmydns.net/.