Lopez | Animation | Student
Basic Steps of Animation
Below is a sprite of Mr. Lopez. This was the first sprite created for his spritesheet, which outlines the animation of his movement frame by frame.

Below is the spritesheet of Mr. Lopez. Each row has a different side of him, because in the project that we used this in, he was able to move freely in all 4 directions. His animation is simple, and depicts basic movement.
![]()
The first change that we made to the spritesheet was the addition of Mr. Lopez’s cane. This was done to show a simple difference in how sprites can appear in the game. Our next step in animation will be drawing new sprites for running and idle animation.
![]()
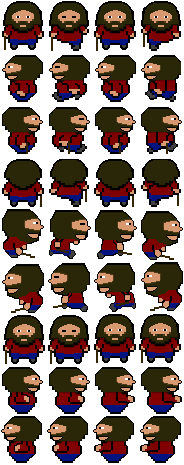
Below is the spritesheet of spritesheet with a few more rows idle animation, running, and punch (attack).
Additions to Game Levels
Adding new animations gives the player new capabilities. For example, drawing sprites for running allows the player to feel as if they are running in the game, rather than walking everywhere.
In our code, running will be based on speed, so there will be different lines in the spritesheet corresponding to different speeds (i.e. row 1 = walking).
Step 1
Download this image and change the file path to fit it.
The code is very easy to modify with new animations. The biggest change would be the changing of rows and frames, which we will be changing next. Under the players section of the var assets, make a new player for Lopez.
players: {
        lopez: {
          src: "/filepath/lopezanimation.png", // Modify this to match your file path
          width: 46,
          height: 52.5,
          idle: { row: 6, frames: 1, idleFrame: {column: 1, frames: 0} },
          a: { row: 1, frames: 4, idleFrame: { column: 1, frames: 0 } }, // Right Movement
          d: { row: 2, frames: 4, idleFrame: { column: 1, frames: 0 } }, // Left Movement
          runningLeft: { row: 5, frames: 4, idleFrame: {column: 1, frames: 0} },
          runningRight: { row: 4, frames: 4, idleFrame: {column: 1, frames: 0} },
          s: {}, // Stop the movement
        }
      },
Step 2
Make a new level in the oop-game-levels.md file by adding this to the game level section. Ensure that your tags are all the same, otherwise it will not work (i.e. player: assets.players.lopez).
new GameLevel( {tag: "lopez", background: assets.backgrounds.avenida, platform: assets.platforms.grass, scaffold: assets.scaffolds.brick, player: assets.players.lopez, enemy: assets.enemies.goomba, callback: testerCallBack } );
Step 3
Create a copy of Player.js titled Lopez.js. Add the speedLimit here.
export class Lopez extends Character {
    // constructors sets up Character object
    constructor(canvas, image, speedRatio, playerData, speedLimit) { // Add speedLimit
        super(canvas, image, speedRatio, playerData.width, playerData.height);
Step 4
Add this property of speedLimit just under your event listeners.
// Additional Property for Speed Limit
        this.speedLimit = speedLimit;
        this.currentSpeed = 0;
        this.acceleration = 0.11; // Adjust based on preference
        this.deceleration = 0.1; // Adjust based on preference
Step 5
Apply the speedLimit under the update function.
// Player updates
    update() {
        // Adjust speed based on pressed keys
        if (this.pressedKeys['a'] && this.movement.left) {
            this.currentSpeed -= this.acceleration;
        } else if (this.pressedKeys['d'] && this.movement.right) {
            this.currentSpeed += this.acceleration;
        } else {
            // Decelerate when no movement keys are pressed
            this.currentSpeed *= (1 - this.deceleration);
        }

        // Apply speed limit
        if (Math.abs(this.currentSpeed) > this.speedLimit) {
            this.currentSpeed = this.currentSpeed > 0 ? this.speedLimit : -this.speedLimit;
        }
Step 6
Now we will be adding code so that the character transitions from moving left and right to smoothly moving into a running animation. The first thing you want to do is add a threshold so that when the character reaches a certain speed the sprite image switches to that sprite row.
This will go under where it says the //Player update update(){
// Apply speed limit
        if (Math.abs(this.currentSpeed) > this.speedLimit) {
            this.currentSpeed = this.currentSpeed > 0 ? this.speedLimit : -this.speedLimit;
        }

        // Update player position based on speed
        this.x += this.currentSpeed;

        // Check for speed threshold to change sprite sheet rows
        const walkingSpeedThreshold = 1; // Walking speed threshold
        const runningSpeedThreshold = 5; // Running speed threshold
Step 7
Next we need to add code so that it can switch rows on the sprite sheet picture based on which direction you are moving.
if (Math.abs(this.currentSpeed) >= runningSpeedThreshold) {
            // Change sprite sheet row for running
            if (this.currentSpeed > 0) {
            this.setFrameY(this.playerData.runningRight.row);
            } else {
                this.setFrameY(this.playerData.runningLeft.row);
            }
        } else if (Math.abs(this.currentSpeed) >= walkingSpeedThreshold) {
            // Change sprite sheet row for walking
            if (this.currentSpeed > 0) {
                this.setFrameY(this.playerData.d.row);
            } else {
                this.setFrameY(this.playerData.a.row);
            }
            } else {
            // Revert to normal animation if speed is below the walking threshold
            this.setFrameY(this.playerData.idle.row);
            }

        // Perform super update actions
        super.update();
    }
This piece of code goes right under the previous code that we just did. Be sure to add Lopez imports to necessary JS files so it applies to different game levels.
Homework
- Implement running animations to Lopez sprite.
- Adjust speed thresholds to your preference.
Challenges (not required): Apply running animations to other characters. Make the punching animation binded to a key and make it kill an enemy.
If there are any problems, please check our Lopez.js file linked here.