Game Objects
An intro to game objects, using object literals and instantiated objects.
Overview
Animated characters, objects, and backgrounds have been essential parts of video games. Many iconic games, such as Super Mario Bros, use sprite animation to bring their characters to life, making their products more engaging and visually appealing. This blog is a brief exploration of how JavaScript can be used to create simple animations using sprites.
Spritesheet Definition
To create the animation, you need to find an image that contains each individual frame side by side, also known as a spritesheet.
Animation is achieved by quickly sequencing through a series of still images in code, allowing the images to appear as if they are moving.
Spritesheet Example
This spritesheet is used for a player in the game. Each row represents a different orientation of movement: left, right, up, and down.
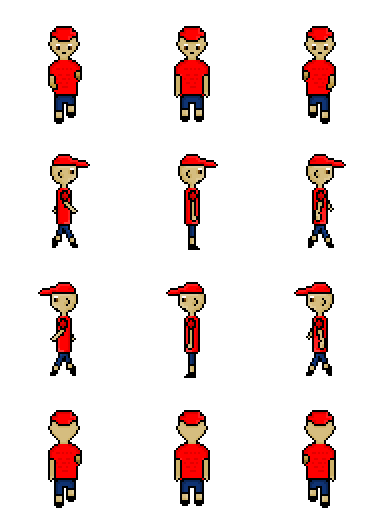
It is an option to make your own spritesheet. Many students have used Pixel Art.
Game Definitions for Character
The code snippet below outlines the data for the sprite character definition, including the location of the sprite, handling different animations for left-right-up-down, defining action keys, position, direction, and hitbox.
// Player data for Chillguy
const sprite_src_chillguy = path + "/images/gamify/chillguy.png"; // The Sprite
const CHILLGUY_SCALE_FACTOR = 5; // Sizing character, guess and check by altering value
const sprite_data_chillguy = { // Encapsulates an Object Literal for the Character's properties
    id: 'Chill Guy',
    greeting: "Hi, I am Chill Guy, the desert wanderer. I am looking for wisdom and adventure!",
    src: sprite_src_chillguy,
    SCALE_FACTOR: CHILLGUY_SCALE_FACTOR,
    STEP_FACTOR: 1000, // How many steps across the screen
    ANIMATION_RATE: 50, // Speed up or slow down animation
    INIT_POSITION: { x: 0, y: height - (height / CHILLGUY_SCALE_FACTOR) }, // Position is relative
    pixels: { height: 384, width: 512 },
    orientation: { rows: 3, columns: 4 },
    down: { row: 0, start: 0, columns: 3 },
    downRight: { row: 1, start: 0, columns: 3, rotate: Math.PI / 16 },
    downLeft: { row: 2, start: 0, columns: 3, rotate: -Math.PI / 16 },
    left: { row: 2, start: 0, columns: 3 },
    right: { row: 1, start: 0, columns: 3 },
    up: { row: 3, start: 0, columns: 3 },
    upLeft: { row: 2, start: 0, columns: 3, rotate: Math.PI / 16 },
    upRight: { row: 1, start: 0, columns: 3, rotate: -Math.PI / 16 },
    hitbox: { widthPercentage: 0.45, heightPercentage: 0.2 },
    keypress: { up: 87, left: 65, down: 83, right: 68 } // W, A, S, D
};
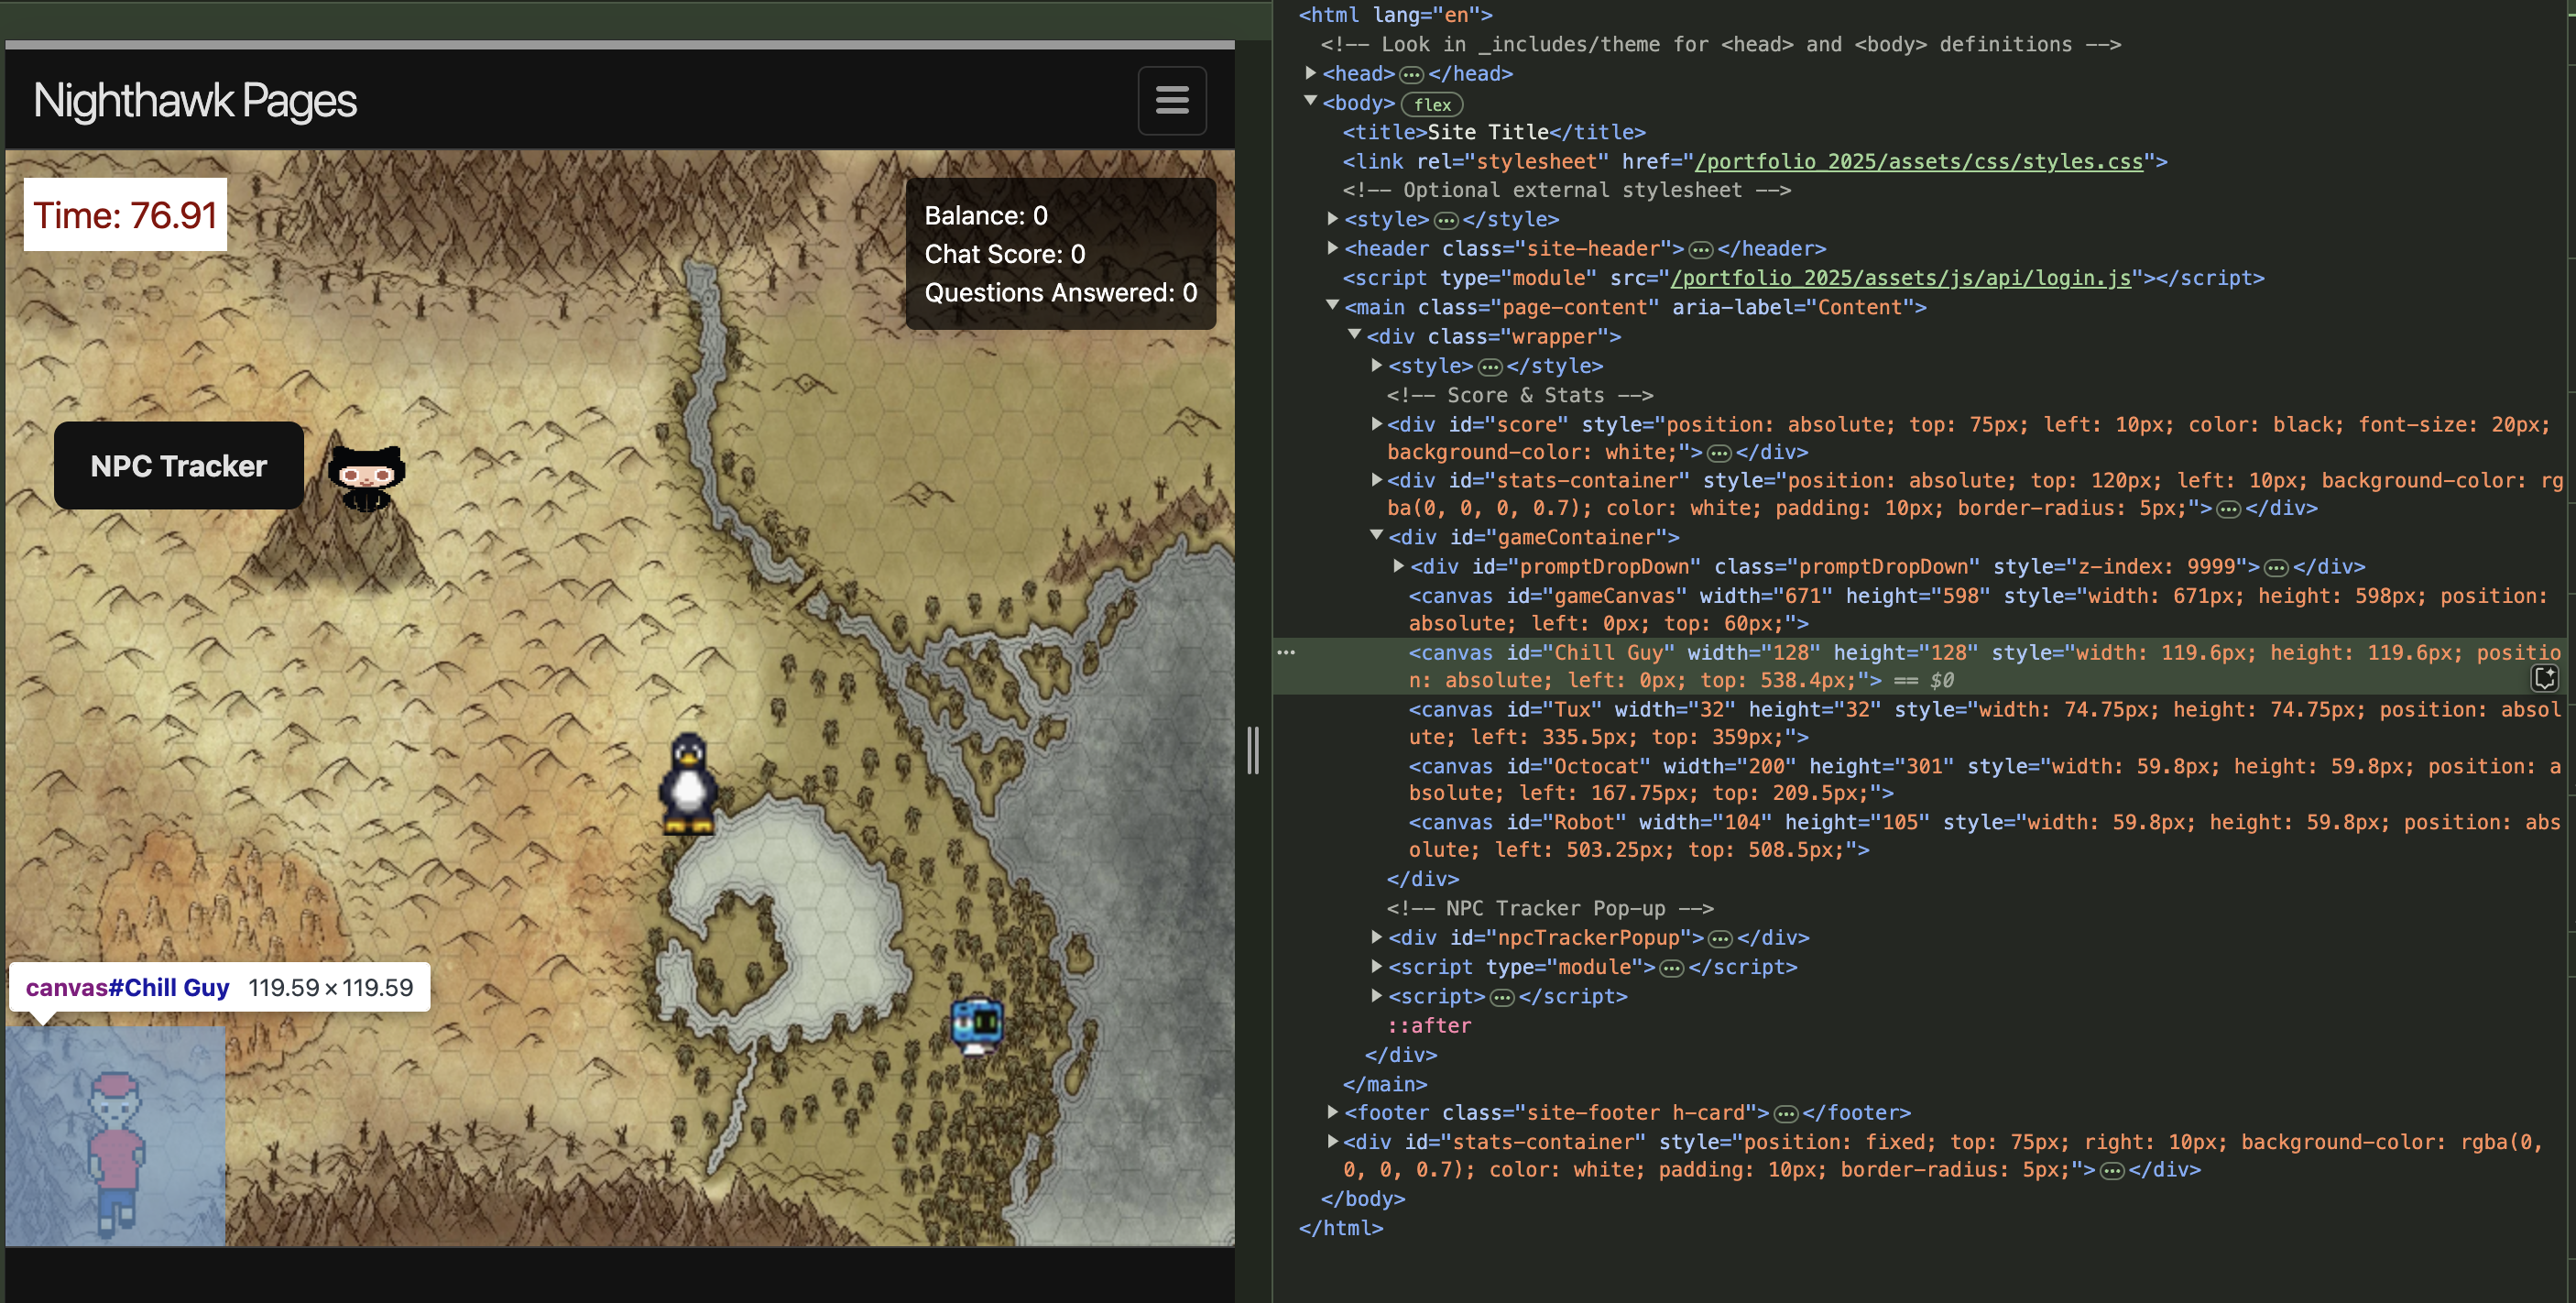
The code snippet below shows how to associate the data: sprite_data_chillguy object literal with the class: Player object-oriented programming template. Each of these class-to-data associations becomes canvas elements and objects in the game.
// List of object definitions for this level
this.classes = [
  { class: Background, data: image_data_desert },
  { class: Player, data: sprite_data_chillguy },
  { class: Npc, data: sprite_data_tux },
  { class: Npc, data: sprite_data_octocat },
  { class: Npc, data: sprite_data_robot },
  { class: Npc, data: sprite_data_r2d2 },
  { class: Npc, data: sprite_data_stocks },
  { class: Npc, data: sprite_data_crypto }
];
Each class in the classes list above is instantiated in GameLevel.js when the level is requested by GameControl.js.
create(GameLevelClass) {
    this.continue = true;
    this.gameEnv.create();
    this.gameLevel = new GameLevelClass(this.gameEnv);
    this.gameObjectClasses = this.gameLevel.classes;

    for (let gameObjectClass of this.gameObjectClasses) { // Looping through each game object class in the classes list
      if (!gameObjectClass.data) gameObjectClass.data = {};
      let gameObject = new gameObjectClass.class(gameObjectClass.data, this.gameEnv); // Using class and data, a new game object is instantiated
      this.gameEnv.gameObjects.push(gameObject);
    }

    if (typeof this.gameLevel.initialize === "function") {
      this.gameLevel.initialize();
    }

    window.addEventListener("resize", this.resize.bind(this));
}
Player extends Character
The constructor for the Character class, which is the parent class for Player, uses the data from the object literal to define a Player object.
- Game Canvas: Assigns properties to the canvas element within the constructor of the
Characterclass.// Create canvas element this.canvas = document.createElement("canvas"); this.canvas.id = data.id || "default"; this.canvas.width = data.pixels?.width || 0; this.canvas.height = data.pixels?.height || 0; this.hitbox = data?.hitbox || {}; this.ctx = this.canvas.getContext('2d'); document.getElementById("gameContainer").appendChild(this.canvas); - Player Object: Assigns properties to the
Playerobject within the extendedCharacterconstructor. ```js // Initialize the object’s scale based on the game environment this.scale = { width: this.gameEnv.innerWidth, height: this.gameEnv.innerHeight };
// Check if sprite data is provided if (data && data.src) { this.scaleFactor = data.SCALE_FACTOR || SCALE_FACTOR; this.stepFactor = data.STEP_FACTOR || STEP_FACTOR; this.animationRate = data.ANIMATION_RATE || ANIMATION_RATE; this.position = data.INIT_POSITION || INIT_POSITION;
// Load the sprite sheet
this.spriteSheet = new Image();
this.spriteSheet.src = data.src;

// Initialize animation properties
this.frameIndex = 0; // Index reference to current frame
this.frameCounter = 0; // Count each frame rate refresh
this.direction = 'down'; // Initial direction
this.spriteData = data; } else {
throw new Error('Sprite data is required'); } ```
Game Draw for Sprite
The draw() method is a crucial part of the animation process in our game. It is responsible for rendering the game character on the canvas, either using a sprite sheet for more complex animations or a simple red square as a placeholder. This method ensures that the character is drawn correctly based on its current state and position. Below is the implementation of the draw() method in Character.js.
/**
 * Draws the object on the canvas.
 *
 * This method renders the object using the sprite sheet if provided, otherwise a red square.
 */
draw() {
    if (this.spriteSheet) {
        // Sprite Sheet frame size: pixels = total pixels / total frames
        const frameWidth = this.spriteData.pixels.width / this.spriteData.orientation.columns;
        const frameHeight = this.spriteData.pixels.height / this.spriteData.orientation.rows;

        // Sprite Sheet direction data source (e.g., front, left, right, back)
        const directionData = this.spriteData[this.direction];

        // Sprite Sheet x and y declarations to store coordinates of current frame
        let frameX, frameY;
        // Sprite Sheet x and y current frame: coordinate = (index) * (pixels)
        frameX = (directionData.start + this.frameIndex) * frameWidth;
        frameY = directionData.row * frameHeight;

        // Set up the canvas dimensions and styles
        this.canvas.width = frameWidth;
        this.canvas.height = frameHeight;
        this.canvas.style.width = `${this.width}px`;
        this.canvas.style.height = `${this.height}px`;
        this.canvas.style.position = 'absolute';
        this.canvas.style.left = `${this.position.x}px`;
        this.canvas.style.top = `${this.gameEnv.top + this.position.y}px`;

        // ... Transformations and animation omitted

        // Clear the canvas before drawing
        this.ctx.clearRect(0, 0, this.canvas.width, this.canvas.height);

        // Update the frame index for animation at a slower rate
        this.frameCounter++;
        if (this.frameCounter % this.animationRate === 0) {
            this.frameIndex = (this.frameIndex + 1) % directionData.columns;
        }
    } else {
        // Draw default red square
        this.ctx.fillStyle = 'red';
        this.ctx.fillRect(0, 0, this.canvas.width, this.canvas.height);
    }
}
Hacks
In the initial development of this game, it was intended to have some default behaviors. Here are a couple of elements that should be revived:
- A red square for player one and a green square for player two. There are some definitions in the game to support alternatives.
- Instead of a static definition of the default direction as down, it would be beneficial if the snowspeeder was facing right.
- Idle animations were lost along the way of development and should be revived.
- Instead of idle being no movement, it seems like the snowspeeder or squid should be moving slightly according to their game environment.
College and Game Terms
This lesson discusses some key concepts that are a part of the requirements for this course.
A. Define a JavaScript Object Notation (JSON) and an Object Litteral. Provide an example from this lesson.
- JSON: JSON is a lightweight data interchange format that is easy for humans to read and write, and easy for machines to parse and generate. It is often used to transmit data between a server and a web application.
- Object Literal: An object literal is a comma-separated list of name-value pairs wrapped in curly braces. It is a way to create a single object with properties and methods.
- Example: The
sprite_data_chillguyobject in the lesson is an example of JSON-like data structure in JavaScript.
    const sprite_data_chillguy = {
        id: 'Chill Guy',
        greeting: "Hi, I am Chill Guy, the desert wanderer. I am looking for wisdom and adventure!",
        src: sprite_src_chillguy,
        SCALE_FACTOR: CHILLGUY_SCALE_FACTOR,
        STEP_FACTOR: 1000,
        ANIMATION_RATE: 50,
        INIT_POSITION: { x: 0, y: height - (height / CHILLGUY_SCALE_FACTOR) },
        pixels: { height: 384, width: 512 },
        orientation: { rows: 3, columns: 4 },
        down: { row: 0, start: 0, columns: 3 },
        downRight: { row: 1, start: 0, columns: 3, rotate: Math.PI / 16 },
        downLeft: { row: 2, start: 0, columns: 3, rotate: -Math.PI / 16 },
        left: { row: 2, start: 0, columns: 3 },
        right: { row: 1, start: 0, columns: 3 },
        up: { row: 3, start: 0, columns: 3 },
        upLeft: { row: 2, start: 0, columns: 3, rotate: Math.PI / 16 },
        upRight: { row: 1, start: 0, columns: 3, rotate: -Math.PI / 16 },
        hitbox: { widthPercentage: 0.45, heightPercentage: 0.2 },
        keypress: { up: 87, left: 65, down: 83, right: 68 }
    };
B. Define the difference between an Object Literal and an Instantiated Object. Find examples in this lesson.
- Example: The sprite_data_chillguy object is an example of an object literal.
- Instantiated Object: An instantiated object is created using a constructor function or class. It is an instance of a class and can have properties and methods defined by the class.
Example: The Player object created in the create method of GameLevel.js is an example of an instantiated object.
let gameObject = new gameObjectClass.class(gameObjectClass.data, this.gameEnv);
C. Explain the concept of Inheritance in Object-Oriented Programming (OOP). Provide an example from this lesson. - Inheritance: Inheritance is a fundamental concept in OOP where a class (child class) can inherit properties and methods from another class (parent class). This allows for code reuse and the creation of more complex objects. - Example: The Player class extends the Character class, inheriting its properties and methods.
    class Player extends Character {
        constructor(data, gameEnv) {
            super(data, gameEnv);
            // Additional properties and methods for Player
        }
    }
D. Describe the role of the draw() method in the animation process. Why is it important? - Role of draw() Method: The draw() method is responsible for rendering the game character on the canvas. It updates the character’s appearance based on its current state and position, ensuring smooth animations. - Importance: Without the draw() method, the character would not be displayed on the canvas, and animations would not be possible. It is crucial for visual feedback and the overall gaming experience.